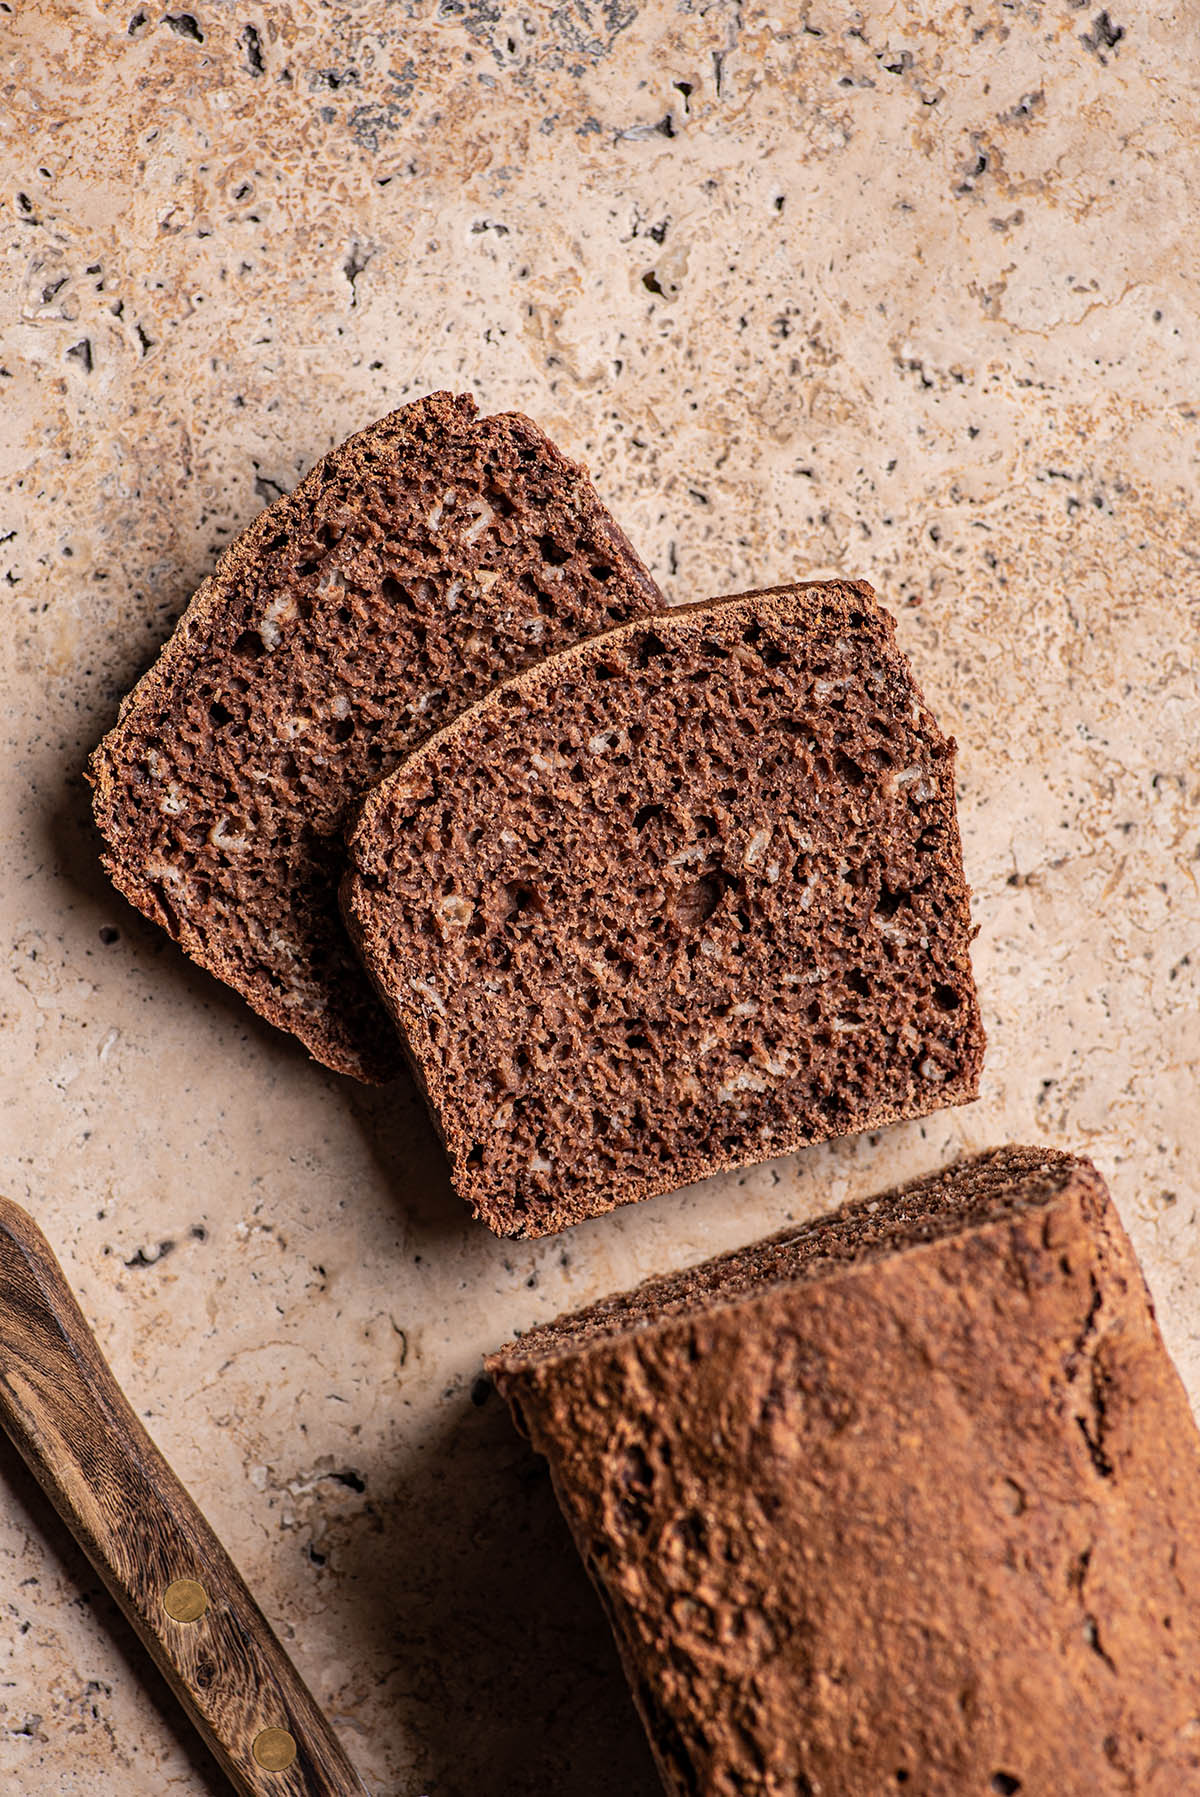
I love overnight bread. It’s much easier to make than normal homemade bread, without any kneading necessary – you just mix everything together in a bowl, let it sit overnight, and then bake it in the morning. This is a typical north German rye bread, dark and slightly sour.
The usual problem is that it’s usually baked in a dutch oven or lidded ceramic dish and involves some dough folding and sitting in a tea towel in the morning after it’s risen overnight, which I find detracts a bit from the simplicity of the method.
The dough rises a second time in the pan you bake it in, so you don’t need to worry about proper folding technique or anything like that. All you have to do is mix it the night before, dump it in a loaf pan, and bake it. No kneading, no folding, no special equipment.
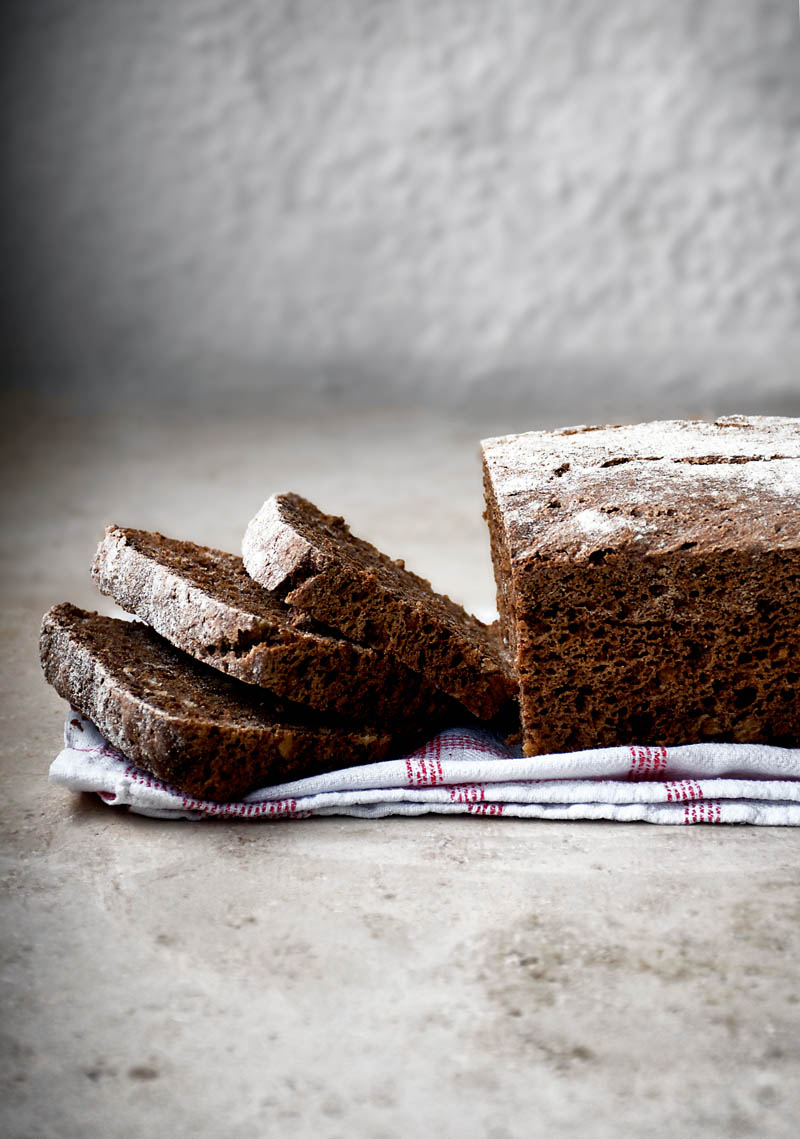
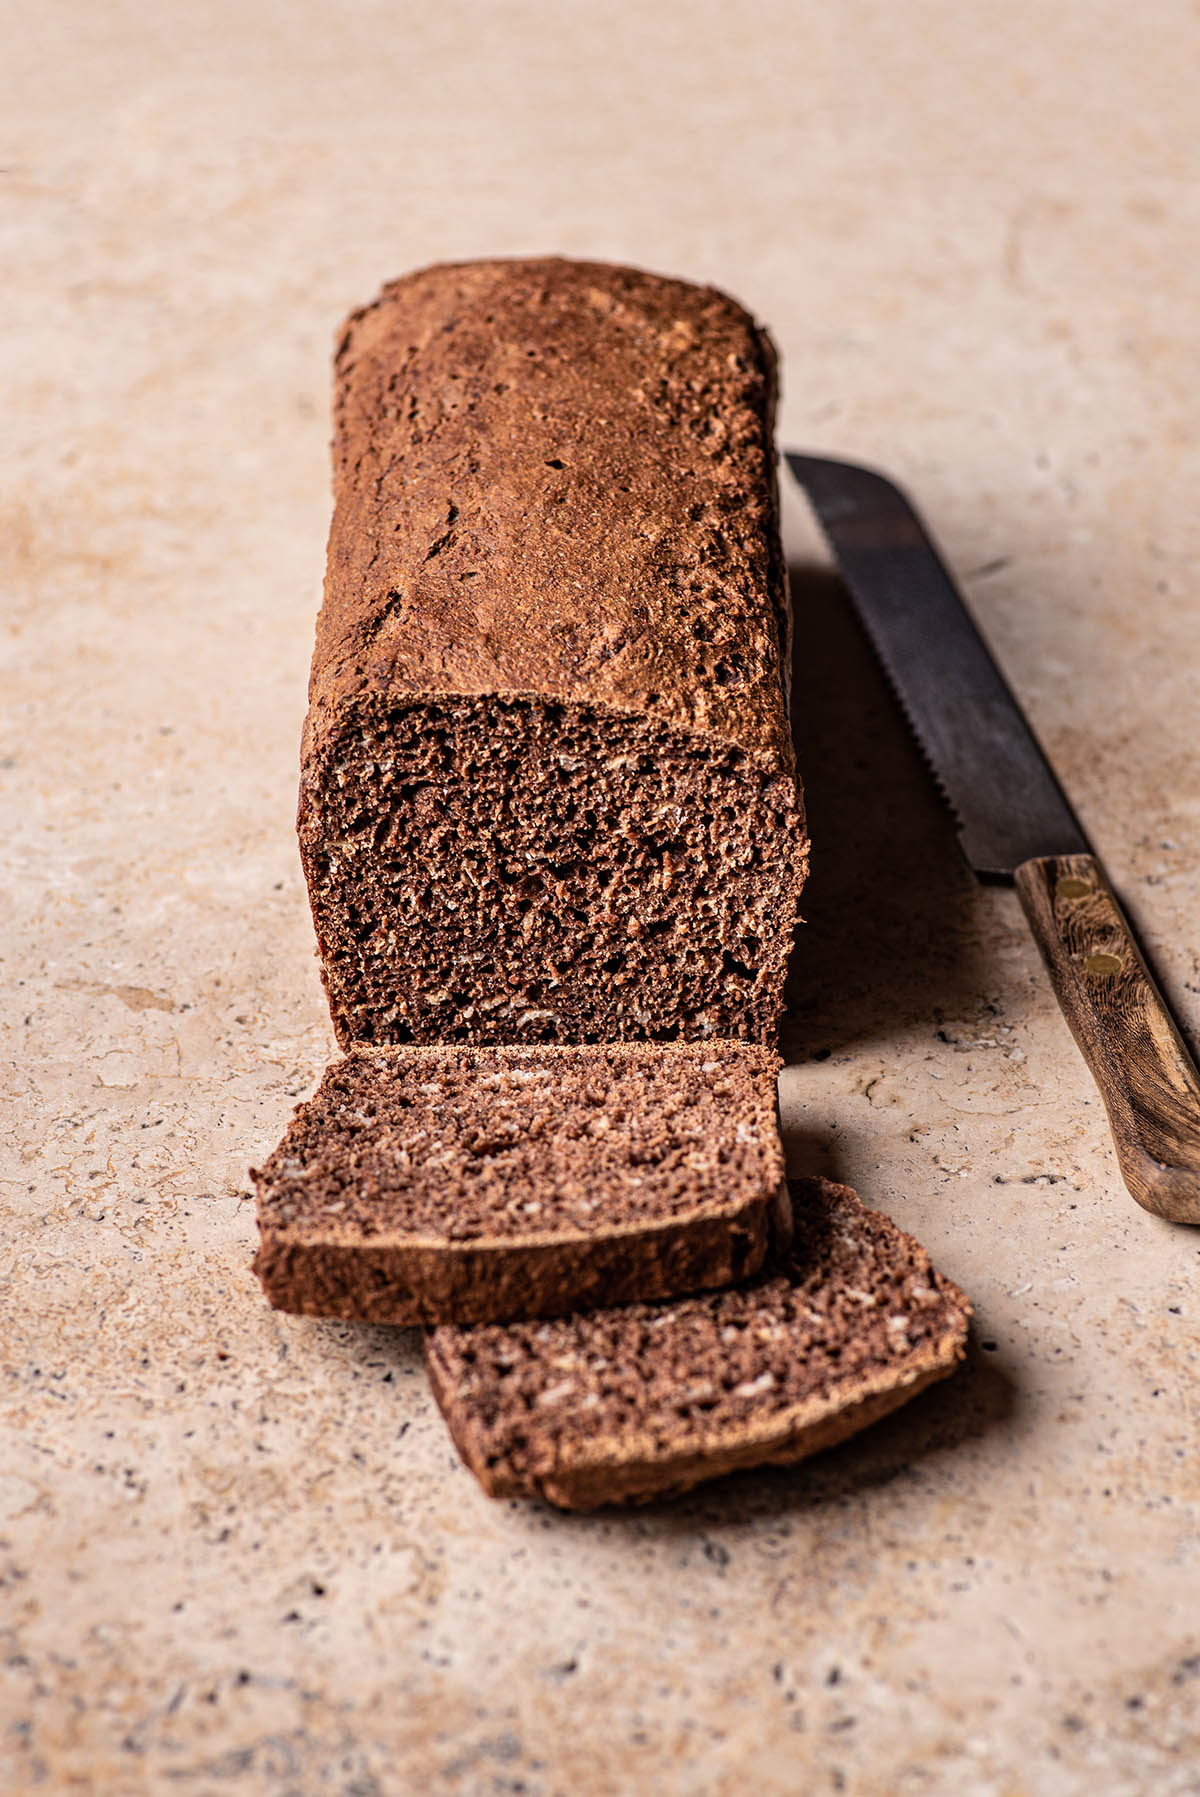
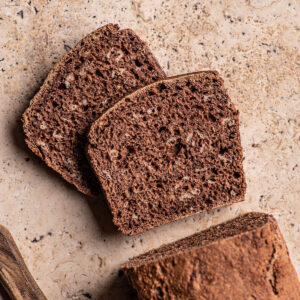
Despite the lack of work that goes into this bread, the crust is surprisingly crispy, and the inside of the loaf is soft and tender. It also lasts longer than other homemade breads, and it keeps for at least a week sitting on the counter, wrapped well.
If you like the idea of rye bread but don’t want to go all the way to a dark rye, try this overnight spelt rye bread instead, or sourdough rye bread if you prefer a natural yeast version.
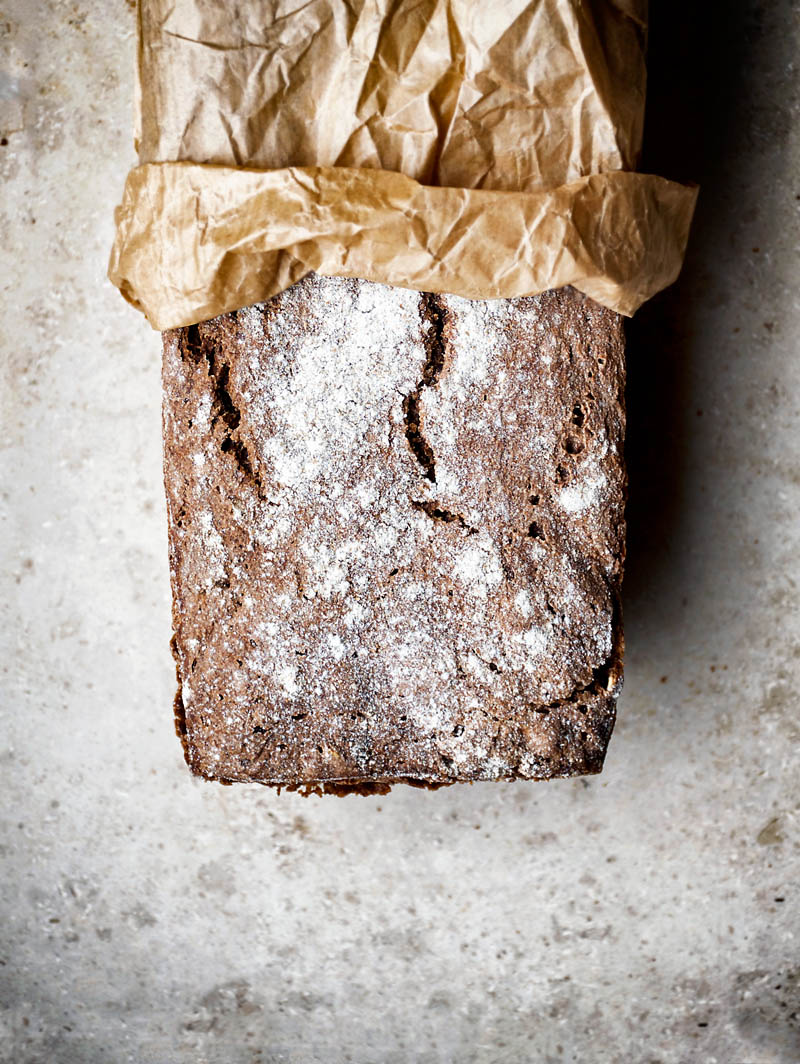
Please note that the darker photos are made with regular cocoa powder and yeast, and the lighter bread is made with sourdough starter and natural cacao. The step-by-step photos are sourdough, so if you want to see the steps for the yeast method, please watch the recipe video.
One reader, Marina, commented: “We have made it 2 times – both times outstanding texture. First time – as written, with rye and regular wheat flour, it ended up being overpowered by cocoa and mild bitterness – not bad, but too mild in flavor. Second time – with spelt and rye and half of cocoa and some cumin and seeds on top. Really outstanding flavor. Thank you for coming up with this recipe – so easy to make and beautiful results even for non-baking people.”
Another reader, Janie, said: “Thank you for this recipe – it makes a delicious loaf that lasts for days. I have been looking for ages for an easy ancient grain recipe and this one hasn’t failed me yet. It’s great to experiment with additions – I’ve enjoyed fennel seeds, caraways seeds and will try a sweet loaf with cranberries for Christmas.”
Ingredients
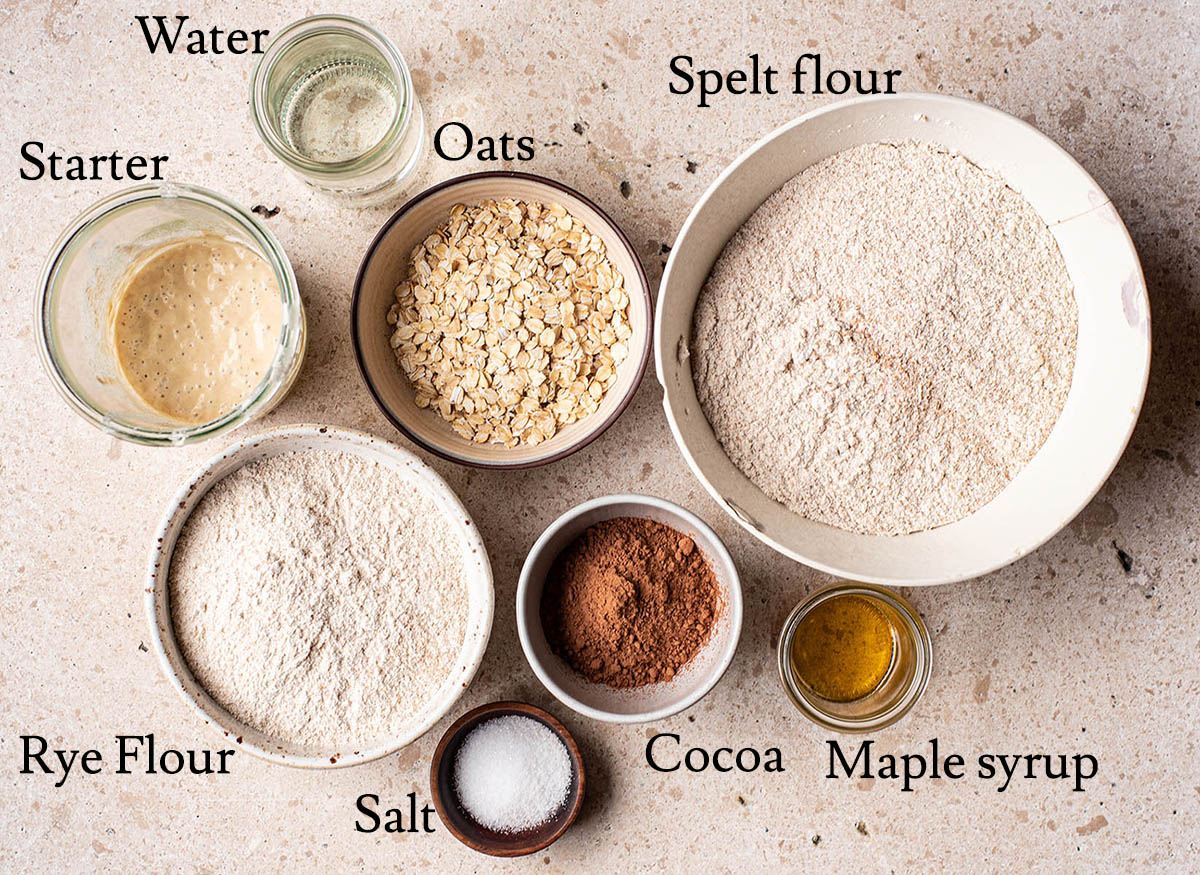
- Whole grain spelt flour: if you don’t have spelt flour, all-purpose makes an excellent substitution. Whole wheat flour can be used as well, but you’ll have to reduce the flour slightly or increase the water a bit to make up for the greater absorption.
- Rye flour: sometimes called dark rye flour, this should be whole grain rye, though light (sifted) rye flour can also be used.
- Rolled oats: the oats can be left out if you prefer – I often omit them – though it is better to increase the amount of flour used by a couple spoonfuls in this case as the oats do absorb a fair amount of water.
- Cocoa powder: make sure you’re using 100% cocoa powder, not hot cocoa drink powder. There shouldn’t be anything like sugar or milk powder in it.
- Yeast (dry or fresh) or active sourdough starter: traditional yeast (not quick rise) is ideal, but it doesn’t make that much of a difference. Active starter can be any starter made with a gluten-containing flour – rye, plain flour, spelt, and so on. There’s a recipe in my cookbook for rye sourdough starter.
- Add-ins: dried fruit, seeds, and nuts can be added to the dough as well. I recommend mixing it in after the bulk rise (overnight) before placing the dough into the tin to rise a second time. Raisins, dried cranberries, and sunflower seeds are my favourite additions. You can also top the loaf with seeds, which makes for a very pretty gift.
Step by Step
See the recipe card notes for instructions on how to make this into a sourdough loaf. The step-by-step photos show the sourdough method because the video shows it made with yeast, so in the interest of maximum information, I wanted to include both.
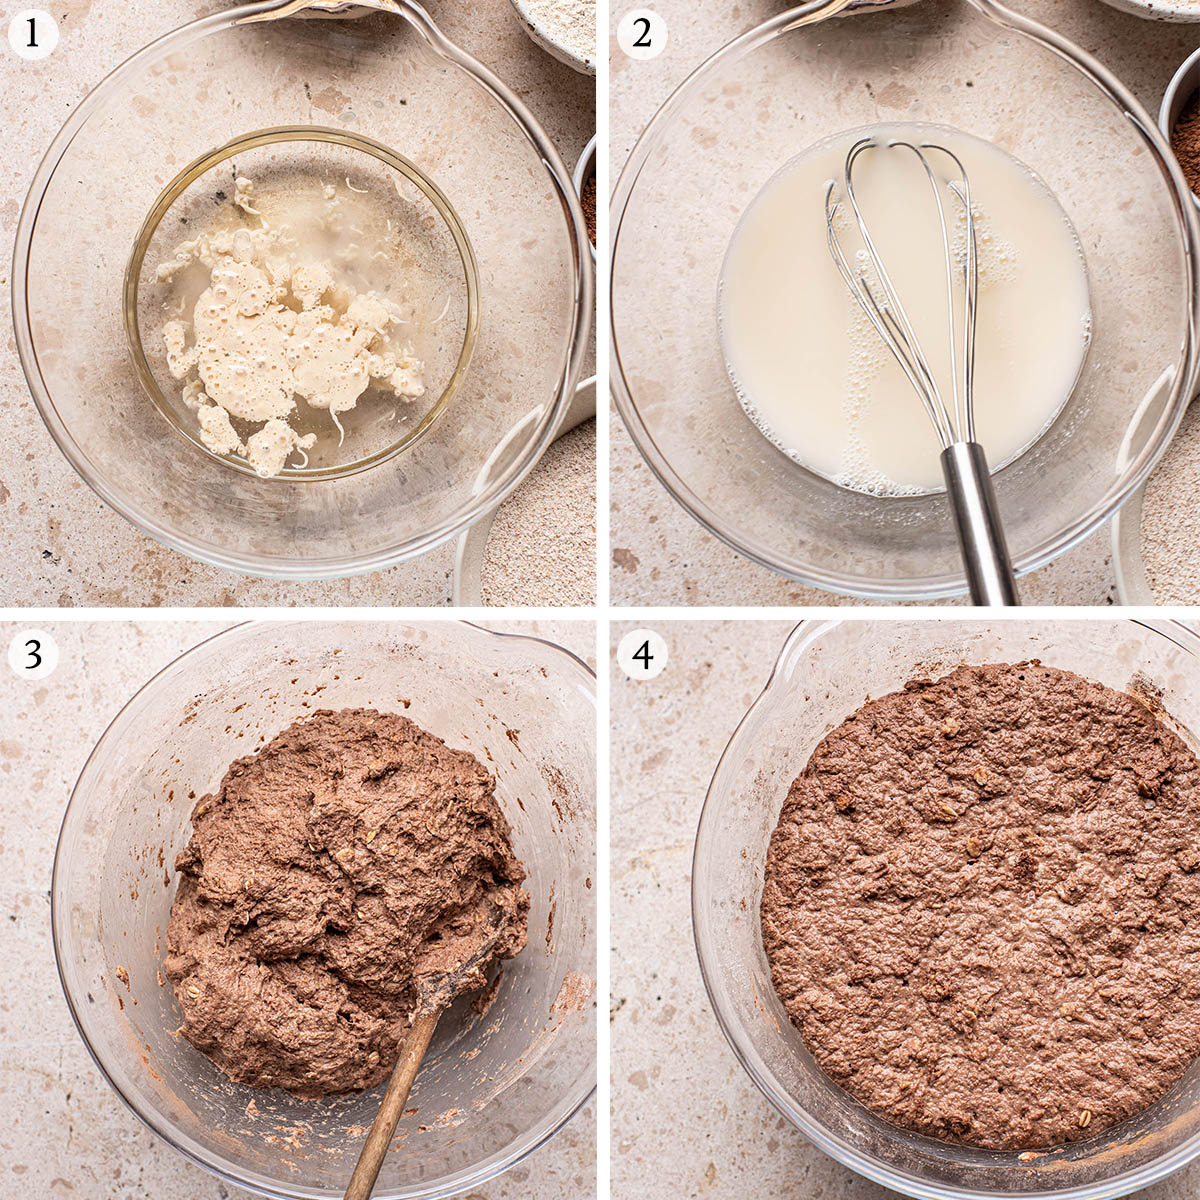
1. Add wet ingredients: add the water, maple syrup, and active starter to a large bowl. The starter should float. If using fresh yeast, add it now.
2. Mix: whisk to combine well.
3. Add dry ingredients: stir in the flours, oats, cocoa, and salt. Add the dry yeast now if using that method and stir into a shaggy dough.
4. Rise: cover with a plate, board, or tea towel, and set it into a room temperature, draft free place for about 12 hours.
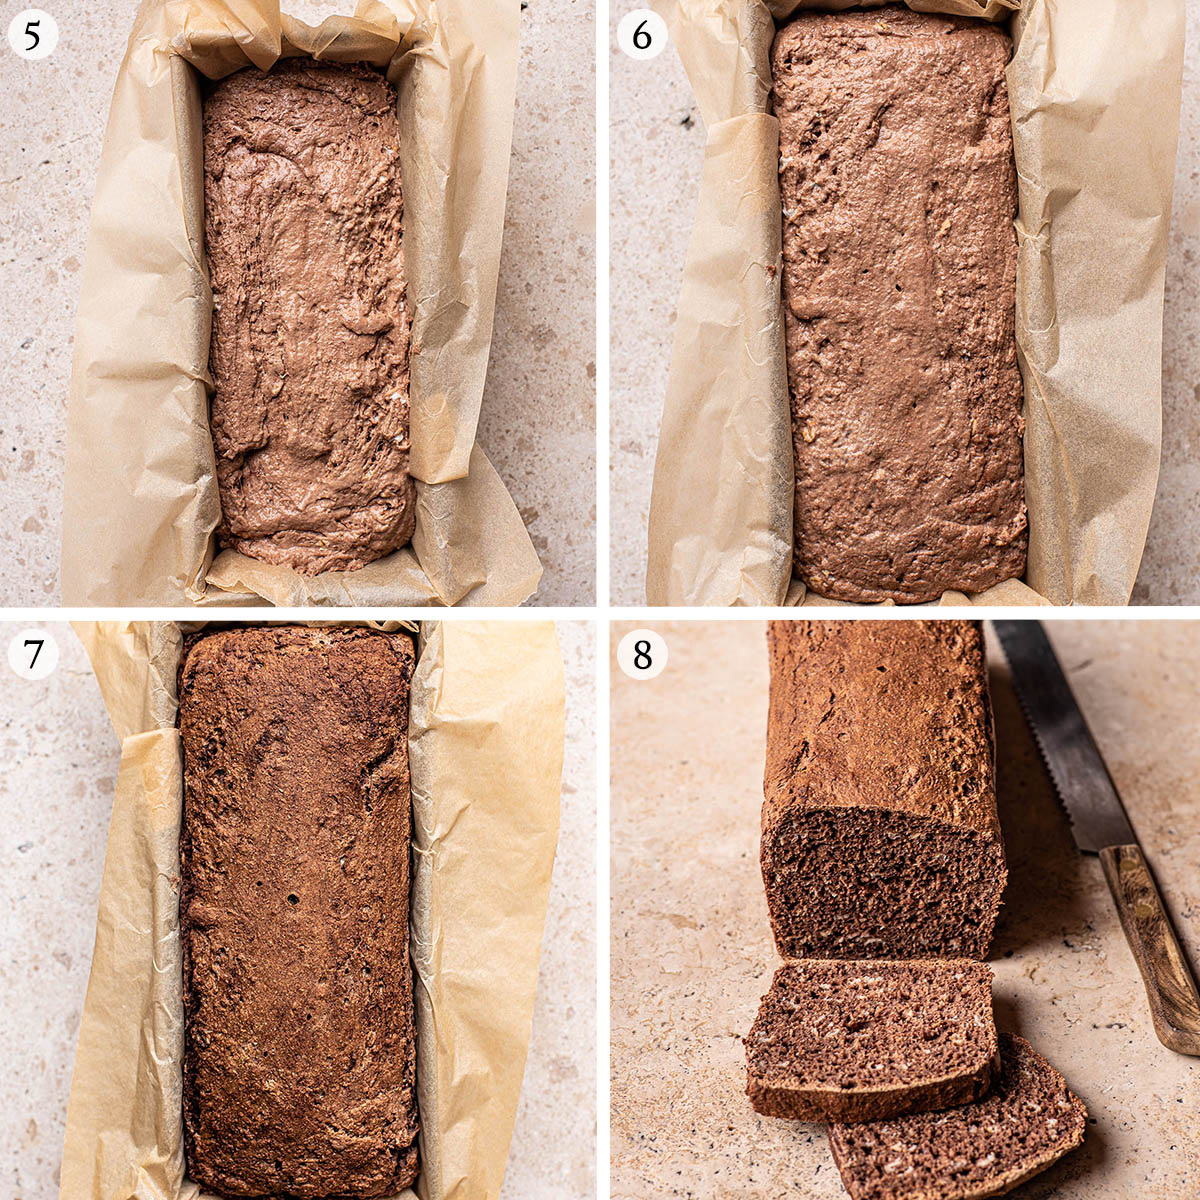
5. Transfer: once the dough as risen, place it into a well greased or parchment lined bread tin. It will lose volume here.
6. Rise: cover the loaf with a tea towel and set it into a draft-free place to rise again for a couple of hours. The dough should be expanded but not quite doubled after this time.
7. Bake: bake the loaf for about 45 minutes, or until the bread sounds hollow when it’s tapped.
8. Cool and serve: cool the bread completely – at least six hours, preferably overnight – before slicing and serving.
Recipe Notes
Like most darker whole grain breads and sourdough loaves, this one needs to rest for a significant amount of time before slicing. The recipe states to let it cool completely – that may mean several hours or even overnight. If you want really nice clean slices I recommend letting the baked loaf sit overnight in a tea towel before slicing the following day.
If you want to make this into a boule, you’ll have to introduce some stretches and folds. I recommend 4 rounds, starting directly after mixing. After the dough has risen overnight, shape it as you usually would and place it into a well floured banneton. Bake in a dutch oven 30 minutes covered and another 15-20 minutes uncovered, at 230°C (450°F).
The dark colour and traditional dark rye flavour here come from the whole grain flours and cocoa powder. It’s not quite a German black bread, which I grew up with, but this style of rye bread is also very common in northern Germany (where I lived) and Scandinavia (though it is hard to find in Gothenburg). If you feel that the cocoa will make it too bitter – though that is kind of the point – you can leave it out, no problem.
How to Store
Storage: the bread keeps well, wrapped in a tea towel, for about a week. The crust will harden slightly but the middle will still be fresh. You can also use a bread bin or sealed container, but I don’t recommend storing this in a plastic bag.
Freezing: this loaf freezes spectacularly, and I highly recommend having some in the freezer at all times. Freeze the whole loaf or pre-slice and take out individual pieces to toast, but either way it’s well worth freezing some in an airtight container.
Expert Tips
- Choose a good draft-free spot: I usually keep my dough in the oven with the door closed, no light needed, for the initial prove.
- Keep an eye on the dough the first time: you may need slightly less time if your starter is very active. The dough is finished the bulk proof when it’s approximately doubled in size.
- Don’t worry about overdoing it: the colour is harder to gauge because the loaf is so dark, but the outer crust should be quite hard and crisp when finished (it’s difficult to over-bake this bread).
- Serve with strong toppings: this is excellent with mirabelle jam, for example, something quite tart. We often have it with peanut butter but a sharp cheese is certainly more traditional.
- Refrigerate after shaping: if doing the sourdough method, it’s no problem to refrigerate the loaf for a few hours before baking. I recommend letting it rise at room temperature for an hour or so before refrigerating for the best results.
More Ancient Grain Bread Recipes
No Knead Honey and Oat Sourdough
Spelt Naan
Saffron Wreath Bread
Simple Spelt Bread
Einkorn Bread
If you make this Dark Rye Bread or any other bread recipes on Occasionally Eggs, please take a moment to rate the recipe and leave a comment below. It’s such a help to others who want to try the recipe. For more OE, follow along on Instagram, Facebook, and Pinterest, purchase the Occasionally Eggs cookbook, or subscribe for new posts via email.
Easy Overnight Dark Rye Bread
Description
Ingredients
- 500 ml (2 cups) room temperature water
- 1 teaspoon maple syrup or honey
- 450 grams (~3 cups) whole spelt flour
- 150 grams (~1 cup) rye flour
- 60 grams (½ cup) rolled oats
- 25 grams (¼ cup) cocoa powder
- 1 ½ teaspoons sea salt
- ¼ teaspoon dry yeast** or 100g active starter see notes
Instructions
- In a large mixing bowl, whisk together the water, maple syrup, and active starter or fresh yeast if using that option.
- Add the spelt, rye, oats, cocoa, and salt to the bowl. Add the dry yeast to the dry ingredients as well if that’s what you’re using. Stir with a wooden spoon to combine, mixing until no visible streaks remain.
- Cover the bowl with a lid, cutting board, or tea towel and let it sit for 12-15 hours at room temperature. It will at least double in size during this time.
- In the morning, grease* a bread pan (see notes) or line it with paper. Scrape the dough into the pan, and then press it down evenly (wet hands work well).
- Cover the dough with a clean dish towel. Let it rest again for 1-2 hours at room temperature.
- Heat the oven to 200°C (400°F). Once the oven is hot, place the bread on a middle rack and bake for 40-45 minutes. The crust will be hard and sound hollow when tapped once the bread is done baking.
- Remove it from the oven and place the pan on a metal rack to cool for 20-30 minutes before removing it from the pan to cool completely. The loaf will keep well for a week at room temperature, best stored in a cloth bag.
Video
Notes
Nutrition
Nutrition is provided as a courtesy and is an estimate. If this information is important to you, please have it verified independently.
This post was originally shared in October 2016. It has been updated most recently as of January 2023 with no changes to the recipe.

Thank you for this recipe – it makes a delicious loaf that lasts for days. I have been looking for ages for an easy ancient grain recipe and this one hasn’t failed me yet. It’s great to experiment with additions – I’ve enjoyed fennel seeds, caraways seeds and will try a sweet loaf with cranberries for Christmas.
I just got a large bag of whole grain rye flour and was looking around for recipes, I really like this one and plan make. My issue is, I’m having a hard time finding a 12” bread pan! I’ve seen a 12 inch “tea loaf” pan but makes a thin loaf (12x4x4), a 12 inch with Teflon- which I avoid and 12.5” x 4.5W x 2.75D and 13 inch pans. Any recommendations? Appreciate
Hi Rebecca, you can use a loaf pan with slightly different measurements, it’s no problem. Glass pans are great but the bread will need a few minutes longer in the oven. I often use differently sized tins for this recipe as we’re currently travelling full time so it’s just whatever’s available. A half-inch difference will be fine if it’s made from a material you’re comfortable with!
Used organic white bread flour starter, removed all sugar, used dark rye and added soaked pumpkin seeds. Gorgeous! Thank you for the recipe 🙂
Excellent bread recipe. I’ve made it twice now. Delicious!! Have you ever reversed the spelt and rye flour amounts? I’m curious to make it more of a rye bread.
Hi Ronda, glad you like the bread. I have, and have tried it with 100% rye flour. It works but gets a little denser and can be slightly gummy the more rye you add. If you use more rye, be sure to let the bread rest for at least 12 hours before slicing.
This is a great, easy to make, authentic, rye bread recipe.
The instructions were concise, easy to follow and accurate.
Although I’ve lived in Australia for 70 years, I’m originally from North Germany right on the Danish border, so this recipe spoke to me, saying … make me, make me!!
I love this bread, been making it every week for about a year now.
There are some comments about the benefit of using coconut flours, or similar.
Do you know if this would still work or how to substitute alternate from wheat flours?
Hi Dario, this recipe definitely won’t work with coconut flour (it absorbs about double the amount of water, and doesn’t contain gluten). If you want to try a GF bread option, I recommend this gluten-free sourdough bread or this millet sourdough.
hi i made but it came out a bit gummy – should i have baked it for longer? i am new to baking bread so still unsure about things.
Hi Raabia, if the texture is gummy, it’s probably from slicing too soon. Rye bread needs lots of time to rest before slicing for the best texture – try to leave it overnight (at least) before slicing for better results. It could also be overproved or underbaked but I think it’s probably just been cut a bit too soon.
Fantastic flavor, very easy, and great texture. This is a keeper, for sure.
I love the look of this recipe but 1/4 teaspoon of yeast seems excessively small for such heavy bread. Is the amount truly correct?
Hi Lisa, the amount is correct and typical for an overnight bread. As it has such a long rising time, if you use more yeast, it will over-prove.
I can’t recall if I have ever written but I discovered this recipe a few years ago and just love it! I have made it several times and it’s so wonderfully easy and delicious! I substitute half a cup of the water with pickle juice and add 2 tbsp of caraway seeds to give it a bit more of that deli rye bread flavor that I like. I’m all about easy recipes so I’m grateful I came across this one in my searching! Thank you for such a great, no-fail recipe! I just mixed up another batch tonight and will bake in the morning.
Hi! What can I use instead of Spelt flour (I don’t mind if it contains gluten)? Can I use Einkorn all-purpose flour or bread flour instead? Thank you!
Hi Melissa, I’ve never used white einkorn flour, but I think it would work well for this loaf. Bread flour would certainly work but the flavour will be better with einkorn. Hope you like it!
This is a very easy loaf to make. I used sourdough starter. I did one set of stretch and folds. They came out with a good texture and crumb.
This looks great, and I’m going to try it over the weekend. I’m wondering if molasses could be substituted for the Maple Syrup?
Hi Nathan, I haven’t tried it, but think molasses would work well in this recipe.
Sounds great! Could this be baked in a Dutch oven instead of a 12 inch bread pan? Would any adjustments need to be made to the bake time/temp?
Hi Carol, I would recommend following the method for this sourdough rye bread if you’d like to bake in a Dutch oven. I haven’t tried it with this loaf but I know other readers have left comments saying that they have and that it worked well.
Simply brilliant! A gluten free bread that doesn’t have a “sawdust texture “
Delicious, easy, a definite repeat recipe. Can’t believe there’s no kneading involved! Makes great sandwich bread. Thanks!!
We recently had salted dark rye bread at a local steakhouse and it was great, so I’m looking to find a similar recipe for something I can make at home. Does the cocoa or syrup make this more sweet than savory? If so, should I adjust either of those amounts to get a more savory flavor?
Hi Laura, this is a very savoury bread, and the added cocoa only makes it more bitter. I would hesitate to add more salt – it will interfere with the yeast – but it is certainly not sweet as is.
Very good bread. I thought it was too chocolatey with a 1/4 cup though, so I usually cut it in half. I’ve also subbed instant coffee, 1-2 tablespoons, though that doesn’t make it as dark. I have let this rise for almost 24 hours before (in the winter).
I love this bread. I have made it with yeast and a starter and left the oats out. It is delicious both way!
Easy to mix with no kneading and nice flavour.