I love overnight bread. It’s much easier to make than normal homemade bread, without any kneading necessary – you just mix everything together in a bowl, let it sit overnight, and then bake it in the morning. This is a typical north German rye bread, dark and slightly sour.
The usual problem is that it’s usually baked in a dutch oven or lidded ceramic dish and involves some dough folding and sitting in a tea towel in the morning after it’s risen overnight, which I find detracts a bit from the simplicity of the method.
The dough rises a second time in the pan you bake it in, so you don’t need to worry about proper folding technique or anything like that. All you have to do is mix it the night before, dump it in a loaf pan, and bake it. No kneading, no folding, no special equipment.
Despite the lack of work that goes into this bread, the crust is surprisingly crispy, and the inside of the loaf is soft and tender. It also lasts longer than other homemade breads, and it keeps for at least a week sitting on the counter, wrapped well.
If you like the idea of rye bread but don’t want to go all the way to a dark rye, try this overnight spelt rye bread instead, or sourdough rye bread if you prefer a natural yeast version.
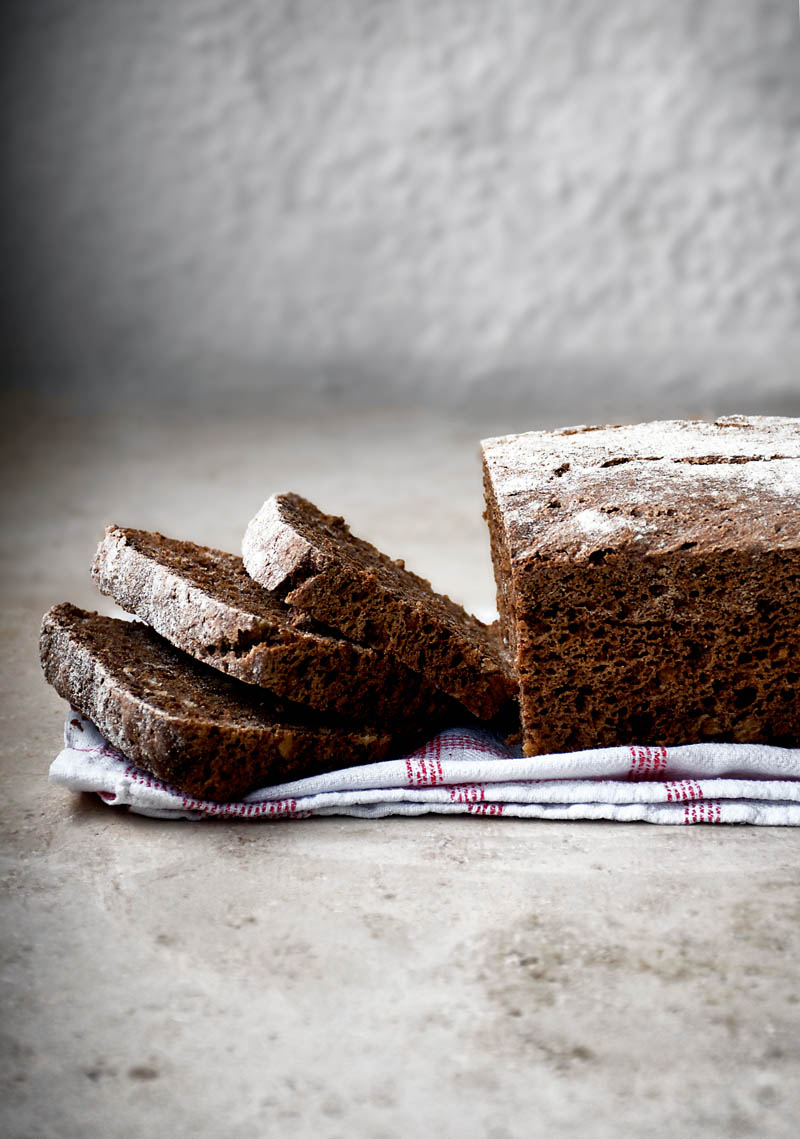
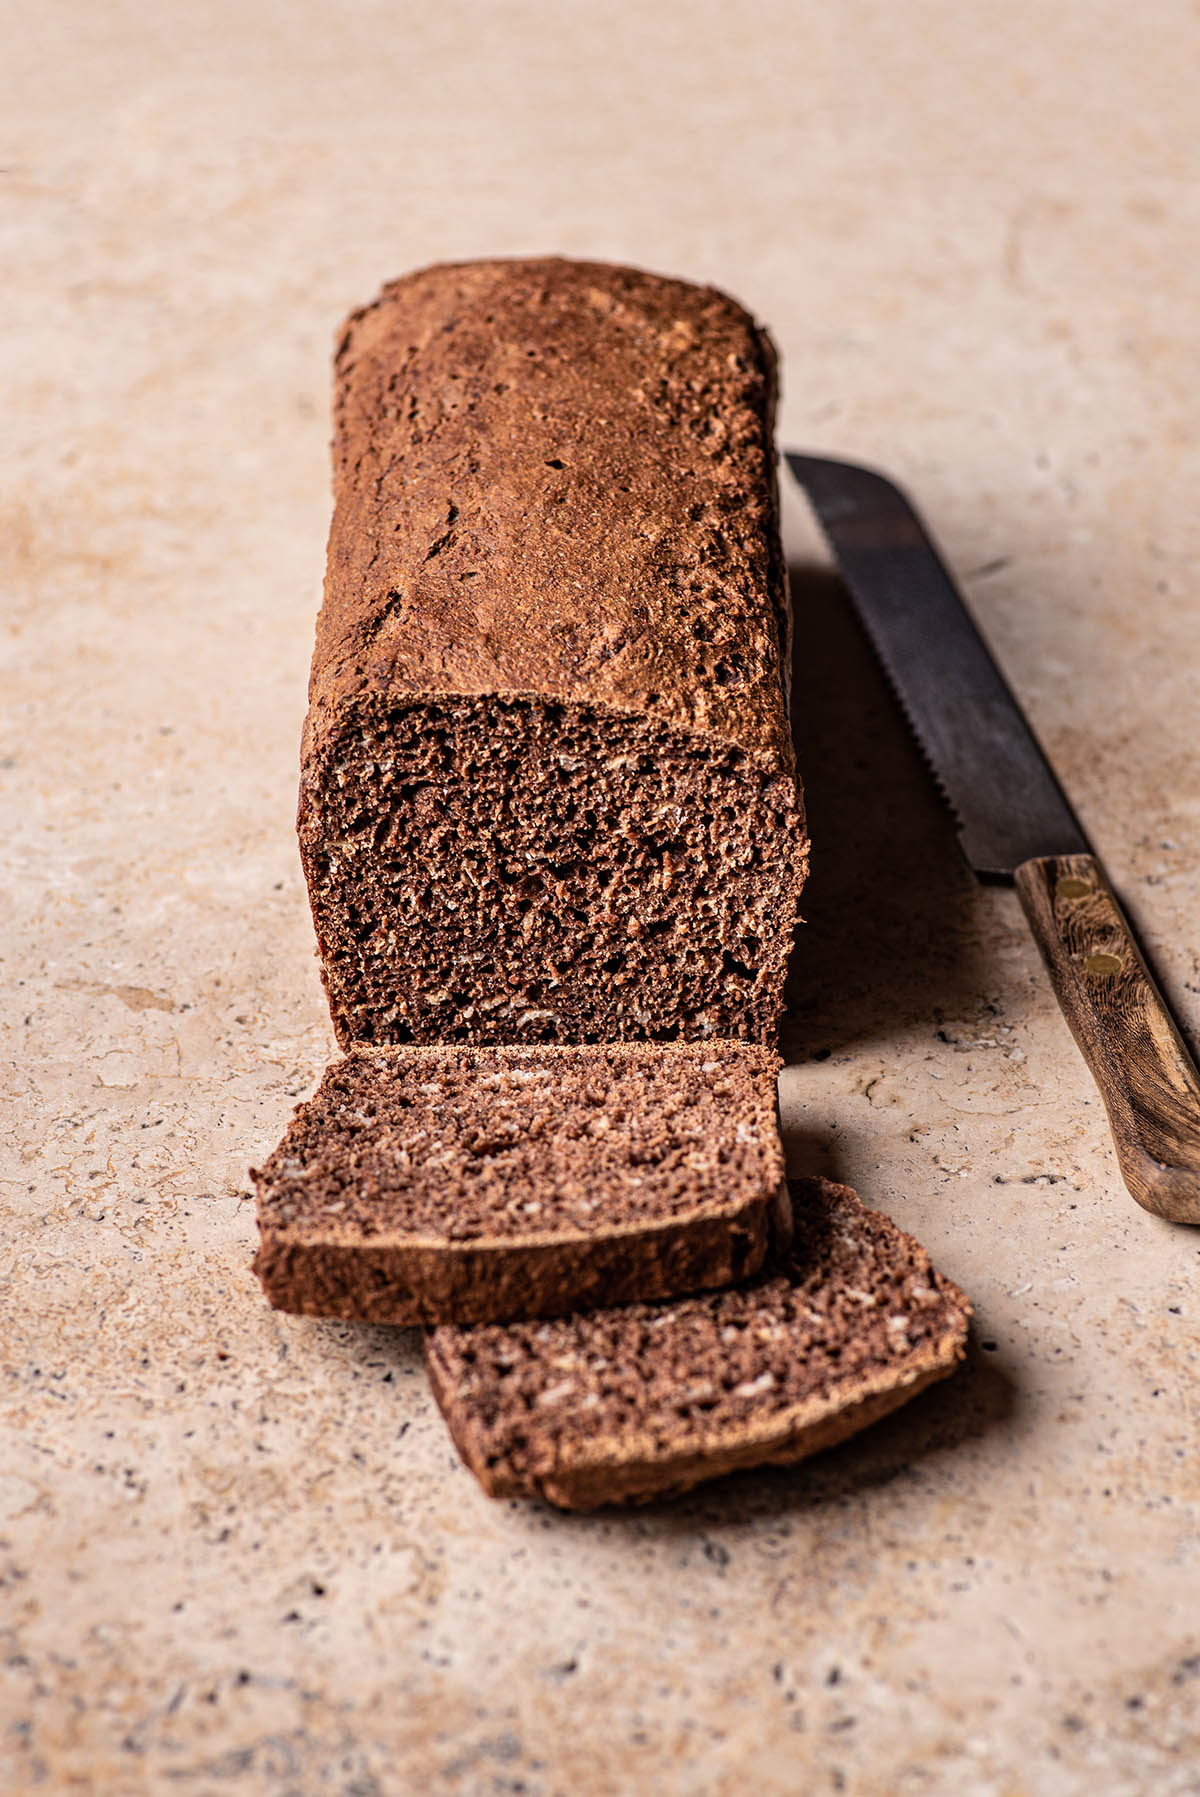
Please note that the darker photos are made with regular cocoa powder and yeast, and the lighter bread is made with sourdough starter and natural cacao. The step-by-step photos are sourdough, so if you want to see the steps for the yeast method, please watch the recipe video.
Ingredients
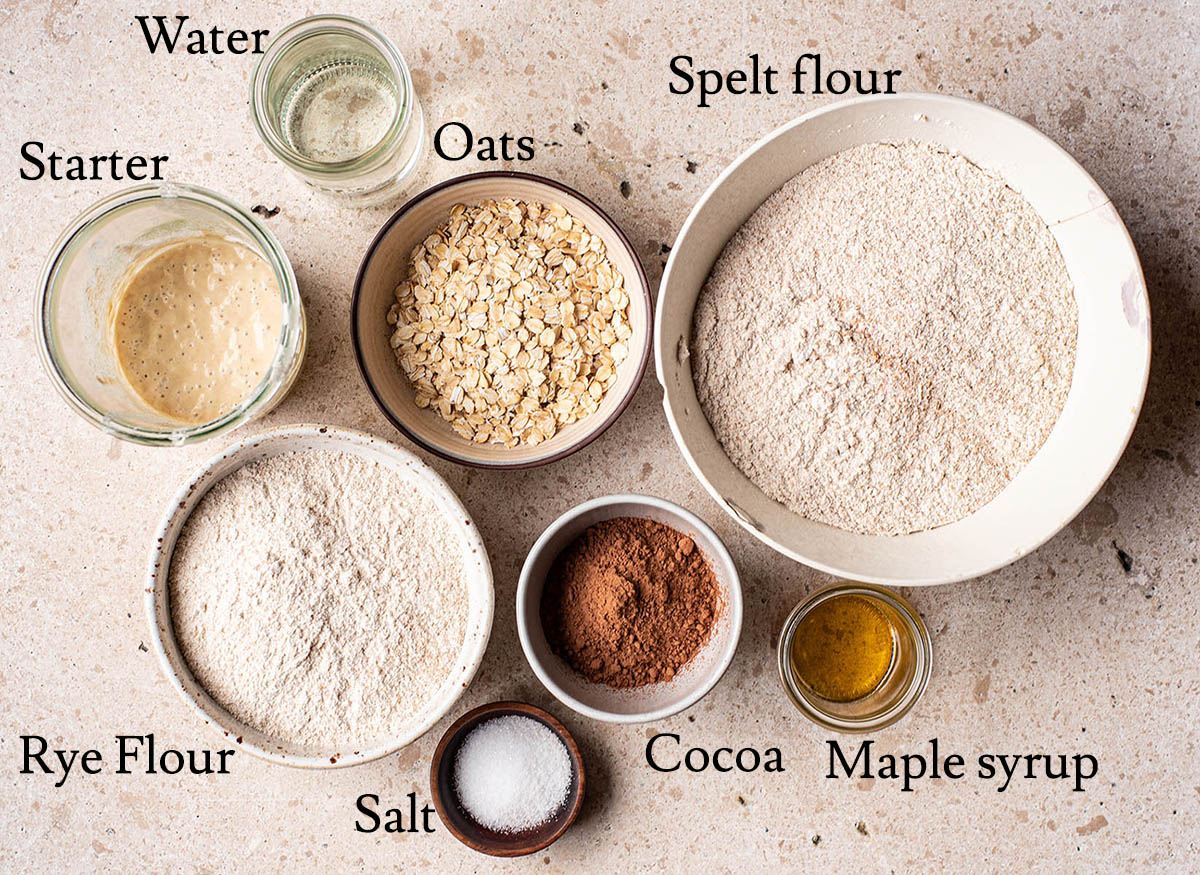
Ingredient Notes and Substitutions
- Whole grain spelt flour: if you don’t have spelt flour, all-purpose makes an excellent substitution. Whole wheat flour can be used as well, but you’ll have to reduce the flour slightly or increase the water a bit to make up for the greater absorption.
- Rye flour: sometimes called dark rye flour, this should be whole grain rye, though light (sifted) rye flour can also be used.
- Rolled oats: the oats can be left out if you prefer – I often omit them – though it is better to increase the amount of flour used by a couple spoonfuls in this case as the oats do absorb a fair amount of water.
- Cocoa powder: make sure you’re using 100% cocoa powder, not hot cocoa drink powder. There shouldn’t be anything like sugar or milk powder in it.
- Yeast (dry or fresh) or active sourdough starter: traditional yeast (not quick rise) is ideal, but it doesn’t make that much of a difference. Active starter can be any starter made with a gluten-containing flour – rye, plain flour, spelt, and so on. There’s a recipe in my cookbook for rye sourdough starter.
- Add-ins: dried fruit, seeds, and nuts can be added to the dough as well. I recommend mixing it in after the bulk rise (overnight) before placing the dough into the tin to rise a second time. Raisins, dried cranberries, and sunflower seeds are my favourite additions. You can also top the loaf with seeds, which makes for a very pretty gift.
Step by Step
See the recipe card notes for instructions on how to make this into a sourdough loaf. The step-by-step photos show the sourdough method because the video shows it made with yeast, so in the interest of maximum information, I wanted to include both.
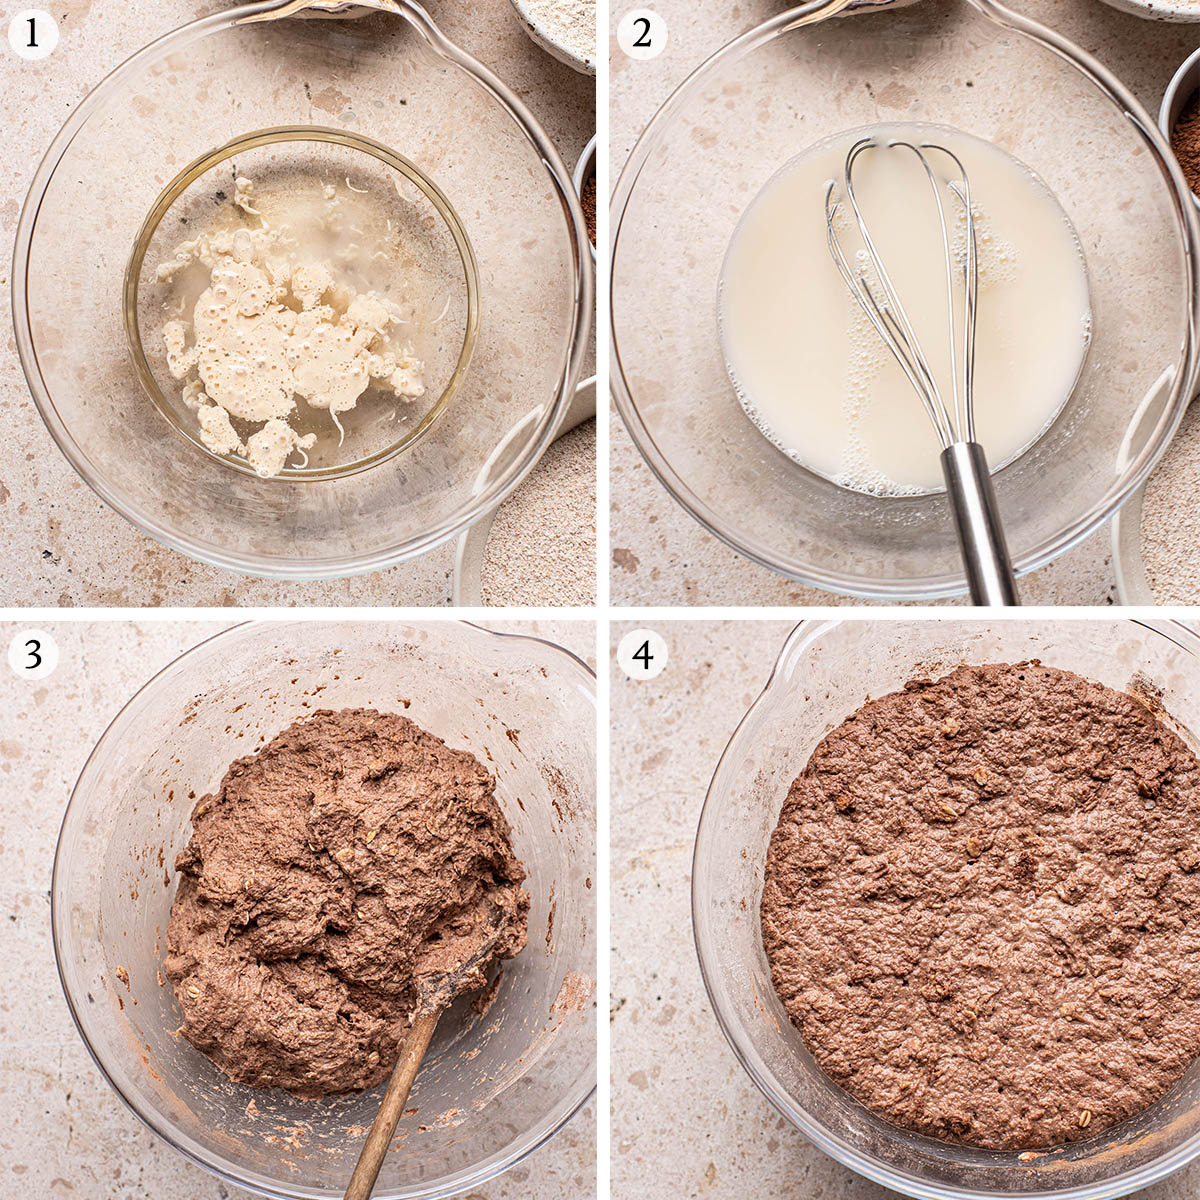
1. Add wet ingredients: add the water, maple syrup, and active starter to a large bowl. The starter should float. If using fresh yeast, add it now.
2. Mix: whisk to combine well.
3. Add dry ingredients: stir in the flours, oats, cocoa, and salt. Add the dry yeast now if using that method and stir into a shaggy dough.
4. Rise: cover with a plate, board, or tea towel, and set it into a room temperature, draft free place for about 12 hours.
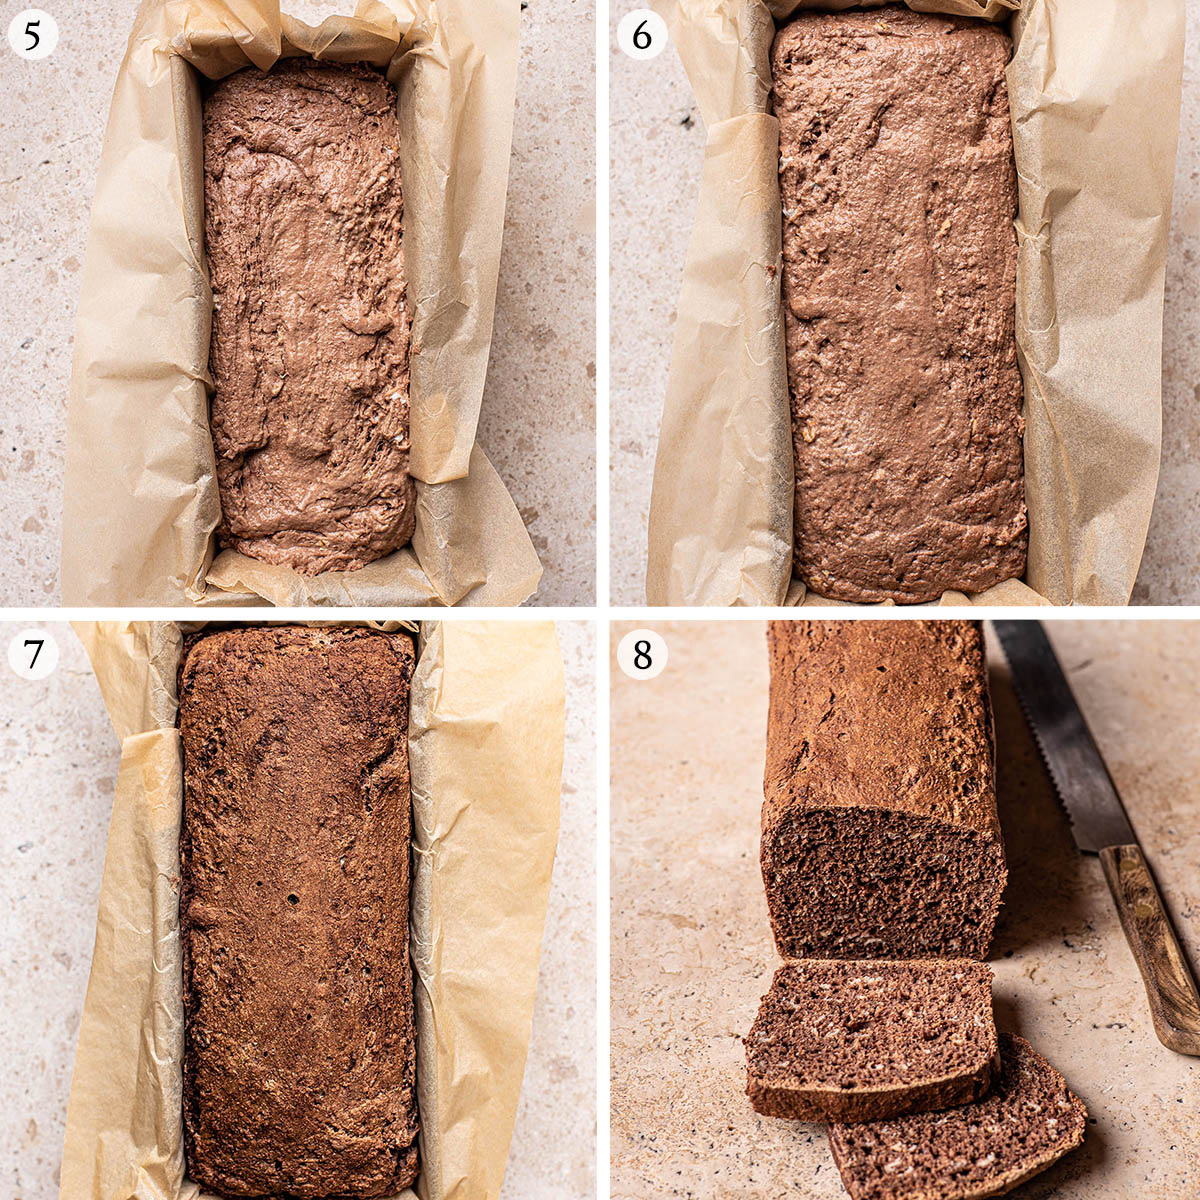
5. Transfer: once the dough as risen, place it into a well greased or parchment lined bread tin. It will lose volume here.
6. Rise: cover the loaf with a tea towel and set it into a draft-free place to rise again for a couple of hours. The dough should be expanded but not quite doubled after this time.
7. Bake: bake the loaf for about 45 minutes, or until the bread sounds hollow when it’s tapped.
8. Cool and serve: cool the bread completely – at least six hours, preferably overnight – before slicing and serving.
Recipe Notes
Like most darker whole grain breads and sourdough loaves, this one needs to rest for a significant amount of time before slicing. The recipe states to let it cool completely – that may mean several hours or even overnight. If you want really nice clean slices I recommend letting the baked loaf sit overnight in a tea towel before slicing the following day.
If you want to make this into a boule, you’ll have to introduce some stretches and folds. I recommend 4 rounds, starting directly after mixing. After the dough has risen overnight, shape it as you usually would and place it into a well floured banneton. Bake in a dutch oven 30 minutes covered and another 15-20 minutes uncovered, at 230°C (450°F).
The dark colour and traditional dark rye flavour here come from the whole grain flours and cocoa powder. It’s not quite a German black bread, which I grew up with, but this style of rye bread is also very common in northern Germany (where I lived) and Scandinavia (though it is hard to find in Gothenburg). If you feel that the cocoa will make it too bitter – though that is kind of the point – you can leave it out, no problem.
How to Store
Storage: the bread keeps well, wrapped in a tea towel, for about a week. The crust will harden slightly but the middle will still be fresh. You can also use a bread bin or sealed container, but I don’t recommend storing this in a plastic bag.
Freezing: this loaf freezes spectacularly, and I highly recommend having some in the freezer at all times. Freeze the whole loaf or pre-slice and take out individual pieces to toast, but either way it’s well worth freezing some in an airtight container.
Sign up for email updates!
Expert Tips
- Choose a good draft-free spot: I usually keep my dough in the oven with the door closed, no light needed, for the initial prove.
- Keep an eye on the dough the first time: you may need slightly less time if your starter is very active. The dough is finished the bulk proof when it’s approximately doubled in size.
- Don’t worry about overdoing it: the colour is harder to gauge because the loaf is so dark, but the outer crust should be quite hard and crisp when finished (it’s difficult to over-bake this bread).
- Serve with strong toppings: this is excellent with mirabelle jam, for example, something quite tart. We often have it with peanut butter but a sharp cheese is certainly more traditional.
- Refrigerate after shaping: if doing the sourdough method, it’s no problem to refrigerate the loaf for a few hours before baking. I recommend letting it rise at room temperature for an hour or so before refrigerating for the best results.
More Wholesome Bread Recipes
No Knead Honey and Oat Sourdough
Spelt Naan
Saffron Wreath Bread
Simple Spelt Bread
Einkorn Bread
If you make this Dark Rye Bread or any other bread recipes on Occasionally Eggs, please take a moment to rate the recipe and leave a comment below. It’s such a help to others who want to try the recipe. For more OE, follow along on Instagram, Facebook, and Pinterest, purchase the Occasionally Eggs cookbook, or subscribe for new posts via email.
Easy Overnight Dark Rye Bread
Ingredients
- 500 ml room temperature water
- 1 teaspoon maple syrup or honey
- 450 grams whole spelt flour
- 150 grams rye flour
- 60 grams rolled oats
- 25 grams cocoa powder
- 1 ½ teaspoons sea salt
- ¼ teaspoon dry yeast** or 100g active starter see notes
Instructions
- In a large mixing bowl, whisk together the water, maple syrup, and active starter or fresh yeast if using that option.
- Add the spelt, rye, oats, cocoa, and salt to the bowl. Add the dry yeast to the dry ingredients as well if that’s what you’re using. Stir with a wooden spoon to combine, mixing until no visible streaks remain.
- Cover the bowl with a lid, cutting board, or tea towel and let it sit for 12-15 hours at room temperature. It will at least double in size during this time.
- In the morning, grease* a 30 cm / 12 inch bread pan or line it with paper. Scrape the dough into the pan, and then press it down evenly (wet hands work well).
- Cover the dough with a clean dish towel. Let it rest again for 1-2 hours at room temperature.
- Heat the oven to 200°C (400°F). Once the oven is hot, place the bread on a middle rack and bake for 40-45 minutes. The crust will be hard and sound hollow when tapped once the bread is done baking.
- Remove it from the oven and place the pan on a metal rack to cool for 20-30 minutes before removing it from the pan to cool completely. The loaf will keep well for a week at room temperature, best stored in a cloth bag.
Video
Notes
* For American cup measurements, please click the pink link text above the ingredient list that says ‘American’.
Nutrition
Nutrition is provided as a courtesy and is an estimate. If this information is important to you, please have it verified independently.
This post was originally shared in October 2016. It has been updated most recently as of January 2023 with no changes to the recipe.

Daniel Manevich says
Hi, Alex,
First of all, thank you so very much for your delightful website and book (which I’ve borrowed from my library a couple of times and just recently bought!).
I’ve been baking an sourdough overnight rye loaf almost weekly for several months, a somewhat different recipe, more like a rugbrød, but I’m eager to try yours.
Curious: have you ever tried adding onions or garlic to your dough? I’m curious to try, and wondering whether it would be better raw or sauteed.
Happy to share my seedy dense rye recipe with you, if you’re curious. It happens to be vegan and oil-free, for extra credit 🙂
Alexandra Daum says
Hi Daniel, thank you so much for this lovely comment! I have never tried adding onions or garlic – garlic can retard the yeast/starter and make for a slower or less successful overall rise, so if you were to add that, I would suggest mixing it in after the initial fermentation, just before shaping. I would definitely sauté onions before adding them but think that would be a nice flavour combination!
Lewis says
Hello, just wondering if i could split this and cook in two 1lb loaf pans?
If so, do you have an idea about proof/cooking times? Thanks!
Alexandra Daum says
Hi Lewis, that’s not much smaller than a typical loaf tin, so I don’t think you’d need to split it. It would just be a slightly smaller, higher loaf if baked in a single tin of that size.
Janelle Ellwood (Umatalu) says
I’ve split this when I put into 2 bread pans. Same proofing time but only cooked 30-35mins
Jerry says
I’d like to try this bread and this is probably nit picking but doesn’t it change the hydration if you use sourdough starter instead of yeast? Same with leaving out the rolled oats, doesn’t that make a difference? Or is this so forgiving that it doesn’t matter?
Alexandra Daum says
Hi Jerry, hydration shouldn’t change between using yeast and starter if you’re using 100% hydration, equal parts flour and water are added in that case. The oats will change it slightly but this isn’t a typical sourdough recipe at all and won’t suffer for that small change.
Corinne says
Great (easy!) recipe!! A must try- especially with cocoa added! Best Rye recipe I could find online that didn’t have white flour added. I’m definitely keeping this one thank you for sharing, Alexandra! I had been looking for ways to make my bread nutritious as possible. I didn’t try adding the oats, but I will next time around. Also want to try soaked sunflower seeds.
I’m accustomed to regular white flour sourdough baking, involving lots of time full of kneading to form gluten, so I was skeptical how this would work just mixing together & plopping in the oven as a sticky unformed mass. But it doubled overnight as it should & rose even a little more after plopping in bread pan for a few hours in the morning! No effort or arm strength needed haha. Has a good bitter & fermented taste. It is, of course, more dense than regular white, yet much more moist, full of flavor, and not as dense or gummy as another whole wheat recipe I attempted. Also, I love the bitter the cocoa adds to it!
[Small adjustments I made was skipping the oats & also adding a mixture of whole wheat flour with the spelt to add up to the 450g, since spelt is so expensive here. Also, I used my whole wheat & rye sourdough starter. However, now looking again at the amounts, I accidentally added 50g less flour than called for, whoops. Still turned out great though.]
Putri says
Been making this bread many times now using sourdough leaven and comes perfect all the time
I even selling it and my client loved it
Thank you for the recipe
Annie says
Hi! I’ve tried making bread a couple times. So with this one it is OK to mix the dry yeast in with everything else and not put it into warm water first? I’ve read that yeast has to be activated by the sugar and warm water or it won’t come alive. Just want to make sure I’m understanding it right. Thanks!
Alexandra Daum says
Hi Annie, the yeast will still activate even in a normal bread, but it’s much slower. Since this is an overnight bread, it doesn’t make a difference. That being said, if you’re not sure if your yeast is still active, or it’s quite old, you might want to bloom it before starting anyway just to make sure it is still working (dissolve it in a bit of warm water, then add).
Anne Lea says
I plan to make this in the next few days. I have a glass Pyrex loaf pan. Any recommendations on what type of pan in the best for this type of bread? Thanks!
Alexandra Daum says
Pyrex should work just fine! I use a metal loaf pan but have used pyrex in the past and it was good – you may still want to line in parchment, though, as the bread does tend to stick a bit.
Andrew says
Love it. Simple and hearty. Strong bread makes strong people…Rye for Liver, Oats & Cocoa for Heart, and Spelt for Stomach. Am enjoying with grass fed butter.
My son has started helping…mixing all the flours together, etc. We always had store bought bread growing up. This is way better!
Lissette says
What size loaf tin are you using? There’s seems to be a lot of flour used for a normal sized loaf tin.
Alexandra Daum says
It’s 30cm long, slightly longer than North American standard, but narrower, so it’s the same volume. Hundreds of readers have made it successfully in a regular loaf tin and I’ve made this loaf weekly for almost ten years – don’t worry, it’ll be fine in a normal tin!
Lissette says
Alexandra, thank you so much for your quick reply. The bread is currently rising beautifully in the oven, although it’s covered with tea towel it’s developing a crust. Is that normal?
Also, wanted to say I love your blog and book. You’re recipes are in heavy rotation at my home❤️
Alexandra Daum says
The crust can happen if your home is rather dry, which can happen in winter – I usually spritz the top of the loaf with water or dampen the towel if this starts to happen, and it should sort it for you. Thank you very much, that is wonderful to hear! I hope the bread turns out well for you <3
Lissette says
Hi Alexandra,
I just wanted to come back and say the the bread tuned out beautifully. Another keeper! Your blog is full of gems. Thanks you so much!
Barbara says
Hello Alexandra,
I’ve left this to the last minute and may not have a reply in time, but decided that I should try anyway.
I’ve mixed the dough and set it to rise. Now my schedule will conflict with tomorrow’s 2nd rise. I need to retard the dough in the frisge but am not sure of the best way to divide the time or apply the method.
At least some hours at room temperature, followed by fridge hours, followed by more room temperature time. And whether I should form the loaf before or after the fridge.
Will give it my best guess, but if you should receive this and have a few spare minutes, I would so appreciate a reply.
So far, this dough is great fun!
Alexandra Daum says
Hi Barbara, I don’t think I’ve replied in time, but you’ll be fine placing the dough in the refrigerator either before or after shaping the loaf. As long as it’s risen both times, it’s no worry, and it won’t hurt the dough to rest in a cold place for a while. You’ll get a more noticeable sour flavour doing that but otherwise no problem! I hope it turned out well!
Barbara says
Hi Alexandra,
Thank you for your reply. It’s reassuring to know that retarding fermentation can be a benefit even with an unfamiliar recipe. In the end, I had no choice but to refrigerate the dough.
The rise/proof sequence ended up being: 12 hours in “light-on cold oven”, 7 hours in loaf pan in the fridge, 3 hours back in the “light-on cold oven”. After another 20 minutes on the table while the oven preheated, the loaf was perfectly proofed. I gave it the full 6 hours to cool, some of that time in the fridge.
Mixing to slicing, about 29 basically effortless hours for a really, really delicious result. I love that this bread is firm enough and moist enough to be sliced thinly.
Thank you so much for posting the recipe.
Alexandra Daum says
Hi Barbara, I’m so pleased the recipe worked out perfectly for you! Thanks for sharing your method, I appreciate it.
Jo says
I cannot eat spelt flour or rolled oats. Could I use GF All purpose flour and quinoa or rye flakes instead?
Could I leave out the cocoa powder?
Could I use a 9″x5″ loaf pan?
Alexandra Daum says
Hi Jo, I’m afraid the recipe won’t work with the substitutions you mentioned, and I would recommend finding a specifically gluten-free bread recipe instead.
Chantal says
Hello.
If I want to opt for whole wheat instead of spelt, how much would I reduce, or what would be the flour and/or water measurements?
If opt for raisins, would you recommend soaking the raisins?
Thank you very much.
Alexandra Daum says
Hi Chantal, I would reduce the flour by 50g and yes, definitely soak the raisins.
Chantal says
Okay great. So the water would remain the same?
I am actually looking to omit the Oats altogether, as I am going for more of a black bread (pumpernickle) with raisins. So I may keep the spelt. Someone had commented that they replaced the spelt with 2c bread flour and 1c of whole wheat, so I am little torn by the measurements and water ratio as well..? Thanks again.
Alexandra Daum says
Hi Chantal, the water would remain the same as whole wheat absorbs a bit more than spelt does. If you omit the oats, I would keep the amounts of flour the same (don’t reduce if using whole wheat). But you can leave the oats out without any issues in any case. I’m not sure what other readers are doing – they may have replaced all the flour, and omitted the rye? But I wouldn’t suggest changing the ratios to such an extent.
Lori says
Can I shape into a boule or batard and place in a banneton and then unmold and bake in a dutch oven as one would handle the typical sourdough bread baking method
Alexandra Daum says
Hi Lori, you can try, but I don’t find this loaf is particularly successful as a boule, and that’s why I always make it in a loaf tin. Other readers have done it, though! You might find this sourdough rye bread recipe helpful if you want to try that.
Eva says
This bread is so delicious! Thank you for the easy, yummy recipe. I used the sourdough option and put it in the fridge for an extra 6 hours or so after the rise before the baking. It turned out so well. I’d love to add some seeds or buckwheat kernals next time and see how it goes. Thank you!!
Rebekah says
Do you have to use a bread pan or can you round the dough and place on a covered baking sheet?
Alexandra Daum says
Hi Rebekah, you can try making a boule, but this dough is quite soft and harder to shape properly. Without some kind of form to hold it in place, it tends to spread too much during baking.
Red says
HI HI – Hubby cannot eat oats – so you have a suggested replacement?
Thanks!!
Alexandra Daum says
You can leave the oats out, that’s no problem. If you still want a bit more texture, add a handful of sunflower seeds.
Abono says
Can you use oat flour in the same weight instead of the whole grain?
Alexandra Daum says
No, sorry. Oat flour doesn’t contain any gluten, so it can’t be substituted in this recipe.
Avino says
Sorry what I mean was instead of usingthe rolled oats in the mix that remain whole ,can they be ground to a powder instead?
Alexandra Daum says
Aha, I haven’t tried it, but I think it would work. I would reduce the amount by half (so use just 30g oat flour). That should be fine.
Daniella says
Hello!
Can I use just rye flour for this bread?
Thankyou!
Alexandra Daum says
Hi Daniella, while the bread would still bake if made with all rye, it turns out very heavy, dense, and sticky. I don’t recommend it.
Daniella Price says
Haha so I only read this after I did all rye 🙃 Im not able to have spelt not wheat.
If I increased the dry yeast, would it work? Less dense, more rise to the dough
If so how much more dry yeast?
Thankyou Alexandra 🙂
Alexandra Daum says
Hi Daniella, you could try other ancient grains like emmer, einkorn, or khorasan if any of those are possible for you to eat, as a sub for the spelt. I don’t think increasing the yeast would make the bread lighter, it would just rise faster. You can certainly make it with all rye but it will be dense, like black bread.
Sivia says
Hi Alex, I’m from Buenos Aries, I ‘m about to prepare your overnight dark rye bread, It seems delicious, and easy!!!
Since I discovered your page, I try to eat more healthy, thank you for being so generous!!!
Regards from the bottom of the planet!!! Silvia
Alexandra Daum says
Thank you, Silvia, I hope you like it!
Jessica Duffin says
This looks beautiful! I’m just wondering if the oven temp is for fan or without fan? Thank you!
Alexandra Daum says
Hi Jessica, the oven temps on OE are done with an internal oven thermometer, so they’re exact – you know your oven best, so if your fan setting doesn’t automatically adjust, please set it to whatever would actually be 200C.
Jessica Duffin says
Thank you so much! 🙂