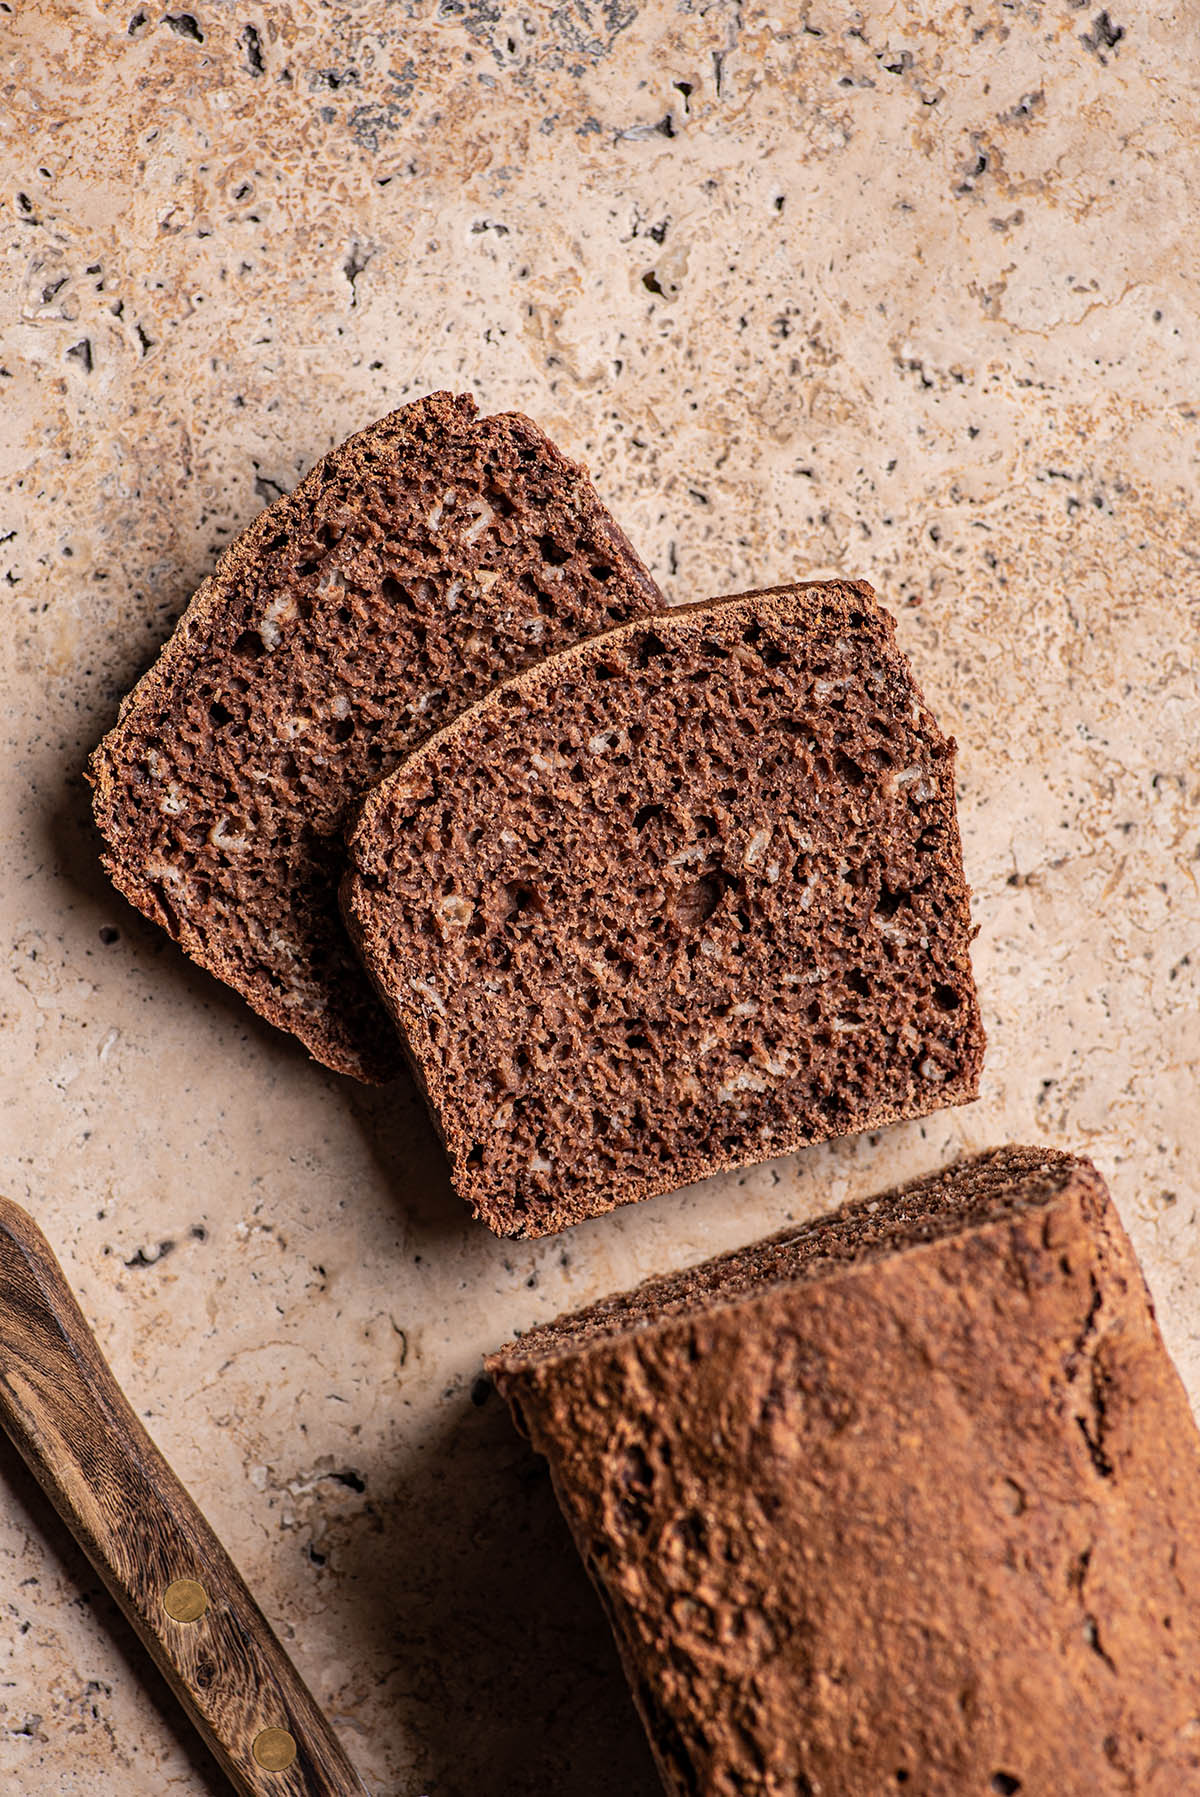
I love overnight bread. It’s much easier to make than normal homemade bread, without any kneading necessary – you just mix everything together in a bowl, let it sit overnight, and then bake it in the morning. This is a typical north German rye bread, dark and slightly sour.
The usual problem is that it’s usually baked in a dutch oven or lidded ceramic dish and involves some dough folding and sitting in a tea towel in the morning after it’s risen overnight, which I find detracts a bit from the simplicity of the method.
The dough rises a second time in the pan you bake it in, so you don’t need to worry about proper folding technique or anything like that. All you have to do is mix it the night before, dump it in a loaf pan, and bake it. No kneading, no folding, no special equipment.
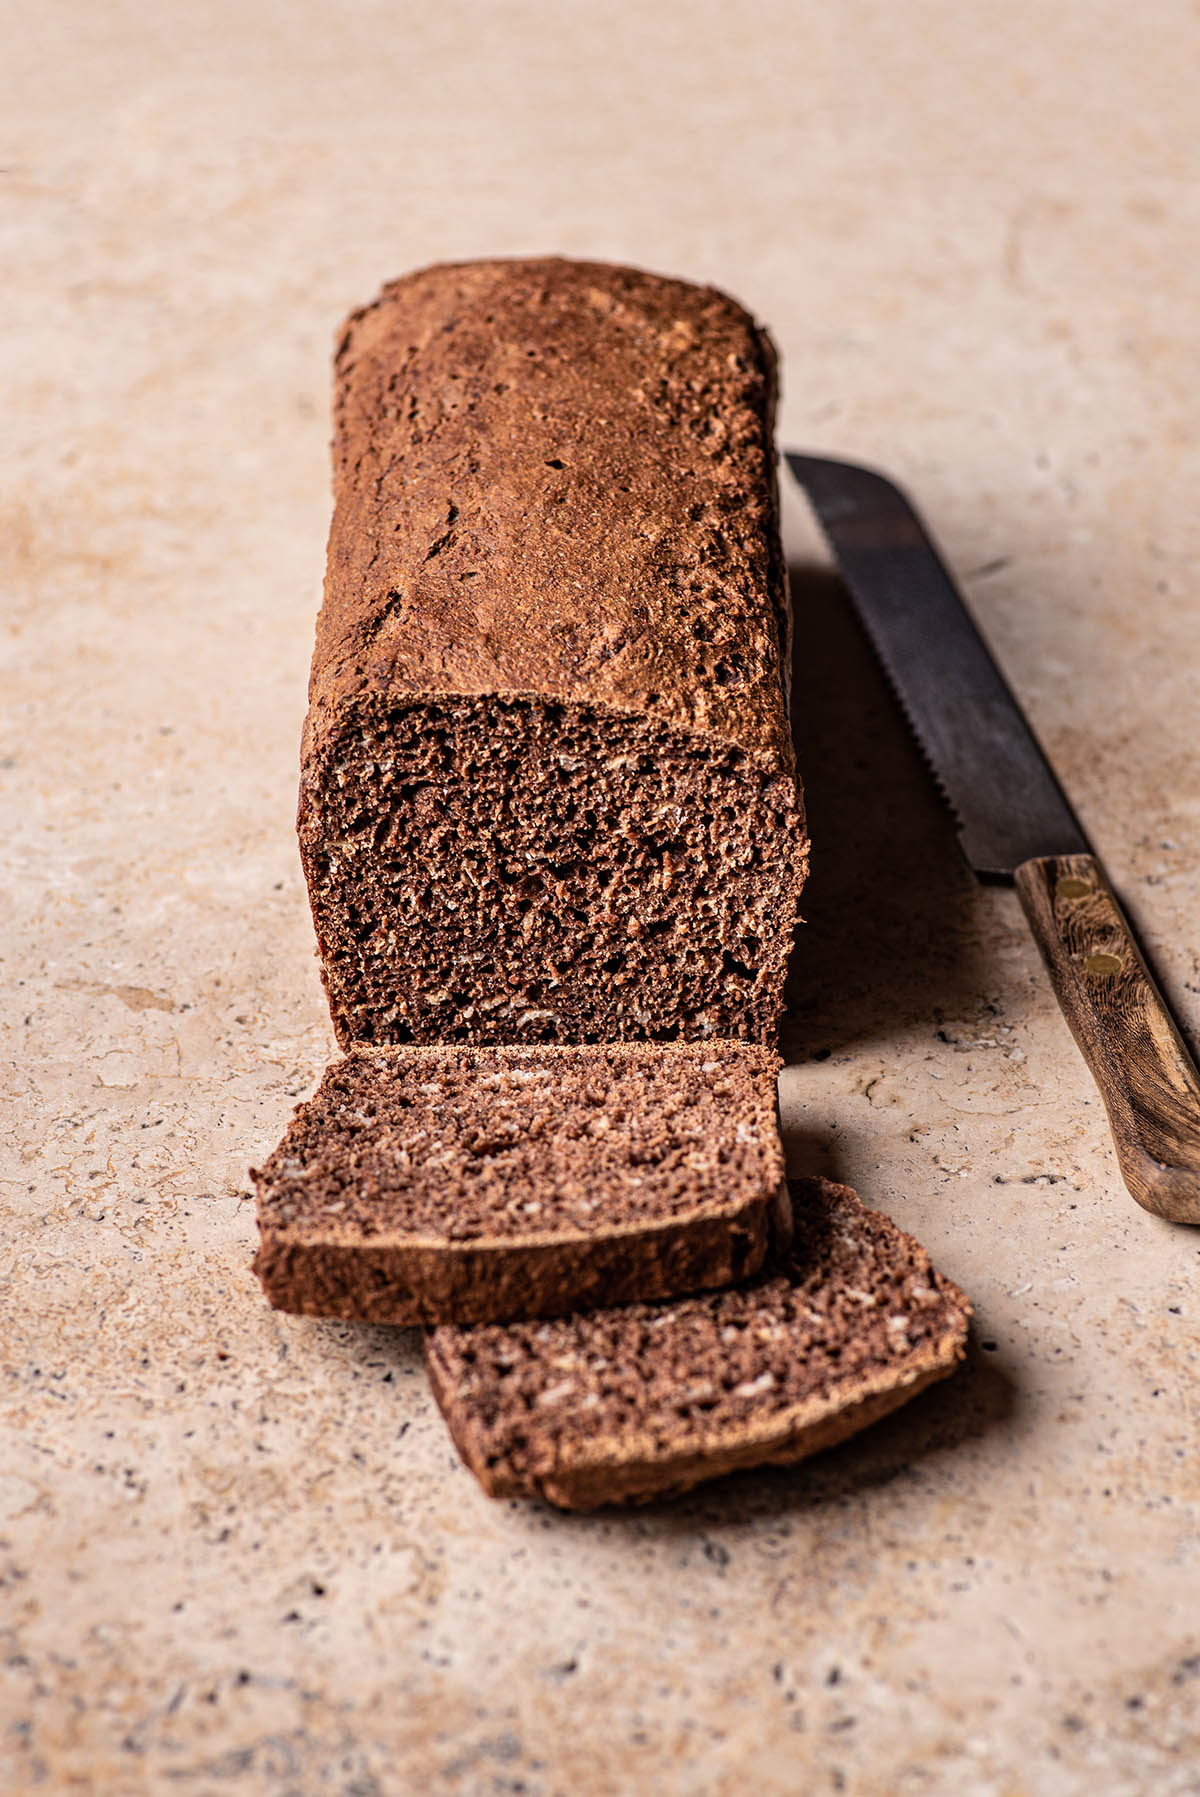
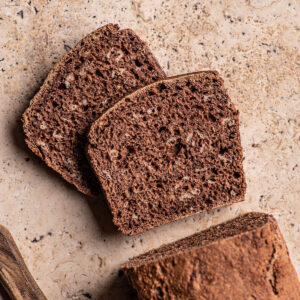
Despite the lack of work that goes into this bread, the crust is surprisingly crispy, and the inside of the loaf is soft and tender. It also lasts longer than other homemade breads, and it keeps for at least a week sitting on the counter, wrapped well.
If you like the idea of rye bread but don’t want to go all the way to a dark rye, try this overnight spelt rye bread instead, or sourdough rye bread if you prefer a natural yeast version.
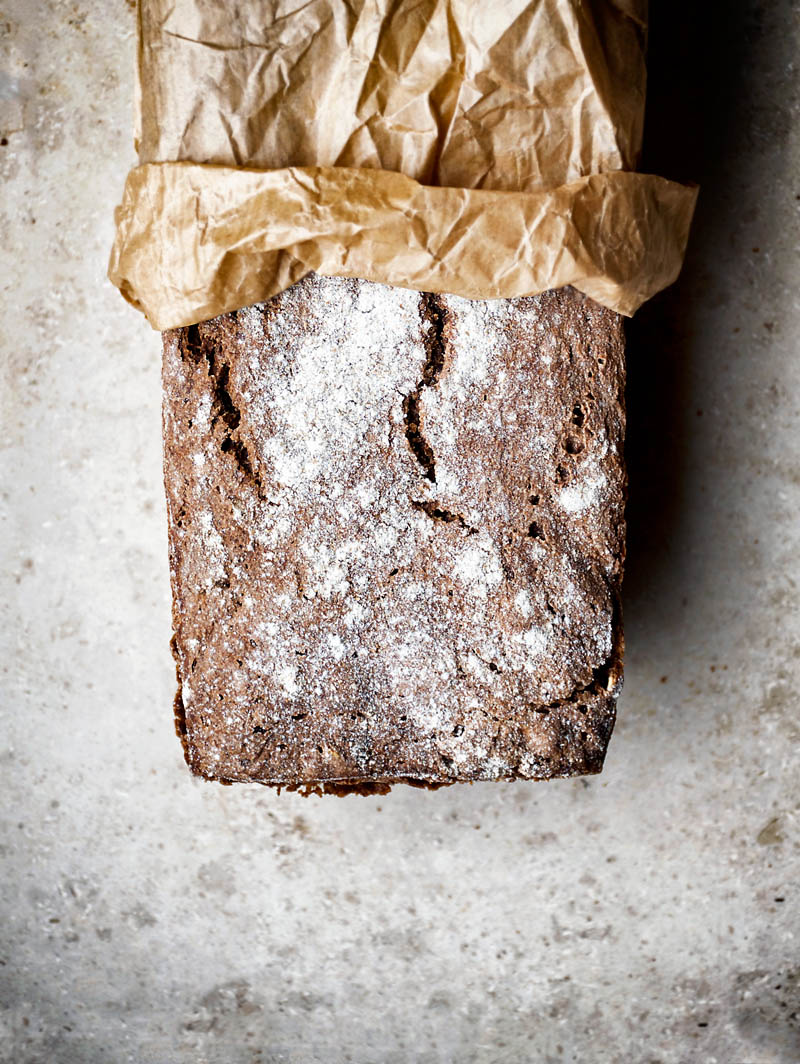
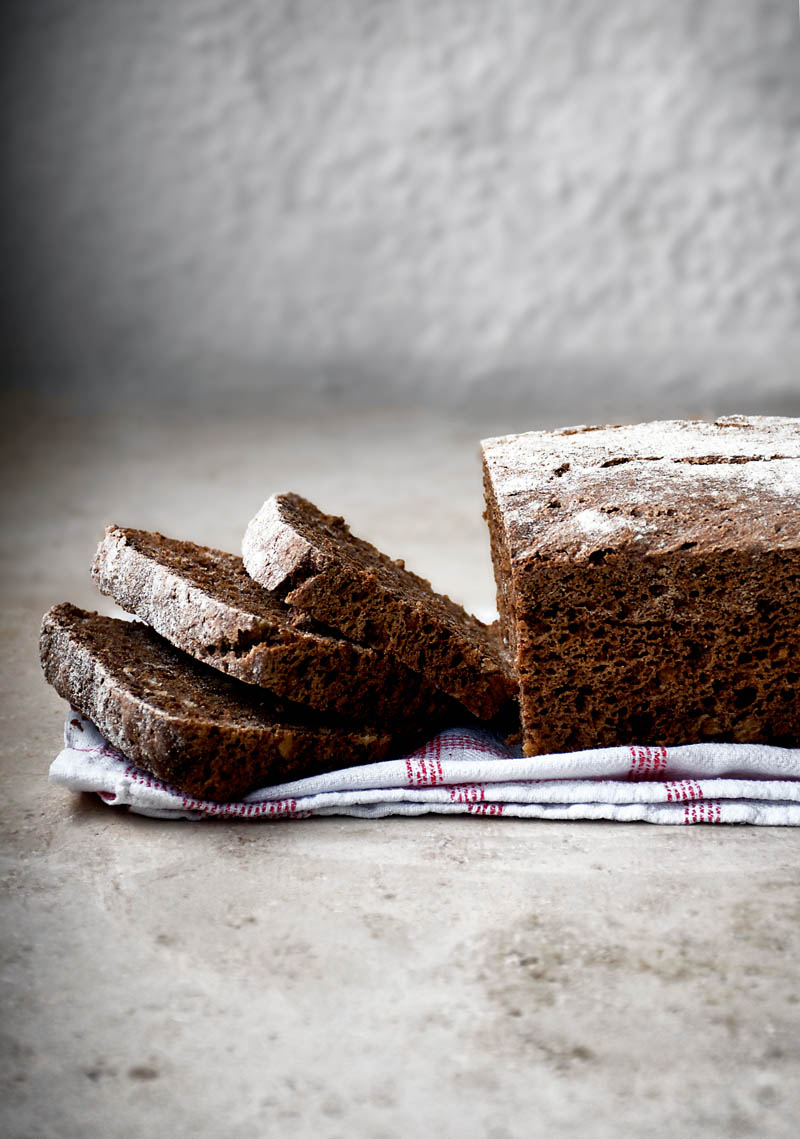
Please note that the darker photos are made with regular cocoa powder and yeast, and the lighter bread is made with sourdough starter and natural cacao. The step-by-step photos are sourdough, so if you want to see the steps for the yeast method, please watch the recipe video.
One reader, Marina, commented: “We have made it 2 times – both times outstanding texture. First time – as written, with rye and regular wheat flour, it ended up being overpowered by cocoa and mild bitterness – not bad, but too mild in flavor. Second time – with spelt and rye and half of cocoa and some cumin and seeds on top. Really outstanding flavor. Thank you for coming up with this recipe – so easy to make and beautiful results even for non-baking people.”
Another reader, Janie, said: “Thank you for this recipe – it makes a delicious loaf that lasts for days. I have been looking for ages for an easy ancient grain recipe and this one hasn’t failed me yet. It’s great to experiment with additions – I’ve enjoyed fennel seeds, caraways seeds and will try a sweet loaf with cranberries for Christmas.”
Ingredients
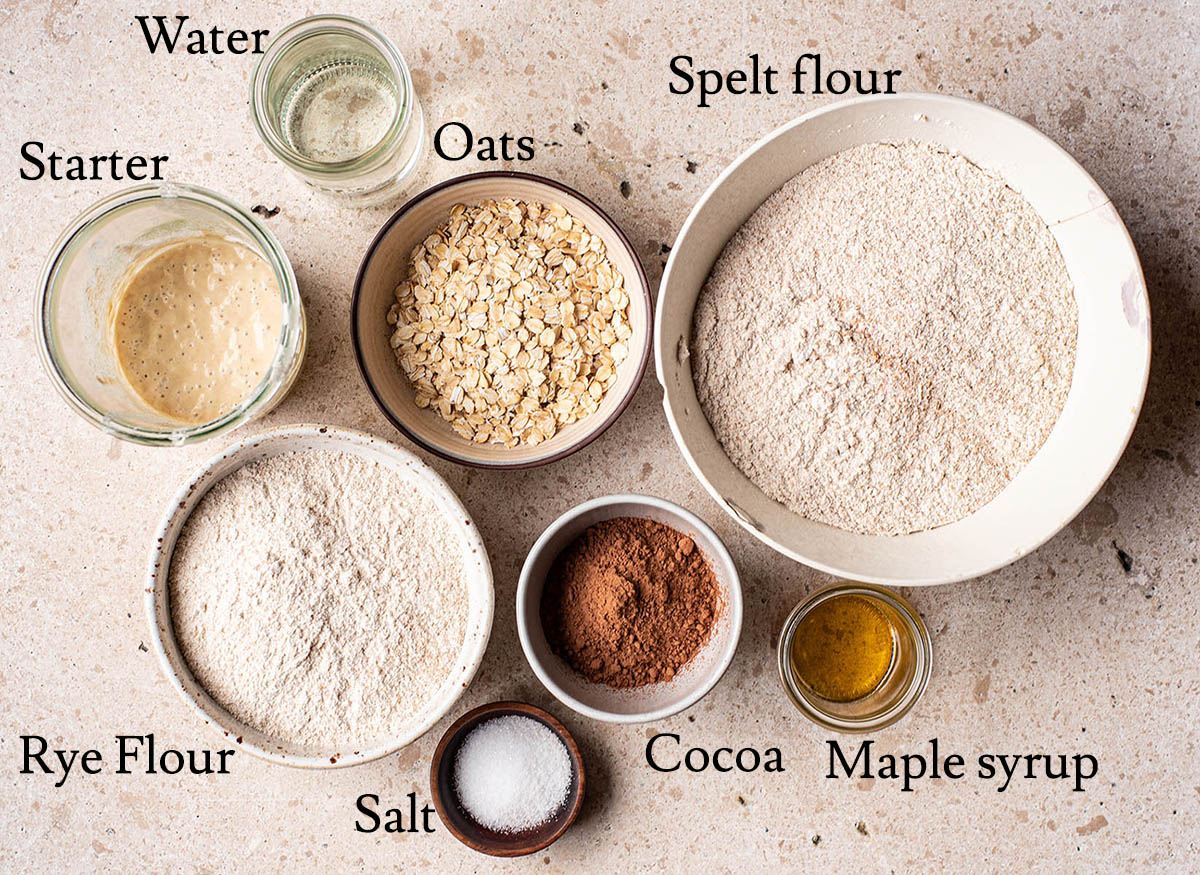
- Whole grain spelt flour: if you don’t have spelt flour, all-purpose makes an excellent substitution. Whole wheat flour can be used as well, but you’ll have to reduce the flour slightly or increase the water a bit to make up for the greater absorption.
- Rye flour: sometimes called dark rye flour, this should be whole grain rye, though light (sifted) rye flour can also be used.
- Rolled oats: the oats can be left out if you prefer – I often omit them – though it is better to increase the amount of flour used by a couple spoonfuls in this case as the oats do absorb a fair amount of water.
- Cocoa powder: make sure you’re using 100% cocoa powder, not hot cocoa drink powder. There shouldn’t be anything like sugar or milk powder in it.
- Yeast (dry or fresh) or active sourdough starter: traditional yeast (not quick rise) is ideal, but it doesn’t make that much of a difference. Active starter can be any starter made with a gluten-containing flour – rye, plain flour, spelt, and so on. There’s a recipe in my cookbook for rye sourdough starter.
- Add-ins: dried fruit, seeds, and nuts can be added to the dough as well. I recommend mixing it in after the bulk rise (overnight) before placing the dough into the tin to rise a second time. Raisins, dried cranberries, and sunflower seeds are my favourite additions. You can also top the loaf with seeds, which makes for a very pretty gift.
Step by Step
See the recipe card notes for instructions on how to make this into a sourdough loaf. The step-by-step photos show the sourdough method because the video shows it made with yeast, so in the interest of maximum information, I wanted to include both.
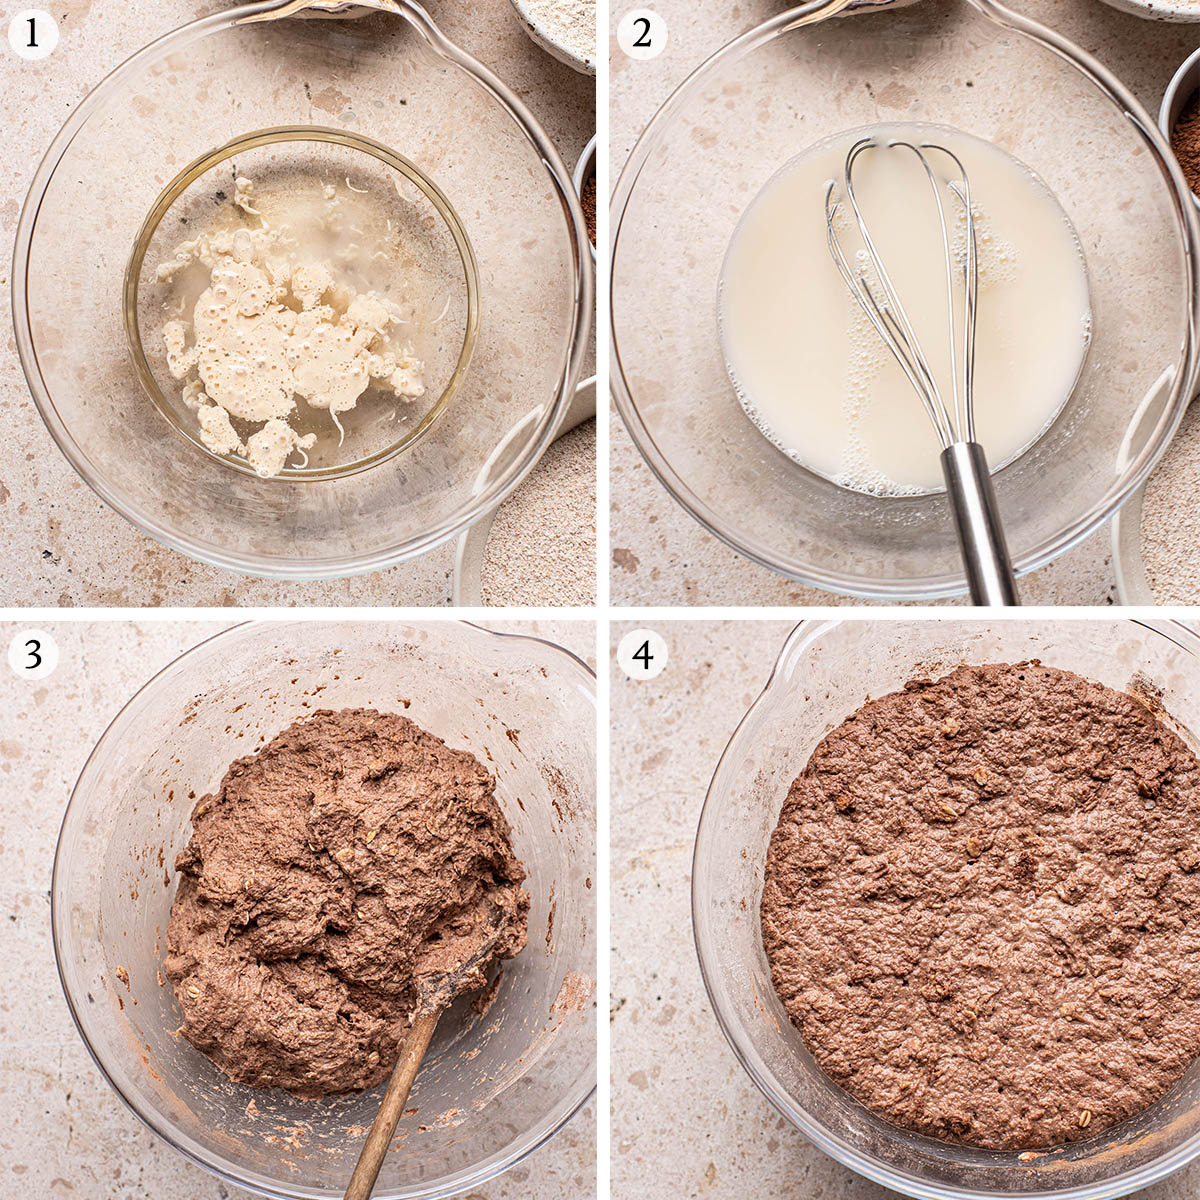
1. Add wet ingredients: add the water, maple syrup, and active starter to a large bowl. The starter should float. If using fresh yeast, add it now.
2. Mix: whisk to combine well.
3. Add dry ingredients: stir in the flours, oats, cocoa, and salt. Add the dry yeast now if using that method and stir into a shaggy dough.
4. Rise: cover with a plate, board, or tea towel, and set it into a room temperature, draft free place for about 12 hours.
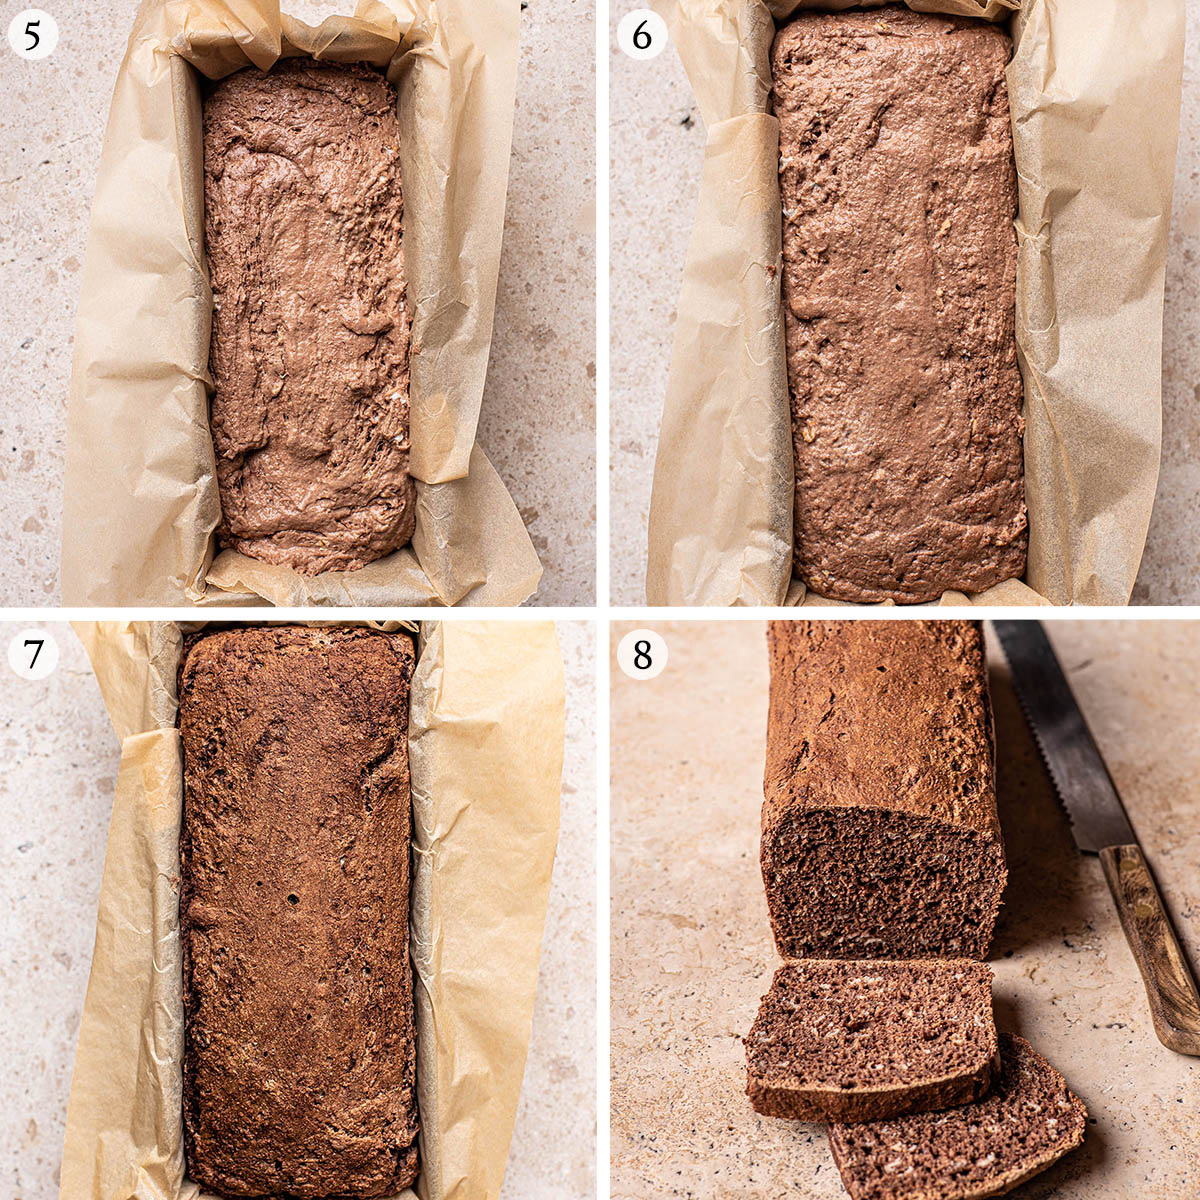
5. Transfer: once the dough as risen, place it into a well greased or parchment lined bread tin. It will lose volume here.
6. Rise: cover the loaf with a tea towel and set it into a draft-free place to rise again for a couple of hours. The dough should be expanded but not quite doubled after this time.
7. Bake: bake the loaf for about 45 minutes, or until the bread sounds hollow when it’s tapped.
8. Cool and serve: cool the bread completely – at least six hours, preferably overnight – before slicing and serving.
Recipe Notes
Like most darker whole grain breads and sourdough loaves, this one needs to rest for a significant amount of time before slicing. The recipe states to let it cool completely – that may mean several hours or even overnight. If you want really nice clean slices I recommend letting the baked loaf sit overnight in a tea towel before slicing the following day.
If you want to make this into a boule, you’ll have to introduce some stretches and folds. I recommend 4 rounds, starting directly after mixing. After the dough has risen overnight, shape it as you usually would and place it into a well floured banneton. Bake in a dutch oven 30 minutes covered and another 15-20 minutes uncovered, at 230°C (450°F).
The dark colour and traditional dark rye flavour here come from the whole grain flours and cocoa powder. It’s not quite a German black bread, which I grew up with, but this style of rye bread is also very common in northern Germany (where I lived) and Scandinavia (though it is hard to find in Gothenburg). If you feel that the cocoa will make it too bitter – though that is kind of the point – you can leave it out, no problem.
How to Store
Storage: the bread keeps well, wrapped in a tea towel, for about a week. The crust will harden slightly but the middle will still be fresh. You can also use a bread bin or sealed container, but I don’t recommend storing this in a plastic bag.
Freezing: this loaf freezes spectacularly, and I highly recommend having some in the freezer at all times. Freeze the whole loaf or pre-slice and take out individual pieces to toast, but either way it’s well worth freezing some in an airtight container.
Expert Tips
- Choose a good draft-free spot: I usually keep my dough in the oven with the door closed, no light needed, for the initial prove.
- Keep an eye on the dough the first time: you may need slightly less time if your starter is very active. The dough is finished the bulk proof when it’s approximately doubled in size.
- Don’t worry about overdoing it: the colour is harder to gauge because the loaf is so dark, but the outer crust should be quite hard and crisp when finished (it’s difficult to over-bake this bread).
- Serve with strong toppings: this is excellent with mirabelle jam, for example, something quite tart. We often have it with peanut butter but a sharp cheese is certainly more traditional.
- Refrigerate after shaping: if doing the sourdough method, it’s no problem to refrigerate the loaf for a few hours before baking. I recommend letting it rise at room temperature for an hour or so before refrigerating for the best results.
More Ancient Grain Bread Recipes
No Knead Honey and Oat Sourdough
Spelt Naan
Saffron Wreath Bread
Simple Spelt Bread
Einkorn Bread
If you make this Dark Rye Bread or any other bread recipes on Occasionally Eggs, please take a moment to rate the recipe and leave a comment below. It’s such a help to others who want to try the recipe. For more OE, follow along on Instagram, Facebook, and Pinterest, purchase the Occasionally Eggs cookbook, or subscribe for new posts via email.
Easy Overnight Dark Rye Bread
Description
Ingredients
- 500 ml (2 cups) room temperature water
- 1 teaspoon maple syrup or honey
- 450 grams (~3 cups) whole spelt flour
- 150 grams (~1 cup) rye flour
- 60 grams (½ cup) rolled oats
- 25 grams (¼ cup) cocoa powder
- 1 ½ teaspoons sea salt
- ¼ teaspoon dry yeast** or 100g active starter see notes
Instructions
- In a large mixing bowl, whisk together the water, maple syrup, and active starter or fresh yeast if using that option.
- Add the spelt, rye, oats, cocoa, and salt to the bowl. Add the dry yeast to the dry ingredients as well if that’s what you’re using. Stir with a wooden spoon to combine, mixing until no visible streaks remain.
- Cover the bowl with a lid, cutting board, or tea towel and let it sit for 12-15 hours at room temperature. It will at least double in size during this time.
- In the morning, grease* a bread pan (see notes) or line it with paper. Scrape the dough into the pan, and then press it down evenly (wet hands work well).
- Cover the dough with a clean dish towel. Let it rest again for 1-2 hours at room temperature.
- Heat the oven to 200°C (400°F). Once the oven is hot, place the bread on a middle rack and bake for 40-45 minutes. The crust will be hard and sound hollow when tapped once the bread is done baking.
- Remove it from the oven and place the pan on a metal rack to cool for 20-30 minutes before removing it from the pan to cool completely. The loaf will keep well for a week at room temperature, best stored in a cloth bag.
Video
Notes
Nutrition
Nutrition is provided as a courtesy and is an estimate. If this information is important to you, please have it verified independently.
This post was originally shared in October 2016. It has been updated most recently as of January 2023 with no changes to the recipe.

HI is 1/4 of a teaspoon of dry yeast really enough for this loaf please? thanks a lot.
Hi Lyndsay, yes, you only need a quarter teaspoon of yeast and you’ll find that to be typical for this style of overnight bread that rises at room temperature for a long time. I hope you like it and please let me know if you have any further questions.
I love this bread. Very satisfying to prepare. It’s memorised now. I make double batch and slice when cool(make sure it is cool I or it’ll real apart) then I slice in toastsnle slices, separate with baking paper pieces and freeze them. Each frozen slice toasts just like it’s fresh. REALLy tasty. I toast and put peanut butter and jelly on them or just butter 😋
I am so stoked to have my first ever attempt at baking bread to be such a success!
I had been buying a dark rye sourdough from my local market, but I got two or three days tops before the crust was so hard it could break your teeth, and if you froze it for toasting, it still cooked really hard. At $7.5AUD a loaf I was fed up of 50% going to waste.
I used the dry yeast method and cooked in my 24cm loaf tin, decreased the coaco by a smidge after reading the other reviews though upon tasting I would have probably been fine to leave it as is.
I’m a total newbie, but from what I can tell this bread has turned out perfectly! Nice crusty top, slightly dense and moist inside and the taste is lovely.
Looking forward to seeing how this freezes as it says in the recipie that it freezes well, as this size is still too much for me to go through on my own in 7 days. I’m considering buying a smaller loaf tin and just halfing the recipie.
Thanks so much for this recipe! I was always too scared to try making my own bread, but this seemed so simple I figured even I could do it!
Can I use a 9 x 5 bread pan? 12-inch bread pans are hard to come by and expensive.
Hi Jodean, it’s the opposite where I live! You can definitely use a standard US bread pan no problem for this recipe, I have, and it’ll work well. I’ve updated the recipe card to reflect this.
Great! Thanks much!
My first (t)rye was a resounding success—sorry, I couldn’t resist. I made the cookbook ‘Scandinavian Dark Rye’ version. The bread had a beautiful aroma, crust and texture. Next time, I shall remove or halve the cocoa as it was too bitter for my taste, though my partner loved it with smørrebrød. I had to add about 100 ml more water because I used crushed oats (thirsty stuff!), which made me rather nervous, but it all went well. I am so happy. Thank you, Alexandra!
Hi Richie, glad it turned out well for you! I find that acid-regulated cocoa can be a little milder in the bread so you may want to try that in addition to reducing it. It’s such a flexible recipe, very adjustable! Great idea to add crushed oats.
Love love love this EASY and delicious bread. My new go-to. I can feel my eastern european ancestors nodding in approval.
Alexandra, you knocked this out of the PARK!! Homerun!!! I made this exactly as written, using exact same ingredients. During the rise I realized this isn’t a cocktail dark rye loaf, its a full loaf! (I was searching on cocktail dark rye) I panicked for a moment, then figured I’d split into 2 as I have 2 of the USA PAN cocktail loaf pans (which I HIGHLY recommend, all their pans are top notch A+). Well, this morning after the rise (it doubled plus a bit), I was dividing it in the bowl, and realized its all going to fit, correctly, in a single cocktail loaf pan, so that’s what I did. Baked it for 40 mins @400F and it is absolute PERFECTION!!
The loaf has that wonderful crisp top with a deep thump, the color and flavor are brilliant; a deep nutty taste, moist, tight dense structure but still tender and delicious! This recipe is SO easy and the results are just the best! I don’t get any bitterness from the cocoa, just flavor and color.
Thank you Alexandra, this is my new dark rye loaf, it is perfection and works wonderfully as a cocktail loaf as well, no changes needed if you use the USA PAN I used (found on Amazon, ~$20/ea)
Keen to try this (absolutely love the overnight spelt & rye which I’ve been making for years) but would like to add seeds like sunflower and pumpkin – when to add? And would they burn if a few on top? Thanks
Hi Cate, you can add seeds along with the flour and other dry ingredients. I often add a handful of sunflower seeds to this loaf. I haven’t experienced burning on top but if you’re concerned just push them in to the dough with a wet spoon when you transfer to the baking tin.
Thanks for the advice (and all the fantastic recipes). I’ll give it a try with seeds.
I am rating this a 5 because it is JUST what I am looking for. I have baked with spelt for years and am craving “whole rye bread”. I have one problem. I am allergic to chocolate. I know i could just leave it out, but I wanted to ask if you had any ideas for a substitute that would provide another layer of richness, color and flavor like it does? Asking alot. I know.Thanks.
Hi there, I think you could probably add a bit of carob powder to get a fairly similar taste. I’d use half the amount (just about ten grams) and see how you like it. You could also try something like roasted ground hazelnuts or walnuts (about 50g finely ground) if you can’t get carob – I think that would also add a similar type of richness that would be less similar but equally delicious.
Hi, I make this with treacle/molasses instead of sugar to make it a bit darker. Seems to work!
Great recipe
We have made it 2 times – both times outstanding texture. First time – as written, with rye and regular wheat flour, it ended up being overpowered by cocoa and mild bitterness – not bad, but too mild in flavor. Second time – with spelt and rye and half of cocoa and some cumin and seeds on top. Really outstanding flavor. Thank you for coming up with this recipe – so easy to make and beautiful results even for non-baking people 🙂
Didn’t rise. I’m admittedly new to bread making. I followed recipe exactly (using dry Active yeast method) and covered bowl with plate, leaving on counter near the stove. Kitchen has no drafts, with temp 66F (~19C) at its lowest. I excitedly opened the bowl twelve hours later only to find the dough exactly as it was when I covered it. It hasn’t risen at all, at least not that I can tell.
Is 1/4 teaspoon for yeast and 1 teaspoon for honey a typo? That’s a LOT less than the other recipes I’m seeing online; just checking. I doubt it’s a type, seeing all the other commenters rave about the recipe. What did I do wrong?
Hi Josh, it sounds like it might have been a yeast issue. I suggest testing your yeast in a bit of warm water (a sprinkling of yeast over a couple tablespoons warm, not hot, water) to see if it’s still active. I’m guessing that was probably the issue. The amounts definitely aren’t a typo – that’s a standard amount of yeast for an overnight bread like this one. Please feel free to send me an email with more details if you’re still running into problems! alexandra [at] occasionallyeggs.com.
Turned out wonderful! It reminded me of bread I would buy while living in Germany! In terms of personal taste preference, I might cut down on the cocoa a little bit the next time I make it, but other than that a total hit!
hi alex, thank you for this recipe – i make it all the time now! i was wondering if the recipe could be turned into rolls?
I’ve never tried making it into rolls, but what a fabulous idea. I think it could be but they’d be tricky to shape in a way that they wouldn’t just puddle as they rise after shaping – I would try putting them in a casserole dish to bake, like dinner rolls, rather than individual buns. I think proving times would be about the same but chilling before shaping would be very helpful so increase the second proving time by an hour or two at room temp in that case. Probably about half an hour bake time. This is all speculation though, I will definitely test it in the new year!