
While glass jars and containers work well for most food storage, and a bowl can always be covered with a plate, there are times when a beeswax wrap is the most practical option. To cover a bowl of rising dough, or wrap up a lunch-to-go, for example (especially since glass is so heavy to carry when travelling).
DIY beeswax wraps are very easy to make at home and you need just a couple of ingredients: old or new fabric and beeswax! There’s absolutely no need for expensive additions like jojoba oil.
This is a great low-waste, plastic-free option to incorporate into your home, and they make lovely gifts, too. I really like to save special fabrics through the year and make some wraps to include in homemade holiday presents.
We’ve been a largely plastic-free household since first moving to Germany in 2016 but I started making wax wraps long before then. We just stopped buying anything like plastic bags or wrap (clingfilm) when we moved and never looked back – we hadn’t been buying plastic wrap in Canada, either, but bags seemed like a wasteful expense too even though we reused them.
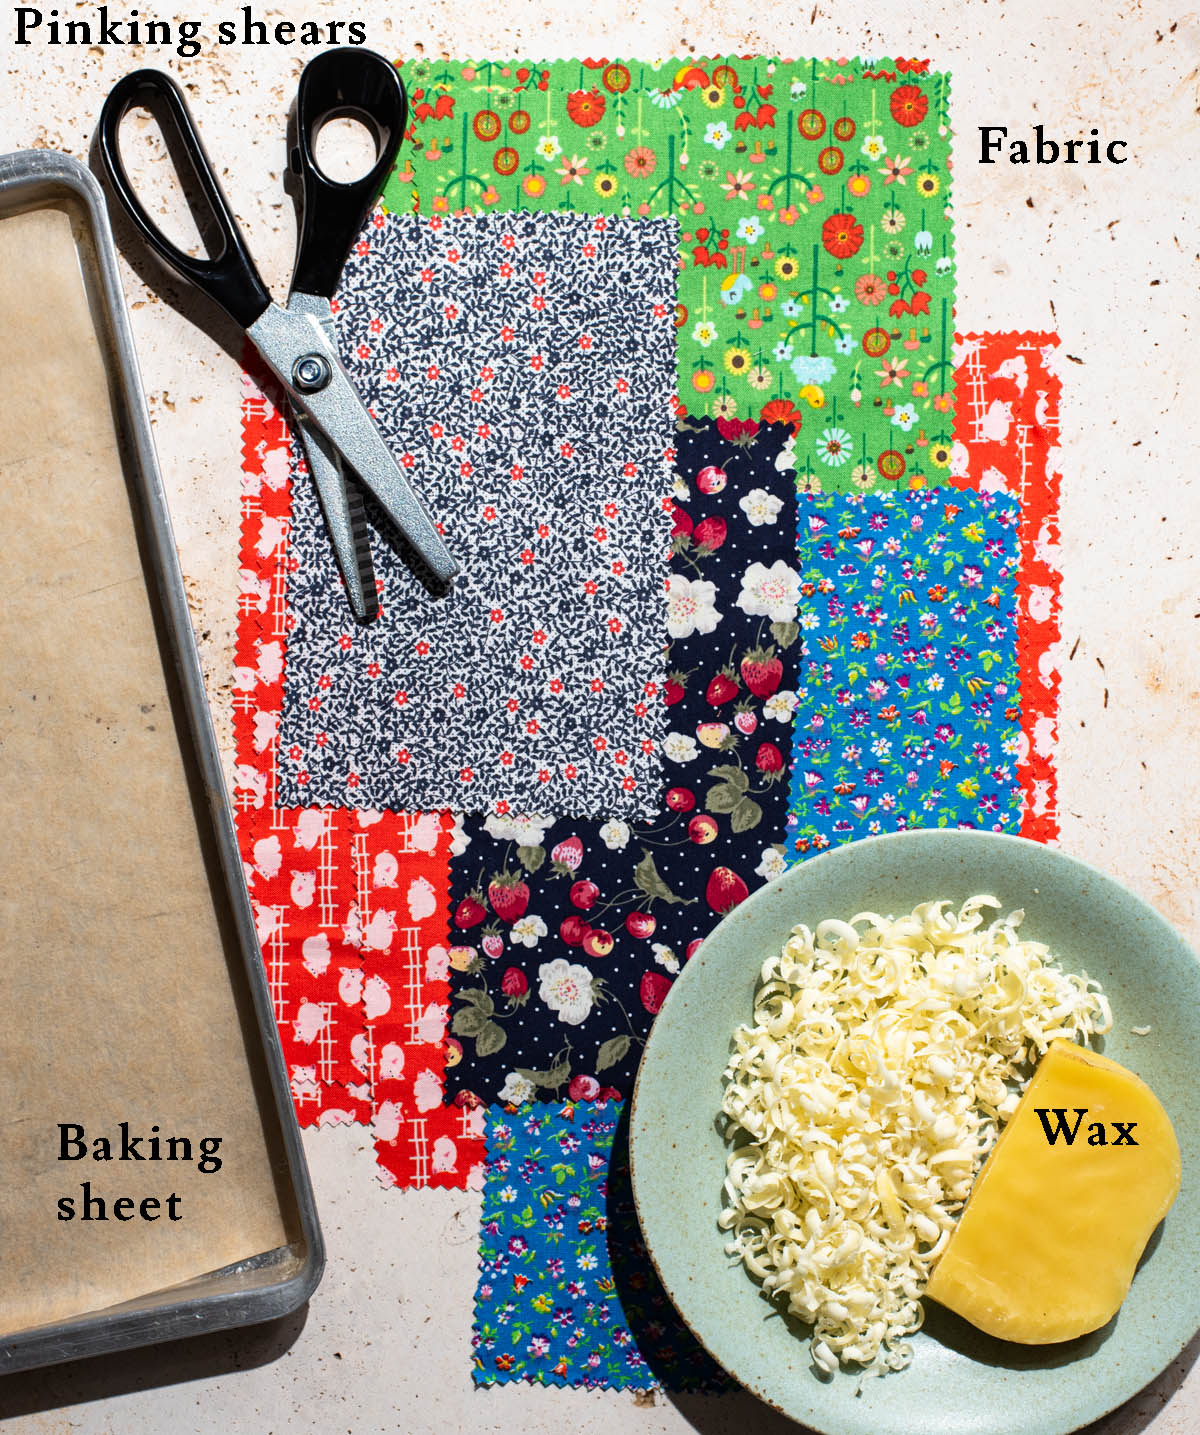
Supplies
How-To Notes and Substitutions
- Beeswax: use pure beeswax for this. You can buy small pellets rather than a big block as pictured, but I don’t mind grating it. To remove wax from your (metal) grater, dip in boiling water a few times, then dump the water outside before the wax hardens – not down the sink! I got the wax pictured at our preferred grocery store in Gothenburg when we lived there and some shops will carry it, but you’ll probably need to look online unless you know a beekeeper.
- Fabric: generally speaking I prefer working with linen, but a tightly woven cotton is ideal for beeswax wraps. Don’t use anything with plastic mixed in – so no polyester, nylon, elastic, and so on. These are fabric scraps that I’ve saved specifically for this but you could buy something like quilting squares or off-cuts.
- Pinking shears: while not strictly necessary, pinking shears will provide a nicer edge that won’t unravel. I haven’t had issues with unraveling, really (see below) but it’s an extra preventative measure. If you don’t have pinking shears, don’t worry, you still don’t need to hem the fabric.
- Baking paper: to protect your baking sheet, you’ll need a piece of kitchen parchment or baking paper.
Step by Step
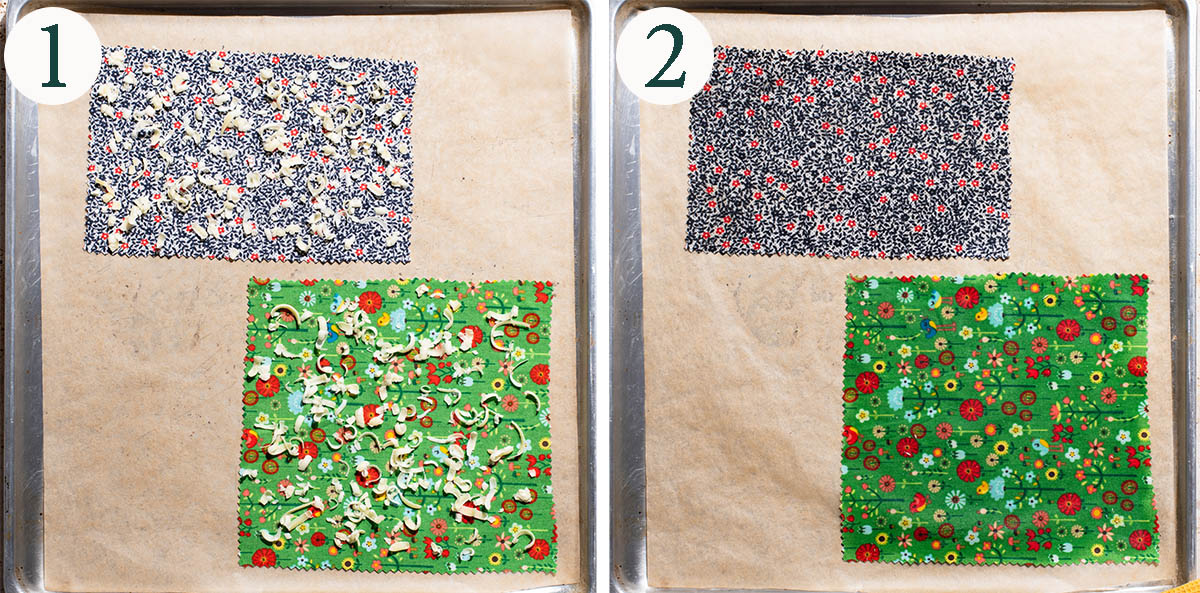
Step 1: place the fabric pieces on a parchment-lined baking sheet and top with beeswax shavings or pellets.
Step 2: heat in the oven until the beeswax has melted, then lift up the fabric pieces to quickly cool the wax before setting aside to cool fully.
Helpful Notes
I usually use fabric leftover from other projects, but you could use any type of cotton or very tightly woven linen fabric you have on hand. Think cut-up shirts, tea towels, anything that doesn’t have much texture. Something like terry cloth won’t work well but the back of an old dress shirt is great, as long as it’s 100% cotton.
I don’t use a pastry brush, it really doesn’t help anything and you end up with a wax-filled brush. The wax cools far too quickly and ends up just sticking to the brush. If you have followed another guide and ruined a pastry brush, dip it in a small pot of boiling water a few times, swirling it about, and the wax will melt off into the water.
You’ll probably need more wax than you think. If the wraps have spots without any wax on them, add a little bit more to those places and reheat to melt.
Lift the wraps immediately after they come out of the oven or the wax will harden on the cloth in patches. Use gloves or tweezers if needed.
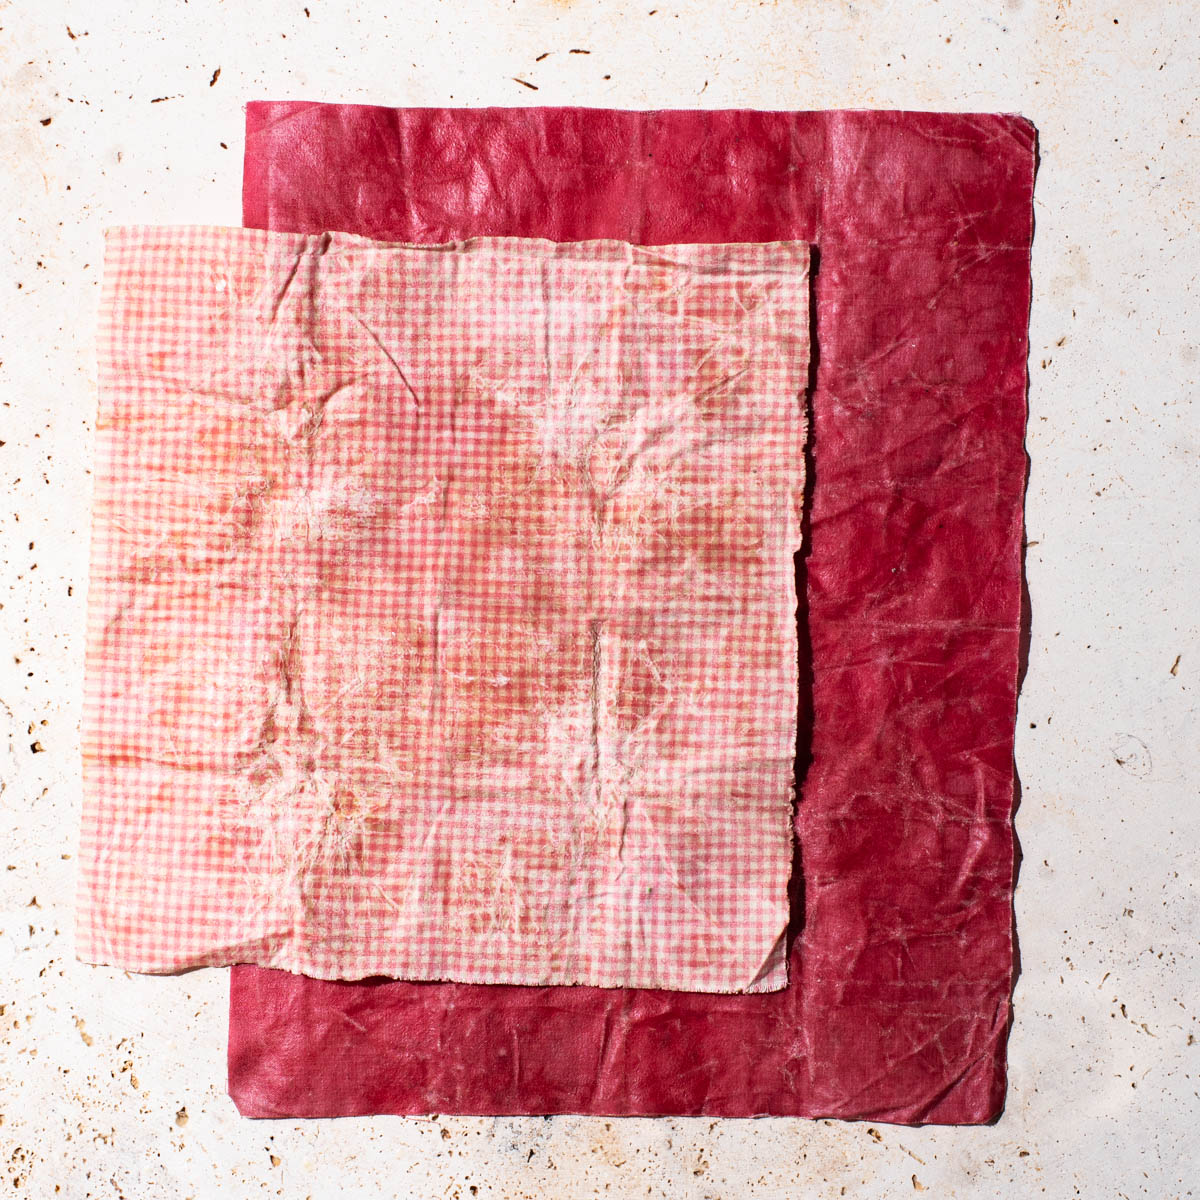
Pinking shears are ideal but un-hemmed and un-pinked fabric can be used too. I have decade-old homemade beeswax wraps that have no hemming in place (see picture below) and they have barely frayed at all – just the slightest, tiniest bit. Don’t let this stop you from making your own.
To refresh old wraps, place one between two sheets of baking paper and run an iron over the top sheet of paper. Make sure the steam is off. Quickly lift it up to cool as you would when making wraps. It doesn’t make them quite like new, but does help to redistribute the wax.
How to Use Beeswax Wraps
Simply take the wrap and fold it around the item you want to cover or wrap up. Use the heat from your hands to warm the folds so that they stick to each other. For jars, you can tie with a bit of string or place an elastic around the top to hold the wrap in place.
Not only for food, these are also great to have on hand when travelling if you try to avoid plastic in other elements of your life. Bar soap and shampoo can be tricky to travel with but can be wrapped up in one of these (even if still wet) and won’t damage anything else in your bag. I’m currently travelling full-time with homemade soap bars and I always wrap my shampoo bar and soap in a beeswax wrap (the two red ones pictured above).
Most shops and market vendors will also accept beeswax wraps in place of their plastic or paper options. If you ask, they’re usually fine with wrapping that piece of cheese or bun up in the wrap or letting you do it (in Europe, at least, but might not be the case elsewhere).
A small wrap makes a great jar grip if the lid is on too tightly.
Cover dishes and drinks during picnics or when eating outdoors. This helps to prevent bugs from flying into your drinks, but will also reduce some of the scent and keep wasps away.
I find an extra large beeswax wrap to be the absolute best way to store a crusty sourdough bread. It keeps just enough moisture in to prevent the interior of the loaf from drying out, but not so much that you lose that nice crisp crust.
Expert Tips
- Wash in advance: make sure any fabric you’re using has been well washed beforehand. There are some things you might not want touching your food. If you’re concerned about unraveling, hand wash rather than using a machine.
- Don’t use for meat: these are great to cover any foods that you wouldn’t have to wash a cutting board after prepping something. That means no raw meat or anything that can transfer to another food and make you sick.
- Avoid hot water: when washing after use, be sure to use cool or tepid water. Hot water will melt the wax, at least slightly, and you’ll end up with patches that have less coverage. A gentle dish soap can be used if necessary.
More How-To Guides
Homemade Deodorant for sensitive skin
Beeswax Lip Balm
How to Make Apple Cider Vinegar
Homemade Face Cream for sensitive skin
How to Make Beeswax Wraps
Ingredients
- Scissors or pinking shears
- Baking paper
- Baking sheet
- Tightly woven cotton fabric pre-washed
- Beeswax to grate, or in small pellets
Instructions
- Cut your fabric into the desired shape and size with pinking shears or scissors. If using pinking shears, you can cut it and then wash, but either way, it should be washed and dried before adding wax.
- Line a large baking sheet with parchment paper and heat the oven to about 70°C (150°F). If heated above around 85°C, the wax will discolour, so don't make it too hot. Beeswax melts at just above 60°C (140°F).
- Place the prepared pieces of fabric on the lined baking sheet in a single layer. You will probably need to do multiple batches depending on the size of the wraps.Tightly woven cotton fabric
- Top each with grated beeswax or pellets, sprinkling on in a thin layer. You'll need somewhere between a teaspoon and a tablespoon of wax depending on the size of the fabric (see step 1 in the post body above).Beeswax
- Place the baking sheet into the oven and wait until the wax melts. It should only take a minute or two so keep an eye on it.
- Remove the baking sheet from the oven and immediately lift the wraps with tweezers or gloved hands (unless you have heat-proof baking hands). The wax will set very quickly as it cools and the wrap will harden almost immediately once lifted. Place on a fresh sheet of parchment or a drying rack once cool enough that it's no longer floppy. I use my laundry rack. Repeat with the remaining wraps.
- Once fully cooled and set, test a wrap by folding a piece over itself and pressing with your fingers to see if it sticks to itself. If it doesn't, you probably don't have enough wax – flip the fabric over, add another sprinkling of wax (less on the second round) and repeat the melting process.
- Beeswax wraps will last for years. If yours are starting to lose stickiness or have some visible fold lines, refresh them by placing a wrap between two sheets of parchment paper and briefly ironing without steam.
- Use beeswax wraps to store sourdough bread, cover bowls, wrap vegetables, store soap for travelling, and more.
About Alexandra Daum
Alexandra Daum is a professional recipe developer, food photographer, and cookbook author. She started sharing carefully tested vegetarian recipes in 2014 and has since published hundreds of recipes with seasonal ingredients and whole grains as the focus. Her work has been featured on CTV, in House & Home and Chatelaine, on popular websites like Buzzfeed and Best Health, and in countless other publications.