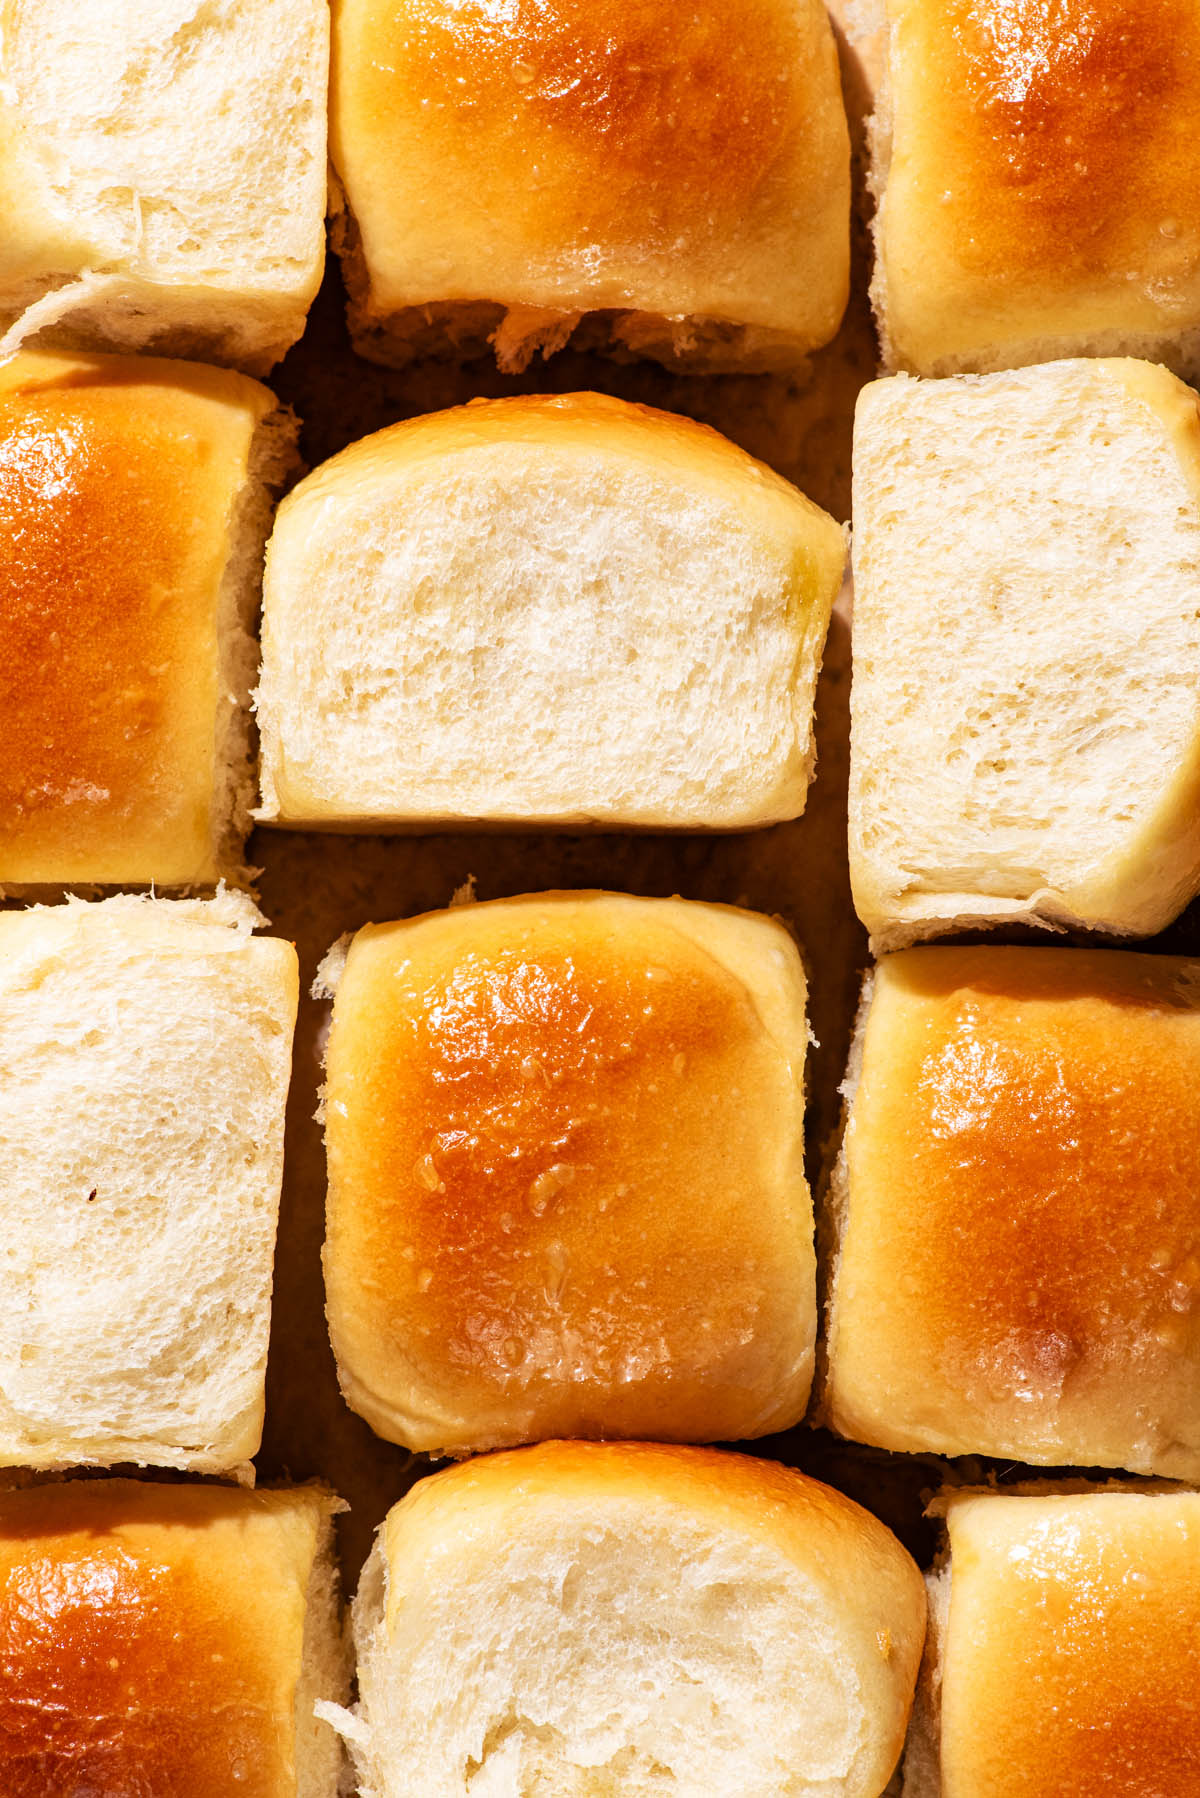
As soft as any good dinner roll, these soft spelt rolls are made to imitate by grandmother-in-law’s old-fashioned rolls. Made with olive oil instead of butter and with 100% spelt flour, the flavour is a little different – slightly more complex – and these are a holiday and occasion meal special in my house.
One reader, Jean, commented: “Amazing! So soft and easy to work with, waaay better than I expected with spelt flour!”
Recipe Rundown: Spelt Rolls
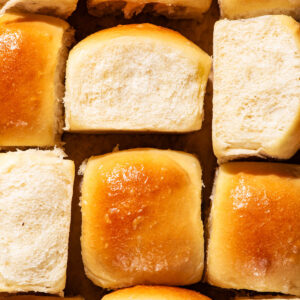
- Texture: very light and soft. The dough is similar to cinnamon roll dough or soft bread sticks, fairly elastic for spelt, with a light crumb. They tear apart very easily.
- Flavour: lightly sweet, like most milk bread. These taste a lot like traditional dinner rolls or milchbrötchen (if, like me, you did not grow up on dinner rolls). Since these are made with olive oil they don’t have a buttery taste but there is quite a bit of richness there.
- Difficulty: not too tricky. A relative beginner could make these and they’d still turn out well. Shaping is the hardest part but it’s not that important. As long as you knead the dough and give it enough time to rise, you’ll end up with good buns. Enriched dough like this is very easy to work with.
Ingredients
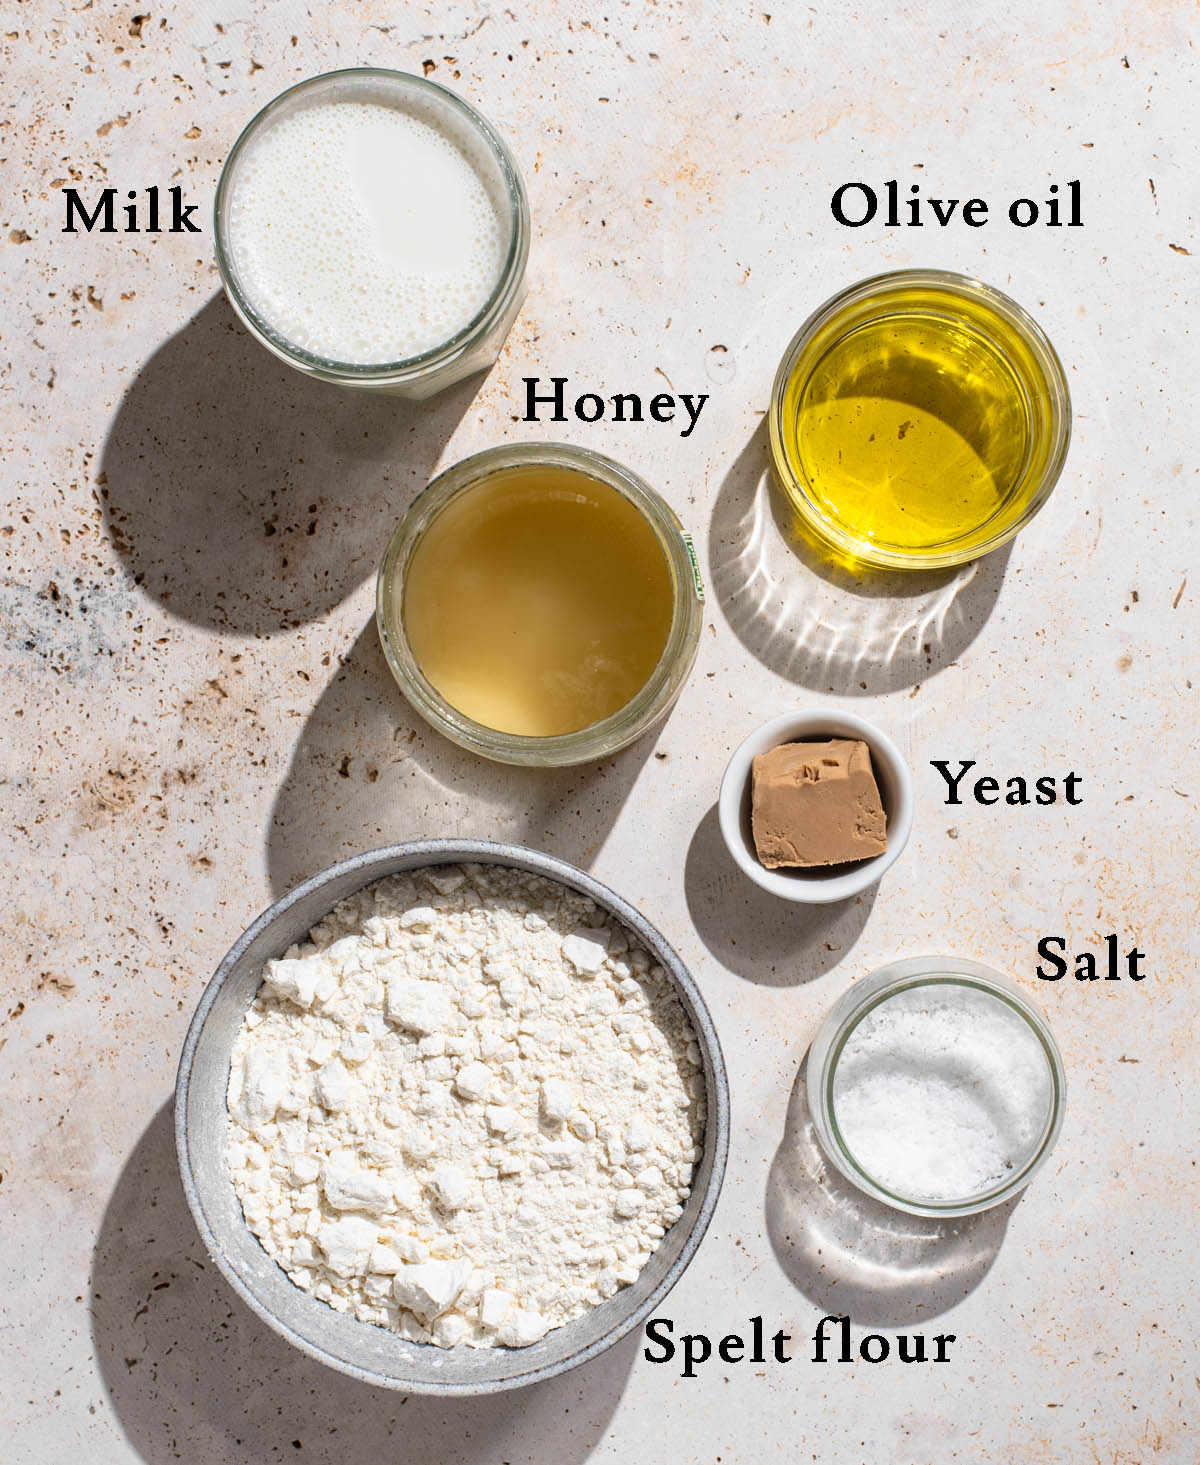
- Spelt flour: while you can use whole grain spelt flour for this recipe, note that the rolls will be less soft. Use up to 50% whole grain for a good balance of wholesomeness and best texture if you don’t like using all sifted flour.
- Milk: any kind of milk, dairy or non-dairy – but note that I have only tested with non-dairy milk (usually oat). Dairy milk will add more protein to the dough and make it a little easier to work with.
- Honey: sub sugar or another liquid sweetener if preferred.
- Olive oil: using olive oil does add a very slight bitter flavour to the buns, in a pleasant way, but you can substitute a neutral oil if preferred. I haven’t tested these with melted butter or margarine.
- Yeast: pictured is fresh yeast, but these work just as well with dry yeast. Use traditional or instant. If using instant yeast, you can skip the blooming step if you want to but no changes need to be made based on type of yeast used. I haven’t tried making these with starter.
For more enriched spelt dough recipes, try my filled star bread, lightly sweet saffron buns, and soft pesto rolls. There are hundreds of spelt flour recipes on the site.
Step by Step
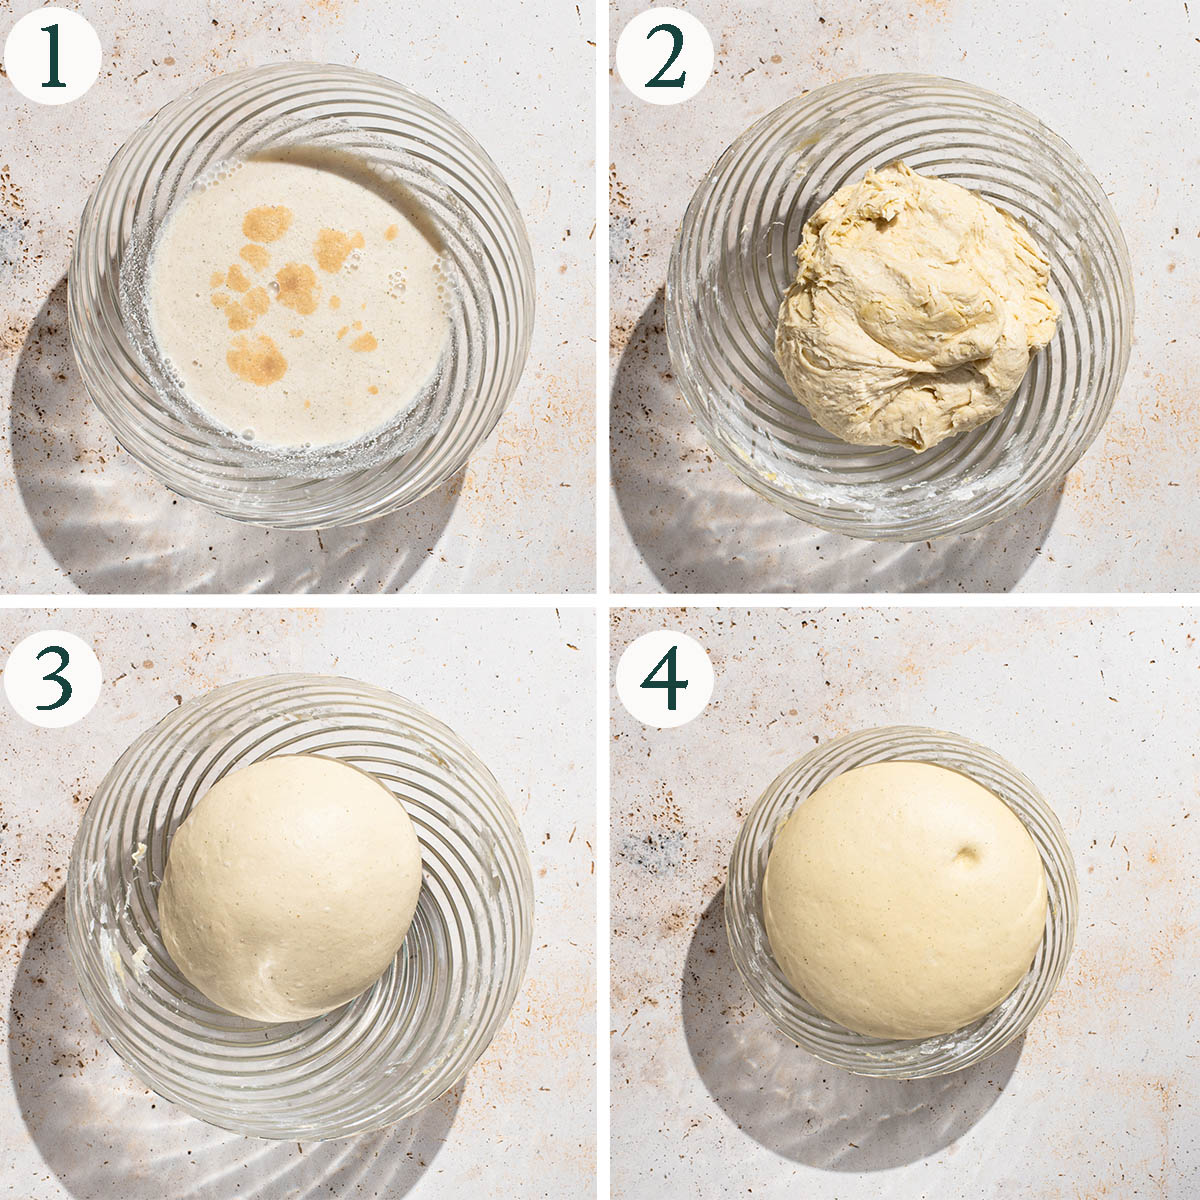
Step 1: heat the milk and whisk in the honey. Add the yeast and set aside to bloom.
Step 2: stir in the oil, then mix in the remaining ingredients.
Step 3: knead the dough until it forms a soft, smooth ball.
Step 4: set aside to rise, covered, until doubled in size.
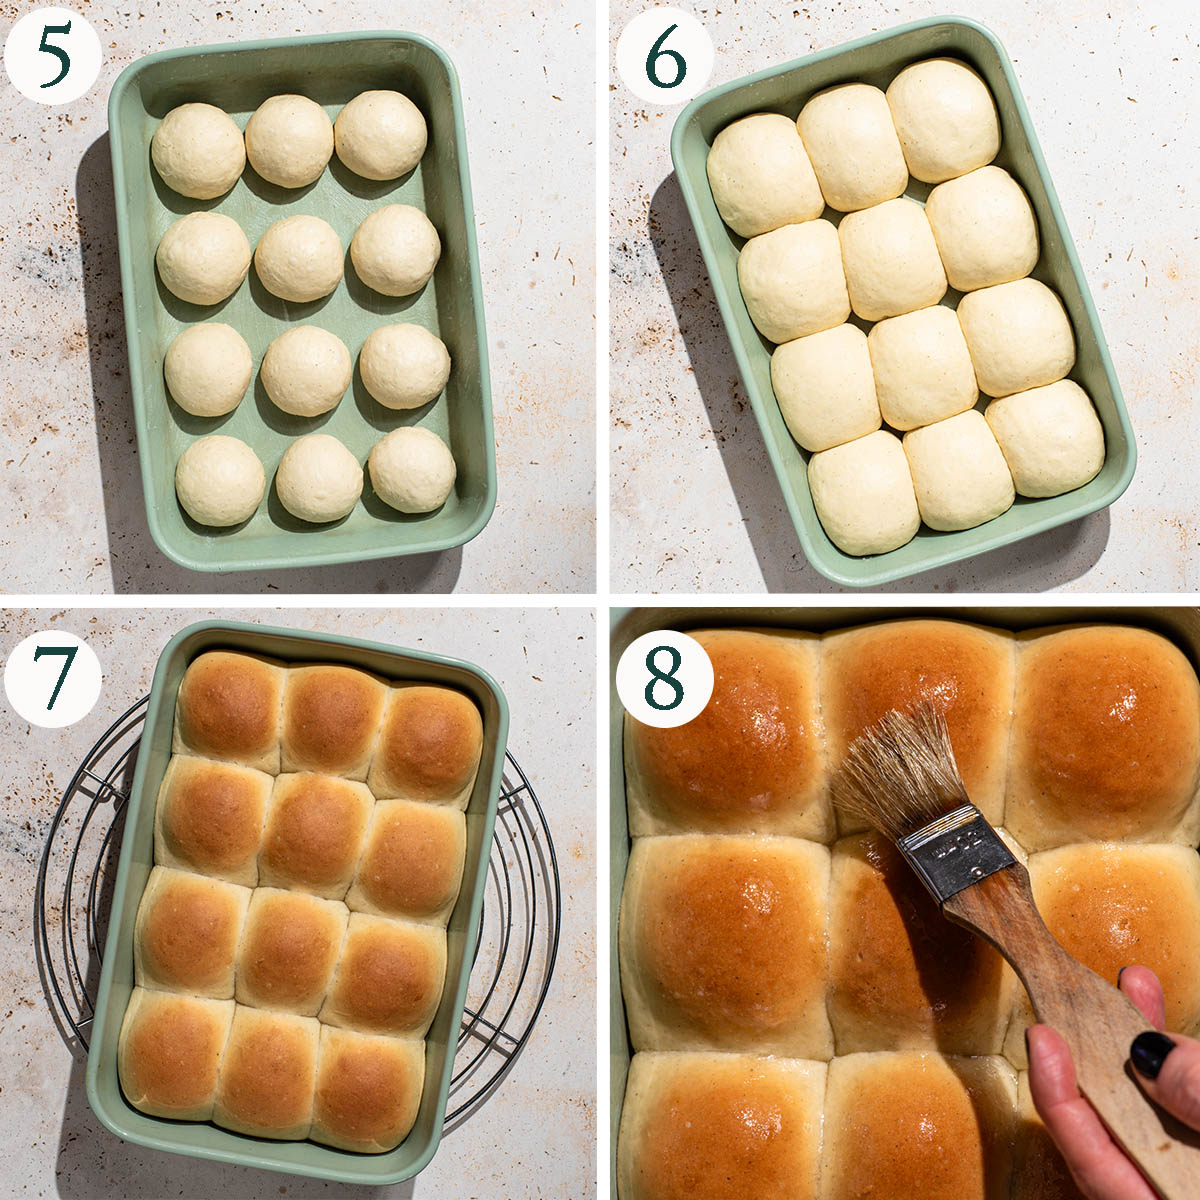
Step 5: divide the dough into 12 balls and rotate each to create some surface tension.
Step 6: let the buns rise again to double in size.
Step 7: bake until golden.
Step 8: brush the tops with a little more oil or melted butter and serve.
Recipe Notes
If you choose to use whole grain flour, reduce the amount by about 20 grams or add an extra splash of milk and let the dough rest (autolyse) for about ten minutes before starting the kneading process to let the flour absorb the liquid.
I usually live in places with very high humidity and rarely have dried out dough, so covering with a tea towel in the oven for the second rise is generally fine. If you’re somewhere very dry, use a damp tea towel and also place somewhere enclosed like the oven. Covering the bowl of dough for the first prove with a towel and a place is usually fine. You can also use something like beeswax wrap under the plate if you want something that keeps in moisture more effectively.
Don’t add more flour while kneading, it will make the dough too stiff and the buns will be tough. I use a handheld electric mixer with the dough attachment for these but if you’re kneading by hand you’ll just have to give it enough time to come together without adding extra flour.
Brushing the tops while the buns are warm is optional but makes for the softest, most attractive buns.
How to Store
Storage: keep in a sealed container at room temperature for 2-3 days. They can be stored for longer but will start to dry out or mould after a while. Refrigeration will dry them out quickly.
Freezing: transfer fully cooled buns to an airtight container and freeze for up to three months. Thaw at room temperature. Freeze the same day they’re baked for best results. If you want to warm them up before serving, spritz with a little water and place in a warm oven for a few minutes.
Expert Tips
- Heat until just warm: the milk should be just over skin temperature. If it’s too hot, it’ll kill the yeast. Test by touching the milk with your finger – if it feels the same temperature as your skin or just a little warmer, it’s perfect. If it’s too hot, set it aside to cool before stirring in the yeast.
- Look for size, not time: the rising time of your dough will depend on a few factors, mostly temperature. Look for the dough to be doubled. If it hasn’t doubled after an hour, you need to give it more time to prove until it has. Rising times are always estimates.
- Cool in the dish, or don’t: if the buns cool slowly in the baking dish, they can get a little soggy at the bottom from trapped humidity. Cooling them quickly (like in an unheated room in wintertime) is great. If your home is warmer, you can turn them out of the dish and cool on a wire rack instead, but note that the edges will dry out a little bit. To prevent that, you can wrap the buns in a tea towel and then place on a wire rack to cool (the fabric will trap some of that humidity, but not too much).
More Spelt Bread Recipes
Spelt Sourdough Bread
Honey Oat Bread
Garlic Pizza Bread
Spelt Pizza Dough
If you make these Spelt Flour Rolls or any other ancient grain bread recipes on Occasionally Eggs, please take a moment to rate the recipe and leave a comment below. It’s such a help to others who want to try the recipe. For more OE, follow along on Instagram, Facebook, and Pinterest, purchase the Occasionally Eggs cookbook, or subscribe for new posts via email.
Soft Spelt Rolls
Description
Ingredients
- 250 ml (1 cup) non-dairy milk or any kind
- 1 tablespoon honey sub maple syrup if needed
- 2 ¼ teaspoons dry yeast or ½ cube fresh
- 3 tablespoons olive oil
- 400 grams (2 ⅔ cups) light (sifted) spelt flour
- 1 ½ teaspoons fine sea salt
Instructions
- Heat the milk until just warm, about skin temperature (around 35°C or 95°F). Add to a large mixing bowl and whisk in the honey, then sprinkle the yeast over top.250 ml (1 cup) non-dairy milk, 1 tablespoon honey, 2 ¼ teaspoons dry yeast
- Set aside for ten minutes to allow the yeast to bloom. If using instant yeast, you can skip this step and add the yeast with the dry ingredients.
- Whisk in the olive oil, then add the flour and salt. Stir into a shaggy dough.3 tablespoons olive oil, 400 grams (2 ⅔ cups) light (sifted) spelt flour, 1 ½ teaspoons fine sea salt
- Knead the dough until it forms a soft, smooth ball. This will take about five minutes with a handheld electric mixer with the dough attachments, or around eight minutes by hand. Spelt flour dough will not pass a windowpane test but it should be smooth and fairly elastic when ready. Don't add more flour when kneading.
- Place the dough back into the mixing bowl and cover well. Set aside to rise until doubled, approximately one hour in a warm, draft-free place.
- Once the dough has risen, gently punch it down and divide into 12 equal pieces. Grease a rectangular dish approximately 31x21cm (~9×13 in.) lightly with oil or butter.
- Rotate each ball with your hand on a clean work surface to create some surface tension on the buns, then place into the greased baking dish. Cover with a damp tea towel and place in an enclosed space like your (cool) oven to rise again until doubled in size, about an hour.
- Preheat the oven to 190°C (375°F). Once the buns have risen, bake for 20-25 minutes* until golden. Once baked, remove from the oven and brush with a little more olive oil, butter, or coconut oil. Cool for 20-30 minutes before serving. See notes for cooling.
- Store in a sealed container at room temperature for a couple of days or freeze for up to three months.
Video
Notes
- Measuring: as always, I recommend using weight measurements for accuracy (cups aren’t reliable). Cup amounts for flour are based on the typical home baker measurement of scoop and level.
- Storage: keep in a sealed container at room temperature for 2-3 days. They can be stored for longer but will start to dry out or mould after a while. Refrigeration will dry them out quickly.
- Freezing: transfer fully cooled buns to an airtight container and freeze for up to three months. Thaw at room temperature. Freeze the same day they’re baked for best results.
- Flour: If you choose to use whole grain flour, reduce the amount by about 20 grams or add an extra splash of milk and let the dough rest (autolyse) for about ten minutes before starting the kneading process to let the flour absorb the liquid.
- Covering: I usually live in places with very high humidity and rarely have dried out dough, so covering with a tea towel in the oven for the second rise is generally fine. If you’re somewhere very dry, use a damp tea towel and also place somewhere enclosed like the oven. Covering the bowl of dough for the first prove with a towel and a place is usually fine. You can also use something like beeswax wrap under the plate if you want something that keeps in moisture more effectively.
- Heat until just warm: the milk should be just over skin temperature. If it’s too hot, it’ll kill the yeast. Test by touching the milk with your finger – if it feels the same temperature as your skin or just a little warmer, it’s perfect. If it’s too hot, set it aside to cool before stirring in the yeast.
- Rising: the rising time of your dough will depend on a few factors, mostly temperature. Look for the dough to be doubled. If it hasn’t doubled after an hour, you need to give it more time to prove until it has. Rising times are always estimates.
- Cooling: if the buns cool slowly in the baking dish, they can get a little soggy at the bottom from trapped humidity. Cooling them quickly (like in an unheated room in wintertime) is great. If your home is warmer, you can turn them out of the dish and cool on a wire rack instead, but note that the edges will dry out a little bit. To prevent that, you can wrap the buns in a tea towel and then place on a wire rack to cool (the fabric will trap some of that humidity, but not too much).
Nutrition
Nutrition is provided as a courtesy and is an estimate. If this information is important to you, please have it verified independently.

Amazing! So soft and easy to work with, waaay better than I expected with spelt flour!