Make Your Own Homemade Bounty Bars
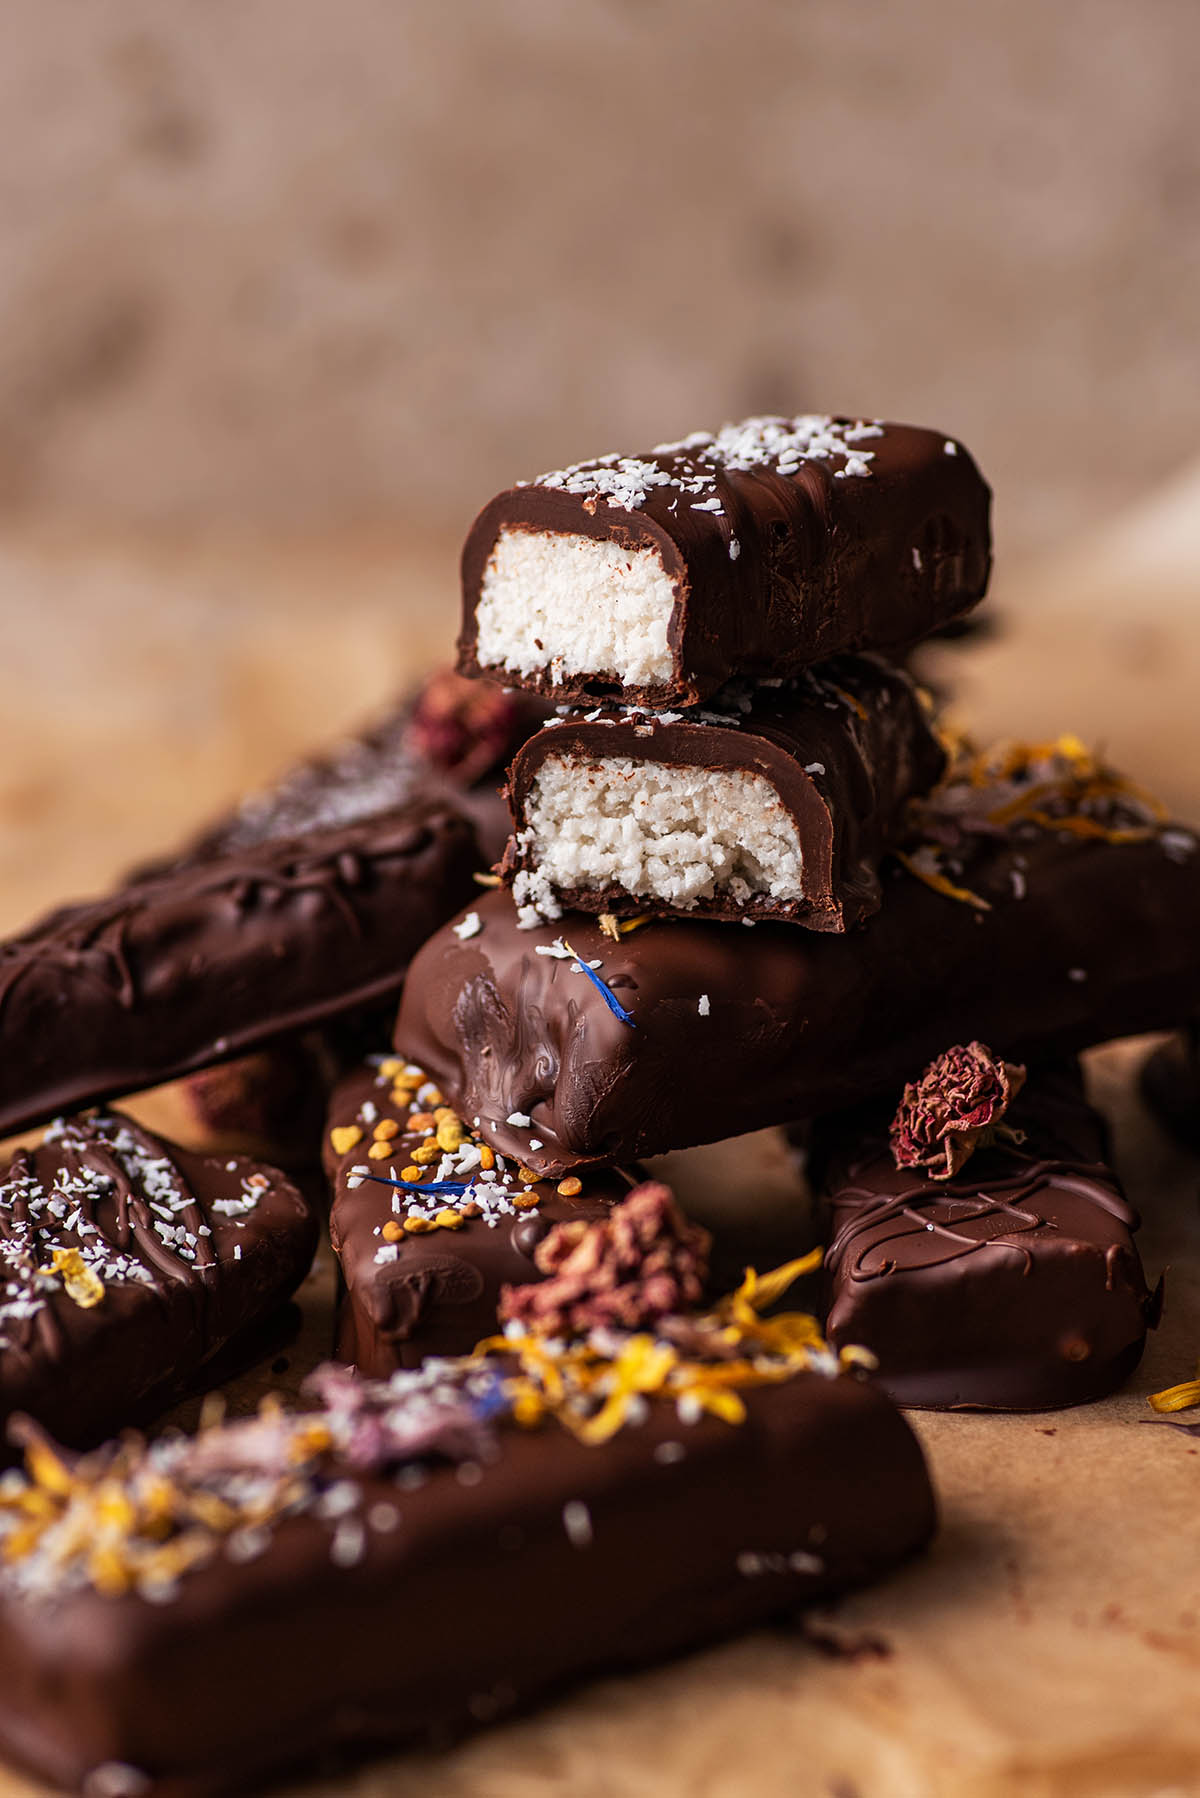
Whether you think of bounty bars or mounds when you hear chocolate coconut bars, this is a lighter version of those candy bars. Sweet coconut filling, dark chocolate coating – but not sickly sweet like the store bought versions.
Bounty was my favourite chocolate bar growing up, but it’s just way too sweet for me now, even the dark chocolate version. This one, on the other hand, is made with some honey (or rice syrup for vegan bounty bars), coconut butter, and unsweetened coconut. It’s still candy, but not so tooth-achingly sweet.
With just seven ingredients total, including vanilla, this is a great recipe to make for a small treat to have on hand and makes excellent gifts. Since the bars are stored in the freezer, they can be made in advance, or just for you to have around. You need coconut butter for this recipe. It can be purchased at most grocery stores, but is easy and cheap to make at home if you have a food processor.

I first shared this recipe in 2016. It’s been updated with improvements to the recipe instructions and slight improvements to the recipe, new photos, including step-by-step photos, and more helpful information.
I don’t use affiliate links. Any links you see here are to other recipes or related information, not paid links.
Ingredients You’ll Need and Why
Essentially, you need three types of coconut – shredded, butter, and oil – plus honey, vanilla, and chocolate to coat. I really wanted the coconut flavour to be punchy here and the bars are made without sweetened condensed milk. These are my notes from a decade of making this recipe and you can find the full recipe card below.
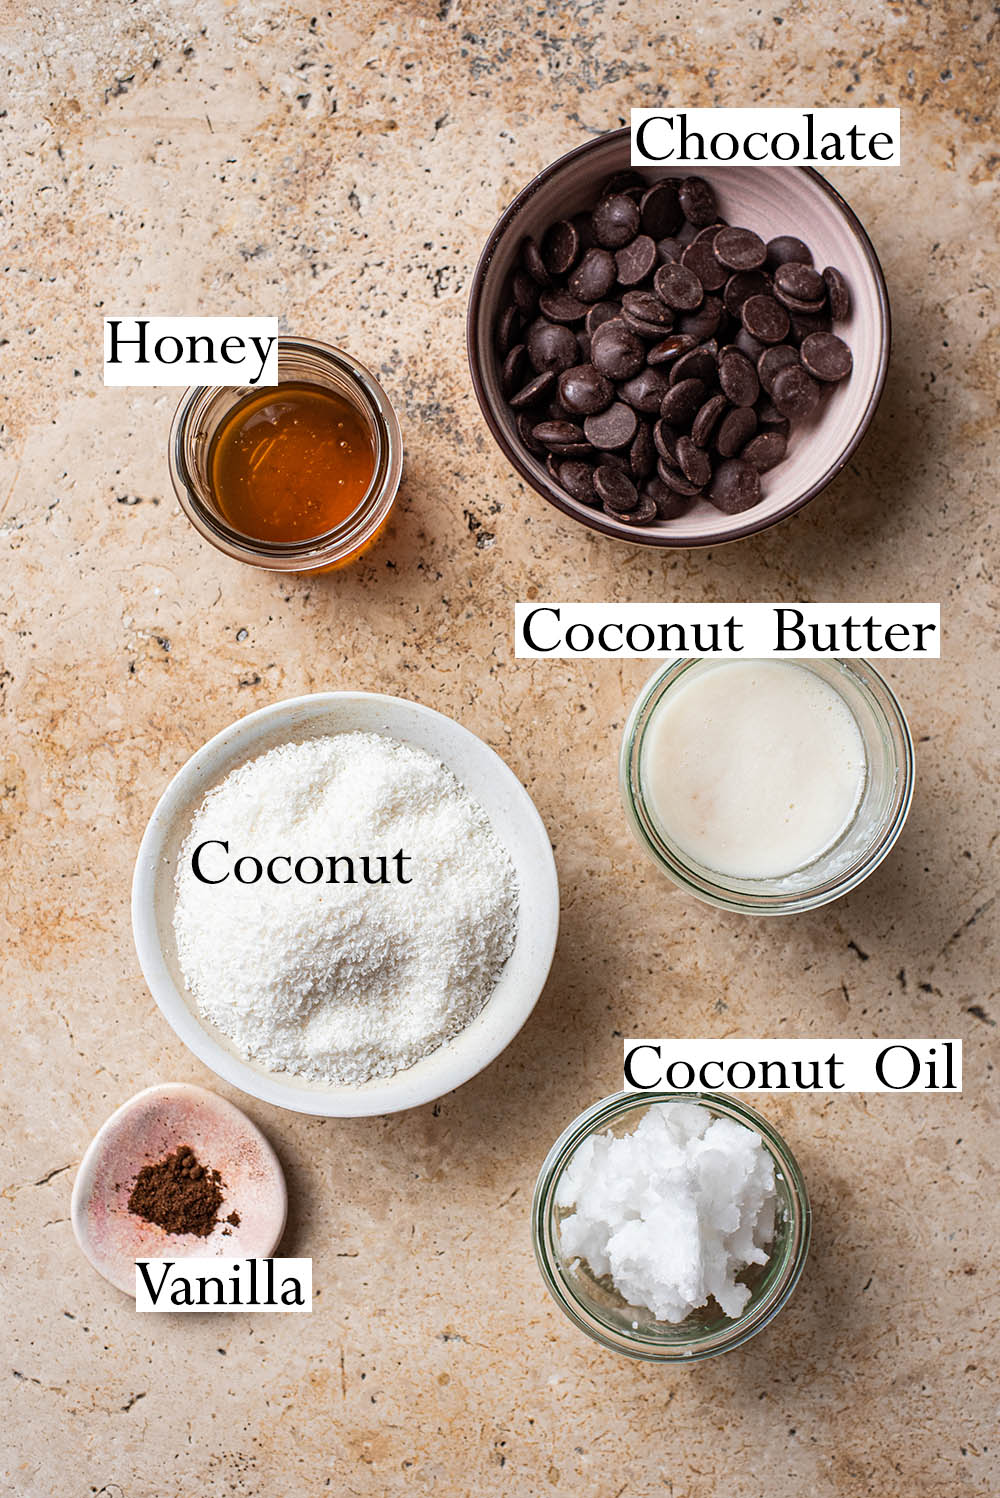
- Coconut: this must be unsweetened, and shredded or desiccated. I recommend desiccated and prefer the smaller shred for this recipe. Unsweetened coconut makes the bars far too sweet and the honey can’t be reduced to make up for it.
- Coconut butter: this helps to bind the bars while also adding a stronger coconut flavour. You can make or buy it but if buying, make sure it’s unsweetened. The only ingredient should be coconut. It’s much less expensive to make yourself.
- Coconut oil: like the butter, it also adds to the taste of coconut and firms up the bars. I recommend using unrefined coconut oil so that you do get a better coconut flavour but refined works in a pinch.
- Honey: this is a big part of what makes the bars stick together, and shouldn’t be reduced or omitted. Brown rice syrup can be substituted for the honey for a fully vegan bar. I don’t recommend other liquid sweeteners because it has to be quite viscous and sticky to work properly.
- Vanilla: pictured is vanilla powder, which works very well, but the recipe has now been updated so that vanilla extract is outlined in the card with powder as a substitute. This is simply due to the easy accessibility of extract.
- Chocolate: any chocolate that melts will be fine. My personal preference is for dark chocolate in bar form or couverture, but chocolate chips are okay, if slightly waxy when frozen.
- Add-ins: this is a minimal recipe and all of the ingredients are vital to its success, but it’s possible to add some things if you’d like. Think along the lines of extra spices or a variety of toppings. Cardamom, cinnamon, freeze dried fruit, things like that.
How to Make Chocolate Coconut Bars
This is a straightforward no-bake recipe, and the important thing is to get the texture of the bars right before freezing the mixture. It needs to hold together when squeezed, and you might need to add a splash of water as outlined in the recipe to ensure that. Coconut butter can be a little too dry sometimes to work as it should – that’s when you’ll need the extra liquid.
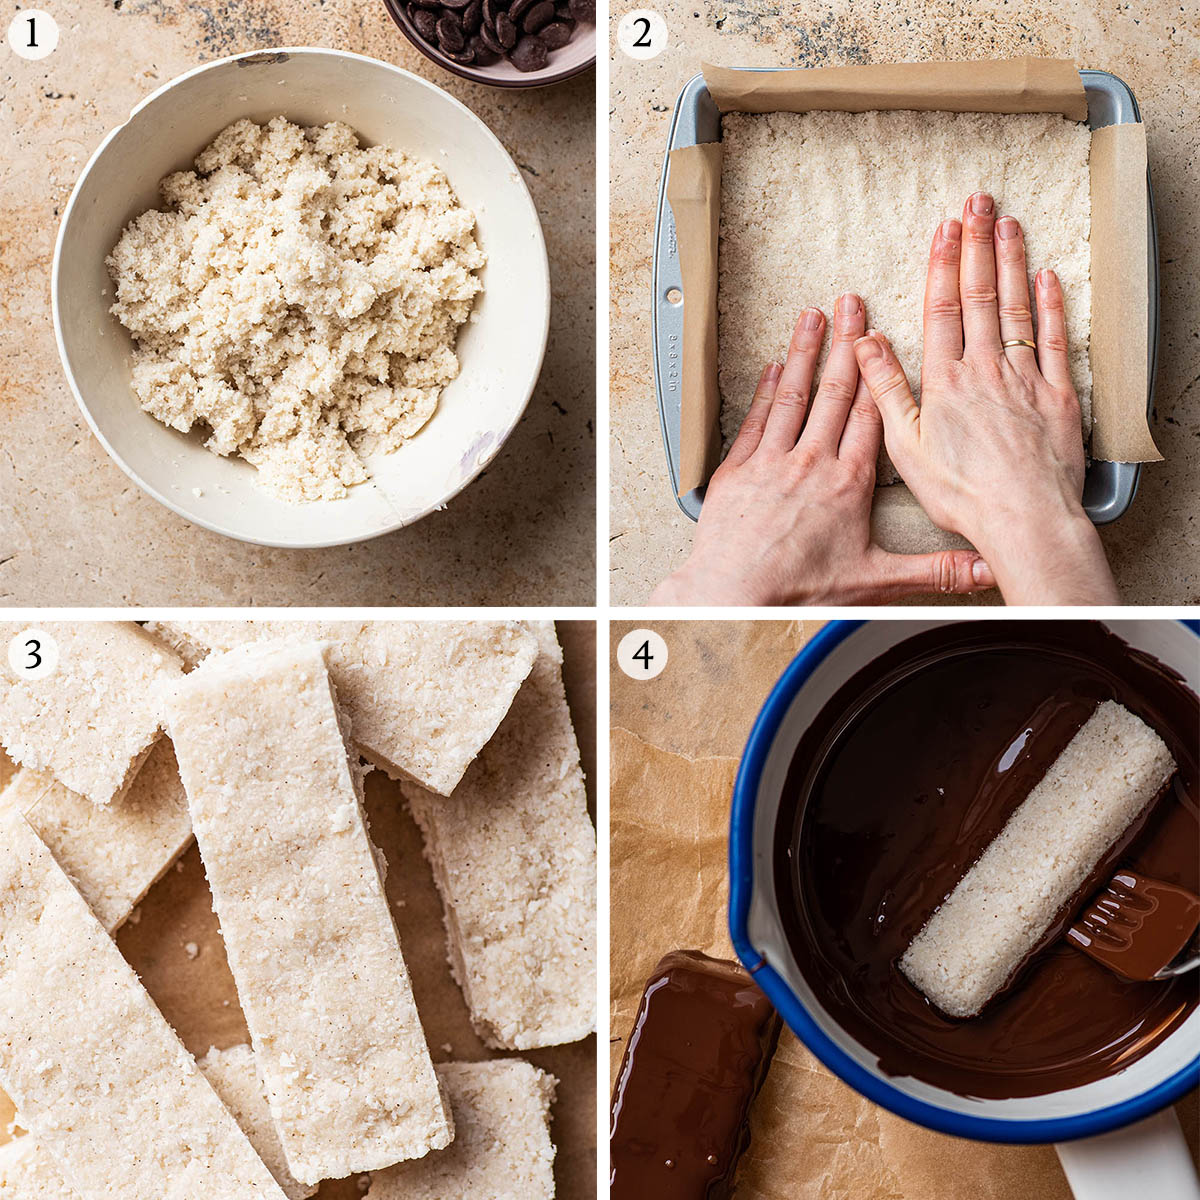
Step 1: mix the coconut, coconut butter, honey, coconut oil, and vanilla in a large bowl. Really get in there with your hands! It should be a consistency a bit like streusel topping or shortbread, where it holds when you press it but otherwise looks crumbly.
Step 2: press the filling into a lined tin, trying to get as even a layer as possible. A 20cm (8 inch) square tin is the perfect size but I’ve also used a bread tin before. The size doesn’t matter so much here because the bars aren’t baked, and you can even make little mounds or balls instead.
Step 3: freeze the bars for at least 20 minutes (or refrigerate for a couple of hours). Once chilled, cut into about ten individual bars. These can be any size you like.
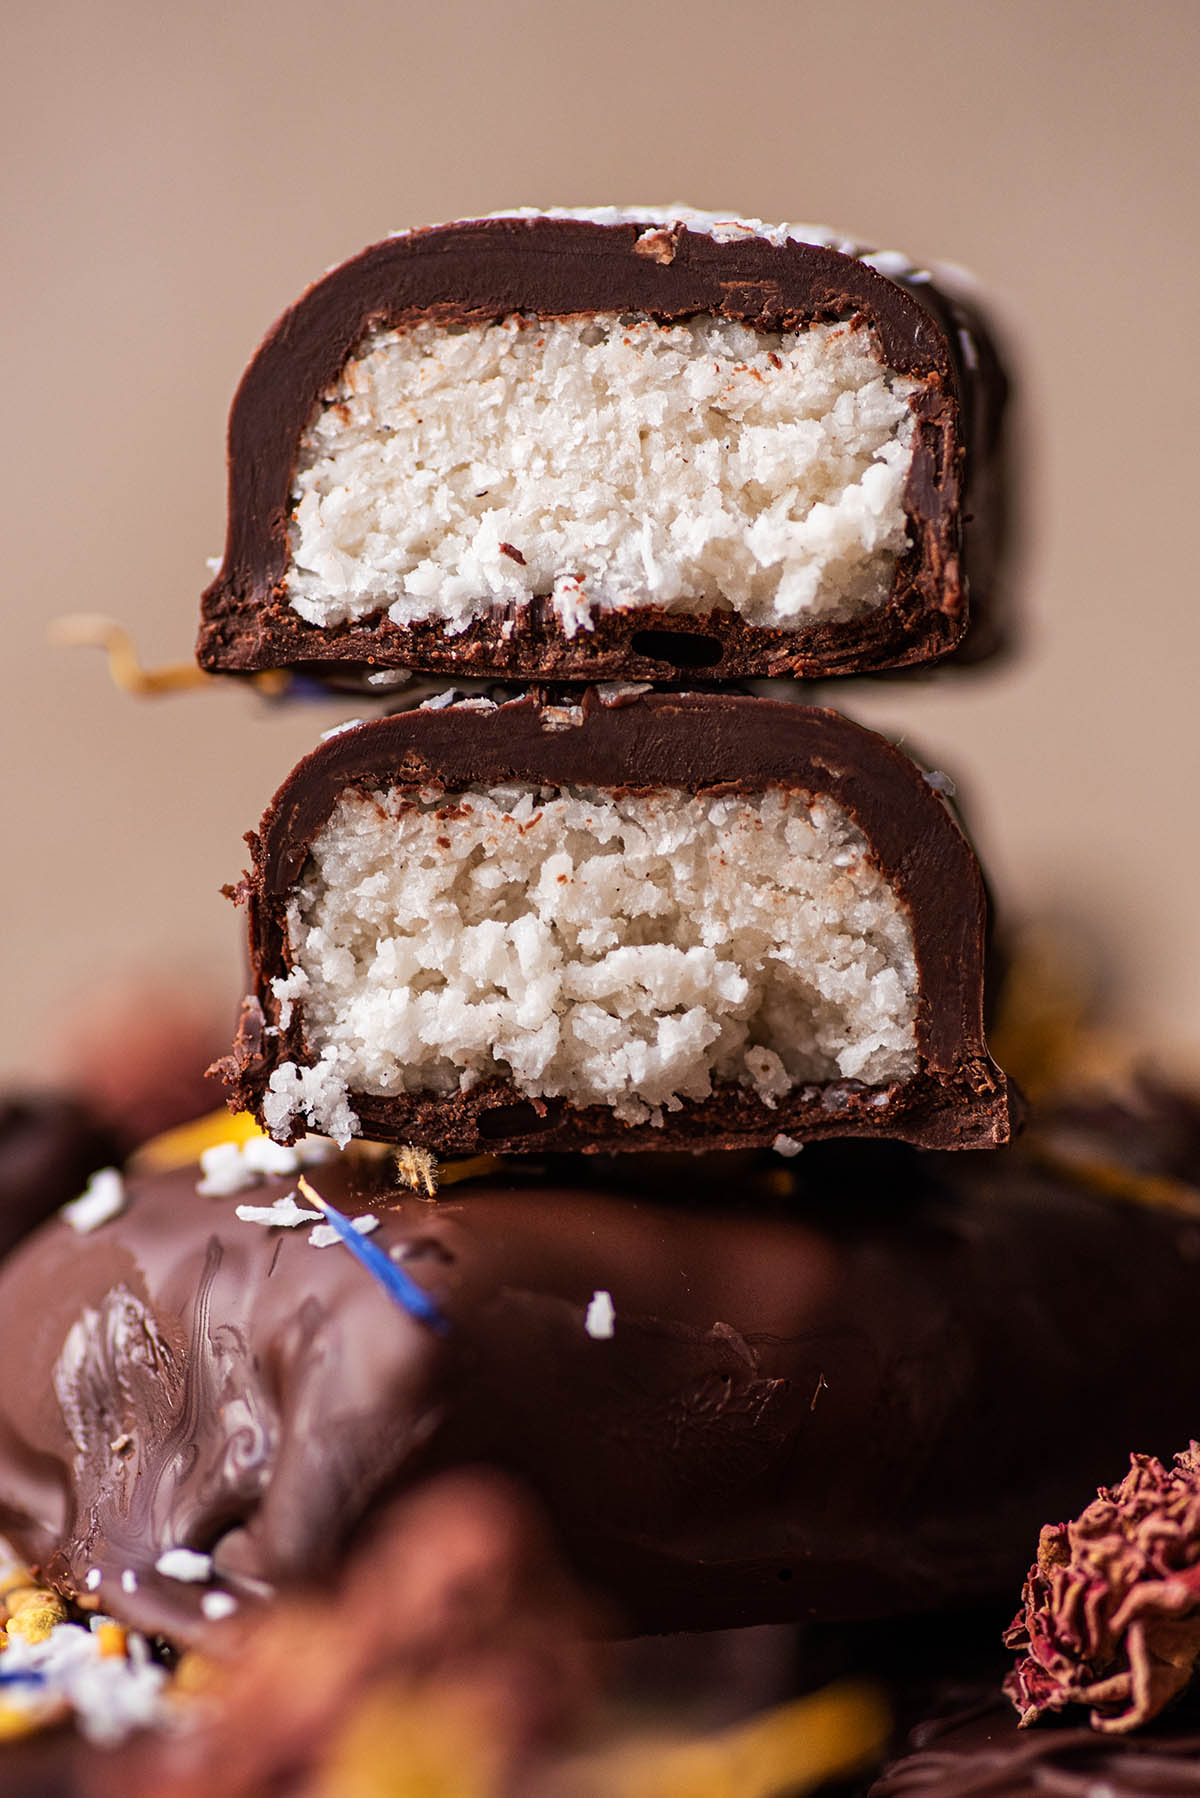
Step 4: dip the frozen bars into melted chocolate, using a fork to flip and lift them. Thin the chocolate with extra oil if you want a very thin layer of chocolate coating on the bars. As written, it’ll be fairly thick. See the cross-section image below showing the cut bar for a visual of this.
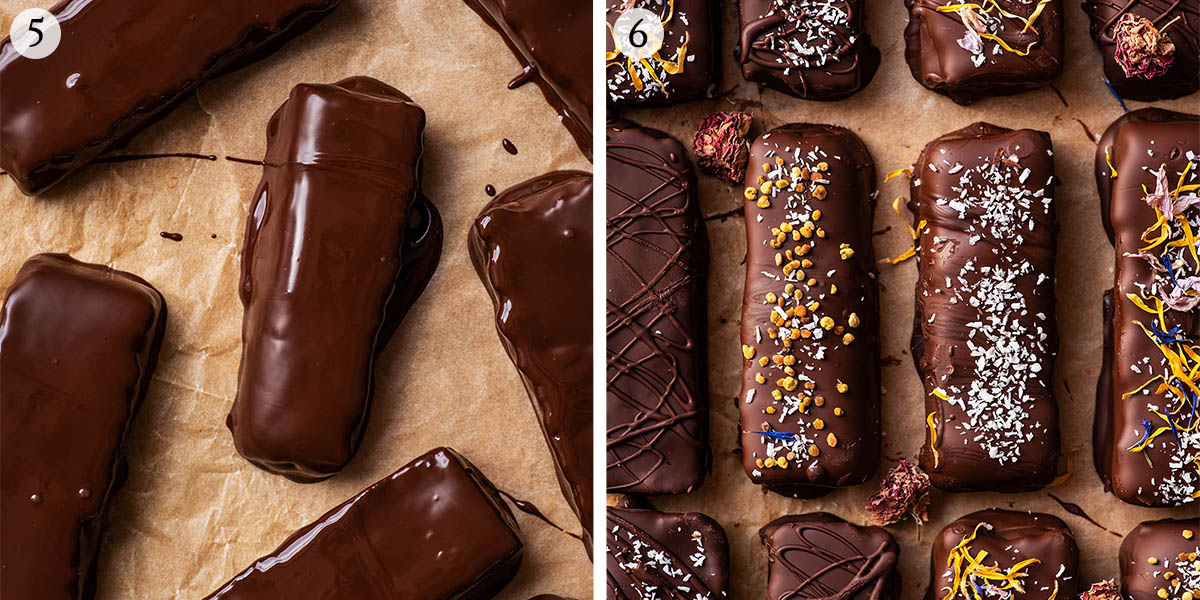
Step 5: place the bars onto parchment paper to set the chocolate. This allows for easy release once the chocolate has hardened, rather than placing on a wire rack or an unlined baking sheet.
Step 6: do a second dip or drizzle extra chocolate, or top the bars with something like more coconut before the chocolate finishes setting. This is optional and decorative only.
Expert Tips for the Best Bars
- Mix well: the recipe card outlines that it may be necessary to add a tablespoon or two of water to the mixture if it’s not coming together. Make sure you mix very thoroughly first, as it does take a minute to come together. Whether you need water will be based mostly on how runny your coconut butter is.
- Slice and freeze again: if your kitchen knives are dull, freeze the filling for 5-10 minutes, slice the bars, and re-freeze for another 15 before dipping in the chocolate. If you have a good sharp knife it should be no problem to cut through the coconut mixture after 20 minutes.
- Chill before dipping: freezing the bars before coating in the chocolate just makes it easier to do. The coconut mixture is harder and less likely to crumble a bit when being dipped in the warm chocolate, and it helps to set the chocolate more quickly.
- Sweeten with chocolate: if you prefer a very sweet bar, you can use a sweeter chocolate to coat – don’t increase the honey, it will prevent the filling from freezing properly.
More Coconut Desserts
Chocolate Coconut Balls – another no-bake recipe, inspired by Swedish chocolate balls
Triple Coconut Bread – also with shredded coconut, coconut milk, and coconut oil, this is a tasty, lightly sweet quick bread
Vegan Coconut Cake – a two-layer coconut cake with vegan ganache frosting
Chocolate Chip Coconut Banana Bread – date and banana sweetened, with no added sugar
If you make these Homemade Bounty Bars or any other vegetarian dessert recipes on Occasionally Eggs, please take a moment to rate the recipe and leave a comment below. It’s such a help to others who want to try the recipe. For more OE, follow along on Instagram, Facebook, and Pinterest, purchase the Occasionally Eggs cookbook, or subscribe for new posts via email.

Homemade Bounty Bars (Chocolate Coconut Bars)
Description
Ingredients
Coconut Filling
- 160 grams (2 cups) unsweetened shredded coconut
- 100 grams (½ cup) coconut butter softened
- 80 grams (¼ cup) honey or brown rice syrup if vegan
- 60 grams (¼ cup) coconut oil softened
- 1 teaspoon vanilla extract or ½ teaspoon vanilla powder
- Up to 2 tablespoons water if necessary
Chocolate Coating
- 150 grams (¾ cup) dark chocolate
- 1 tablespoon coconut oil
Instructions
- Mix the coconut, coconut butter, honey, (softened) coconut oil, and vanilla in a large bowl. Really get in there with your hands! If it’s not coming together, you can add a tablespoon or two of water* so it holds its shape when pressed.160 grams (2 cups) unsweetened shredded coconut, 100 grams (½ cup) coconut butter, 80 grams (¼ cup) honey, 60 grams (¼ cup) coconut oil, 1 teaspoon vanilla extract
- If it’s a touch too dry, add a tablespoon of water and mix again. If it’s still not sticking you can add one more tablespoon.Up to 2 tablespoons water
- Line a square (20cm or 8 inch) tin with two pieces of parchment paper, one in each direction. Press the filling into the lined tin, trying to get as even a layer as possible.
- Repeat until all of the filling has been shaped into bars, and then place the board in the freezer for at least 30 minutes before coating in chocolate. Wet your hands slightly after every 3-4 bars to keep it from sticking to your hands too much.
- Freeze the bars for at least 20 minutes (or refrigerate for a couple of hours). Once frozen, cut into about ten individual bars.
- Melt the chocolate and coconut oil over very low heat or by using a double burner. Dip the frozen bars into the chocolate, using a fork to flip and lift them. Place the coated bars into parchment paper (or a rack if you don’t mind the mess).150 grams (¾ cup) dark chocolate, 1 tablespoon coconut oil
- Let the chocolate harden for a second dip, or top the bars with anything you like. Pictured are edible flower petals, shredded coconut, and bee pollen. An extra drizzle of chocolate is very nice.
- Keep the completed bars in a sealed container in the refrigerator for up to a week, or in the freezer for up to a month.
Notes
Nutrition
Nutrition is provided as a courtesy and is an estimate. If this information is important to you, please have it verified independently.

Hey Alex, I don’t have coconut butter (I know I can make it, but may not have time). Is there another substitute that you would recommend? Or maybe I just bite the bullet in make it. : )
Hi Kris! I’ve never made these without coconut butter, but a mix of applesauce and coconut oil might do the trick if you can’t make it! If you have cashew or almond butter those would work well but they’ll make it into a nutty coconut bar (which is nice too). <3
Thanks Brittany, that's so sweet! Of course, I always try to include a vegan option if the recipe isn't already vegan 🙂 ha, I need lots of help at that time too!
Thank you so much, Nicoletta!
Thanks, Cristina! I hope it goes well and that your chocolate is perfect 🙂
Alexandra, these are my kind of treats! Also, you photography never ceases to amaze me. Your photos have such a dark, velvety delicious quality to them. Absolutely stunning! I've just pinned the recipe!
As usual, your photography is phenomenal Alexandra! I could scroll through your pictures all day.
These bars look delicious. I really appreciate all the information on substitutions and swaps. Thanks for including a vegan option! (And another thanks for the raw chocolate tip for "that time", I need all the help I can get than so I will be trying that for sure!)
Those look HEAVENLY! I find chocolate bars so sickly sweet too, but have always been too afraid of tempering chocolate to make them myself. You make it look so easy, and these are beautiful! I'll have to add them to my list to try!
They look gorgeous, your pictures look gorgeous! I've never liked those kind of treats, even as a kid, way too sweet for my taste buds. But I'd definitely try your version. Love the ingredients you used. And I agree on their mini size. My compliments for such a great recipe!