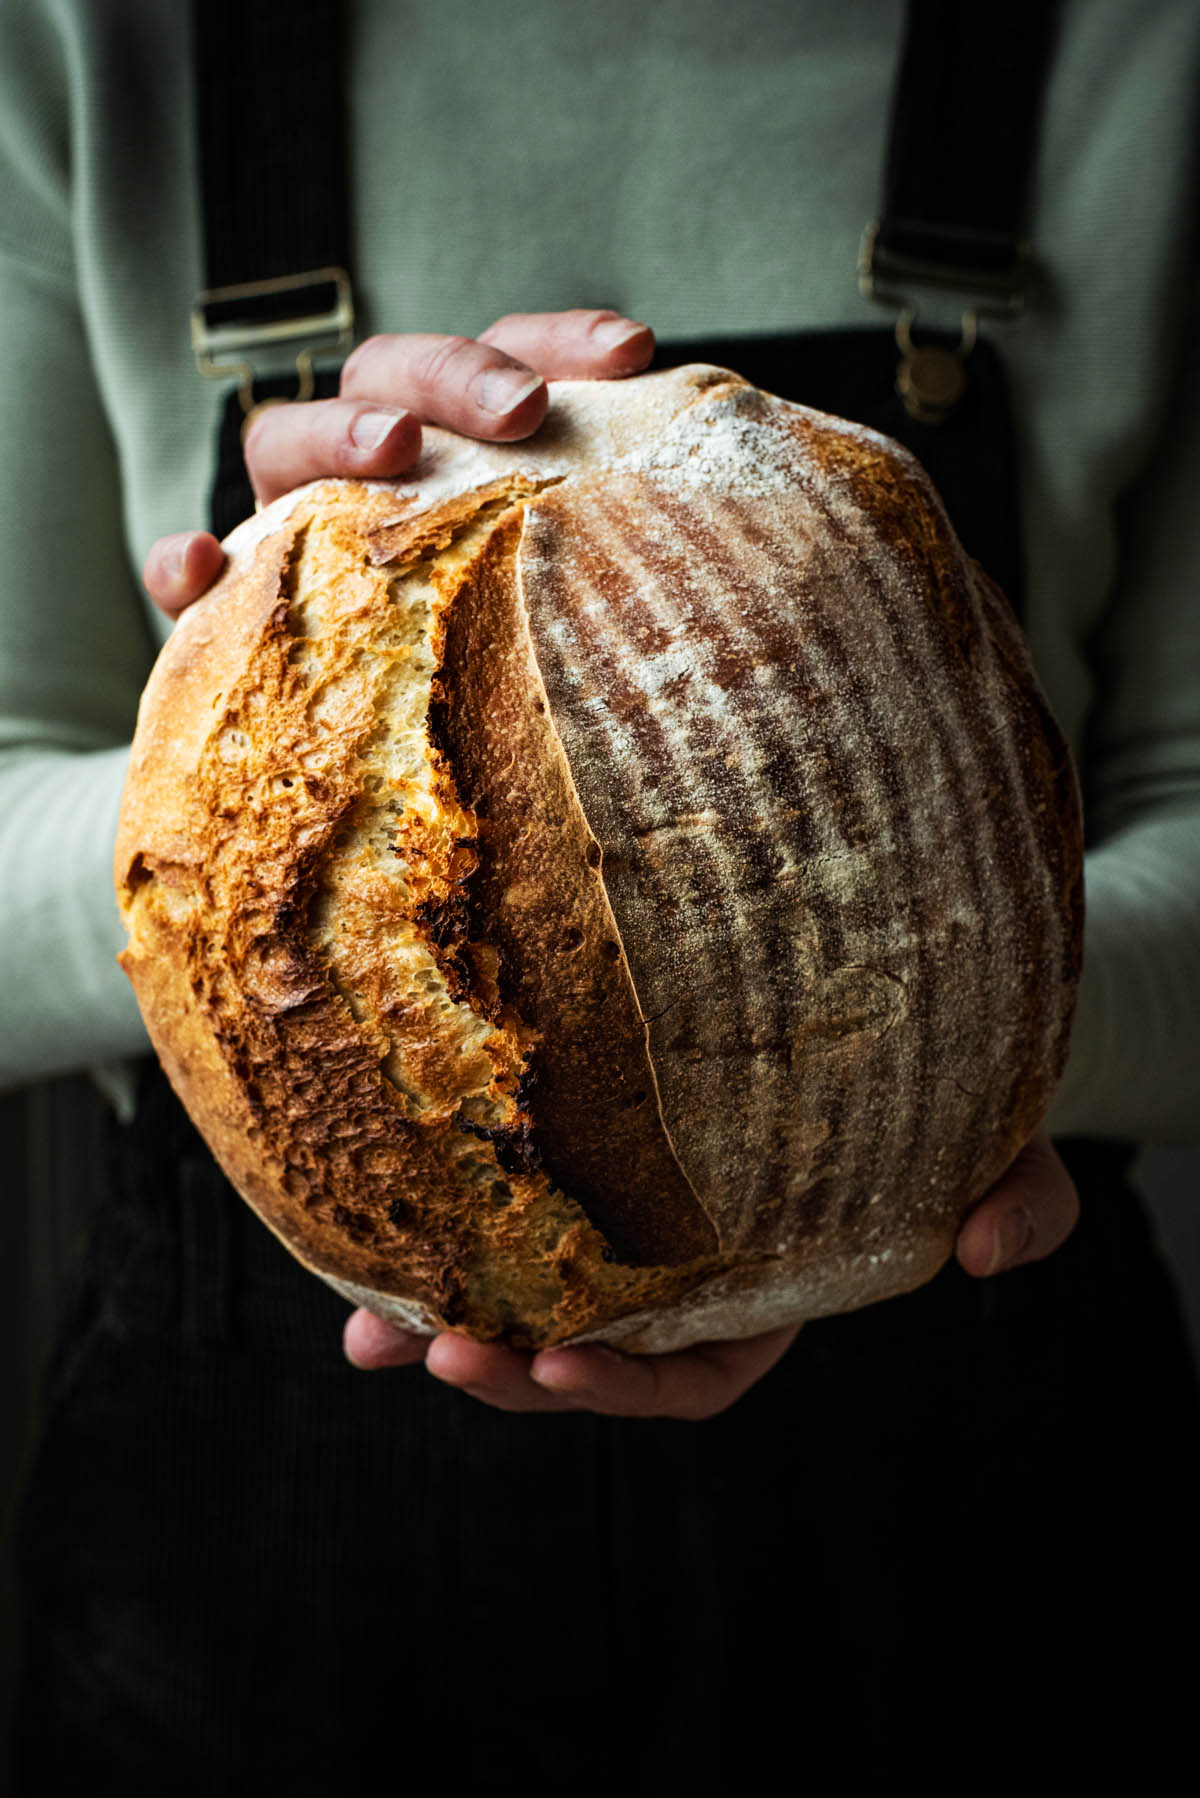
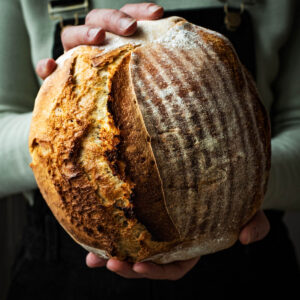
After months of testing in different ovens in Germany, the Netherlands, and Sweden, with different flour types, I’m finally sharing this foolproof fully spelt sourdough bread recipe. This is my go-to bread and I make it a couple times a week.
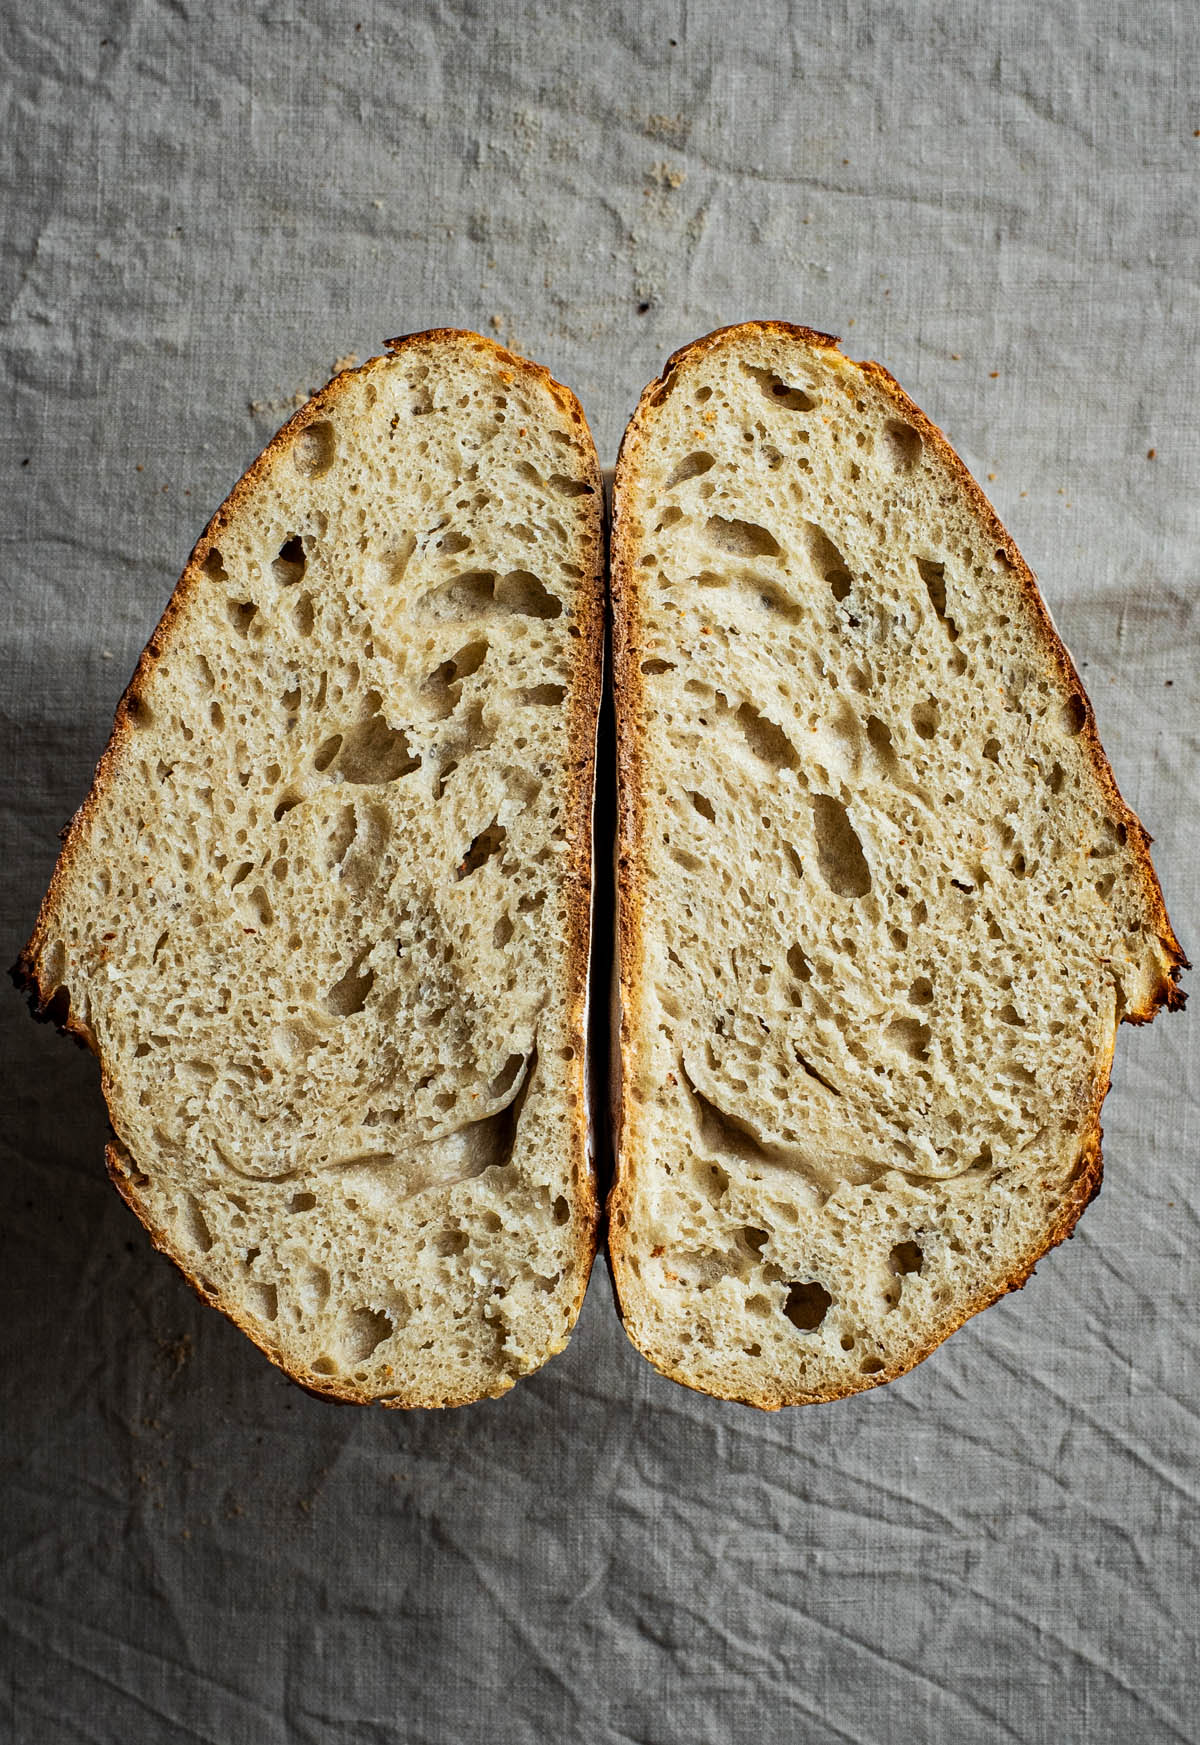
It’s a lower hydration dough, meaning a high ratio of flour to water. Most sourdough recipes made with bread flour seek to use the highest hydration possible for the most open crumb and greatest oven spring. Here, we have a slightly tighter crumb and less extensive oven spring, but an excellent and flavourful loaf.
This is a good daily bread that can hold up to any number of toppings. If you want a more complex, sour flavour, try this sourdough dark rye bread. For something more toothsome, try my honey oat sourdough.
There is a spelt sourdough in my book, but I hope this recipe can provide a straightforward guide for anyone looking to bake more with spelt flour.
One reader, NH, commented: “Perfect recipe, thank you! I’ve been trying to get a perfect spelt loaf and this recipe worked from the first try! The only change I made was bake covered at 270 for 20 min then 220 uncovered for 20 min.”
Another reader, Helen, said: “Love this recipe, works every time. I use 100g wholemeal spelt flour and 450g white spelt. I’m wheat intolerant with IBS and I can eat this bread with no reaction. Thank you.”
Why You Should Try This Recipe
A full spelt sourdough can be a bit tricky to find, and that’s because people expect that pillowy open crumb from sourdough loaves. There’s so much to be said for ancient grains in this oldest form of leavened bread, though, and I hope you can embrace the stronger flavours alternative flours will bring to the table. Not only that, this loaf is also:
- Shockingly easy: even for beginners, this is a truly easy sourdough to make. It’s low hydration, so much less sticky, and easy to shape as a result.
- Sourdough lasts longer: this loaf still tastes great after a week and doesn’t dry out as quickly as yeasted bread does. The crust might get a bit harder but that’s it.
- It’s a good basic bread: this is my go-to for anything from sandwiches to french toast, as it is so easy to make and use.
Ingredients
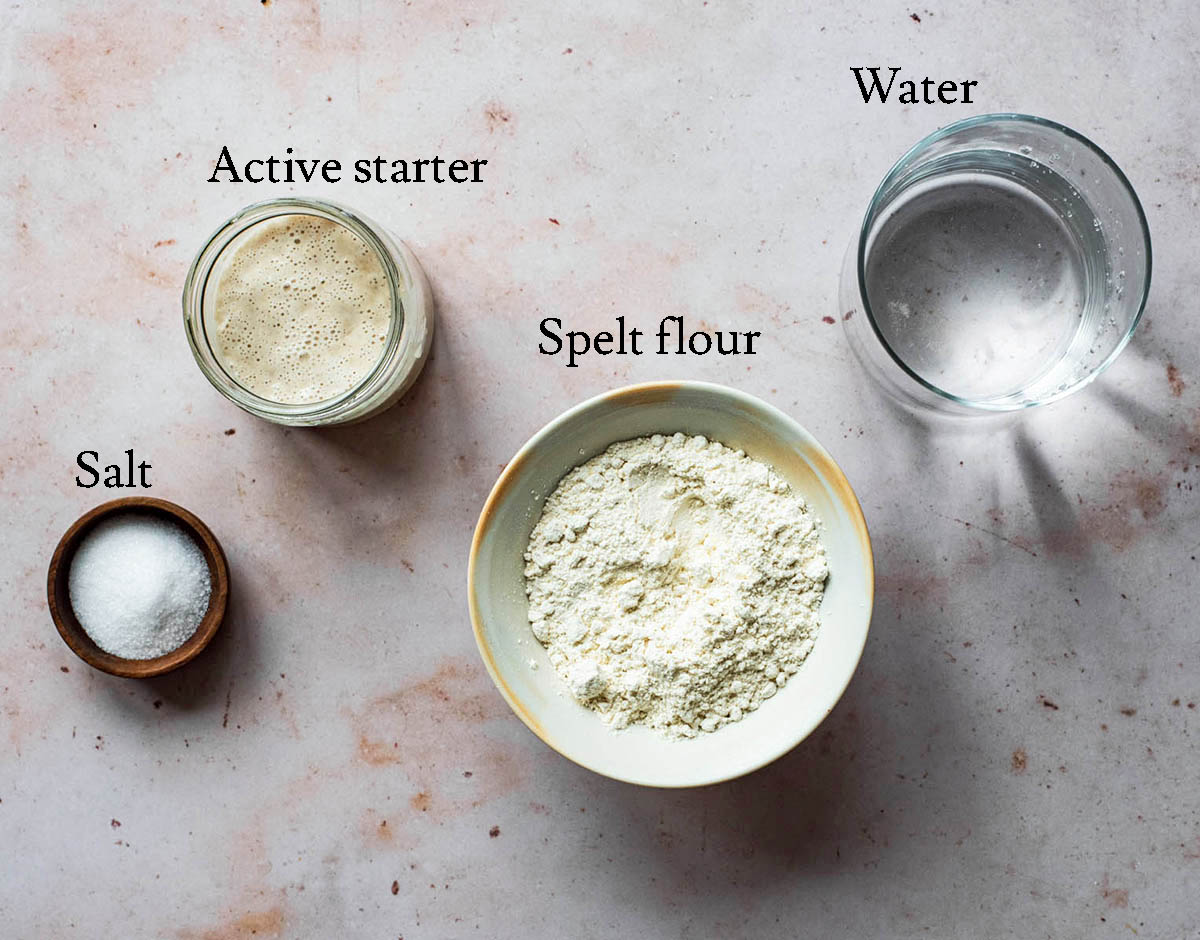
Ingredient Notes
- Spelt Flour: light or sifted the first time, and then experiment with adding whole grain. See more on this below.
- Sourdough Starter: any kind of starter can be used for this recipe, as long as it’s 100% hydration (using equal parts flour and water). Levain can also be used.
- Salt: fine grain sea salt. Don’t change the salt amount used, it’s necessary for proper gluten development.
Step by Step
1. Mix the starter: add the active starter to water in a large mixing bowl. The starter should float.
2. Add the flour: mix in the flour(s) and salt to form a shaggy dough.
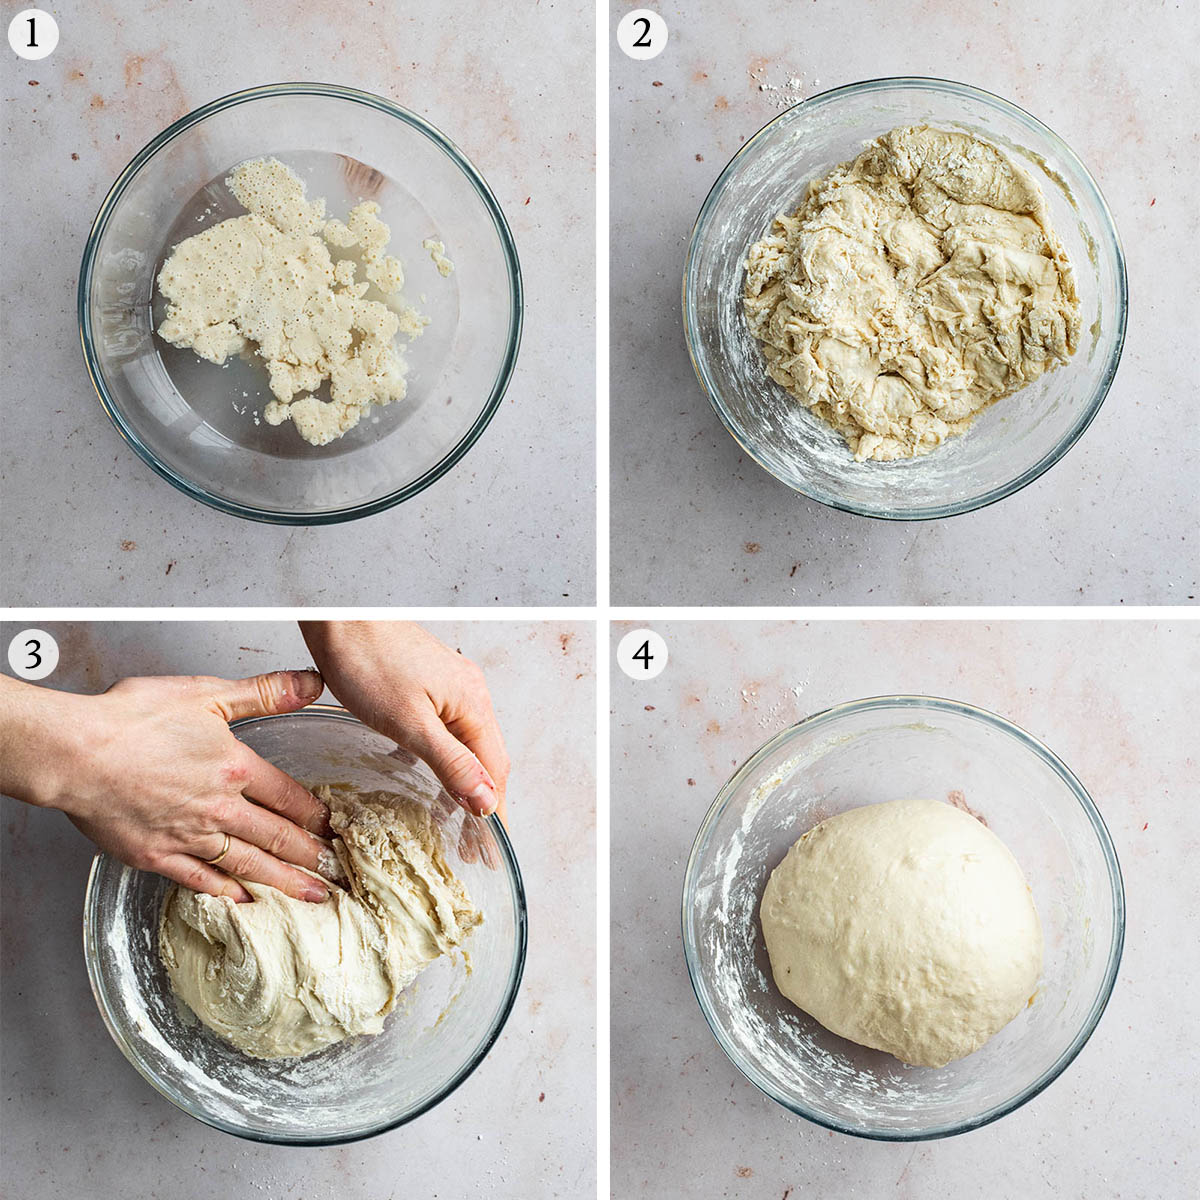
3. Stretch and fold: do three rounds of stretches and folds.
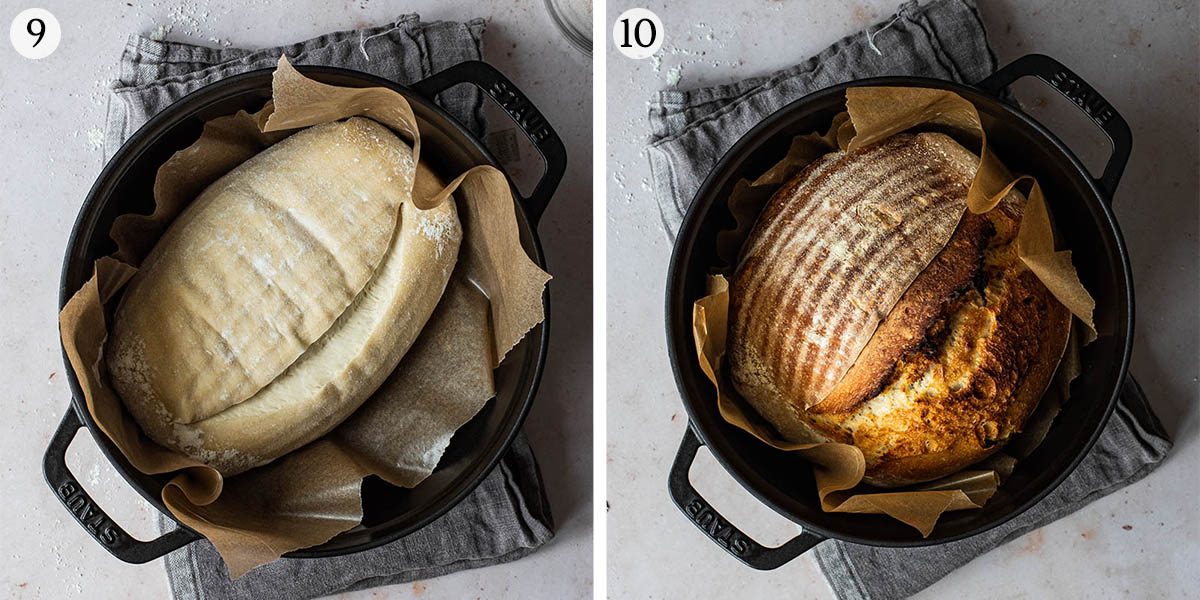
4. Shape: after folding, the dough should be smooth and rounded.
5. Form a boule: use your hands to rotate the dough into a boule or ball with surface tension.
6. Place in the basket: seam side up into a lined and floured banneton.
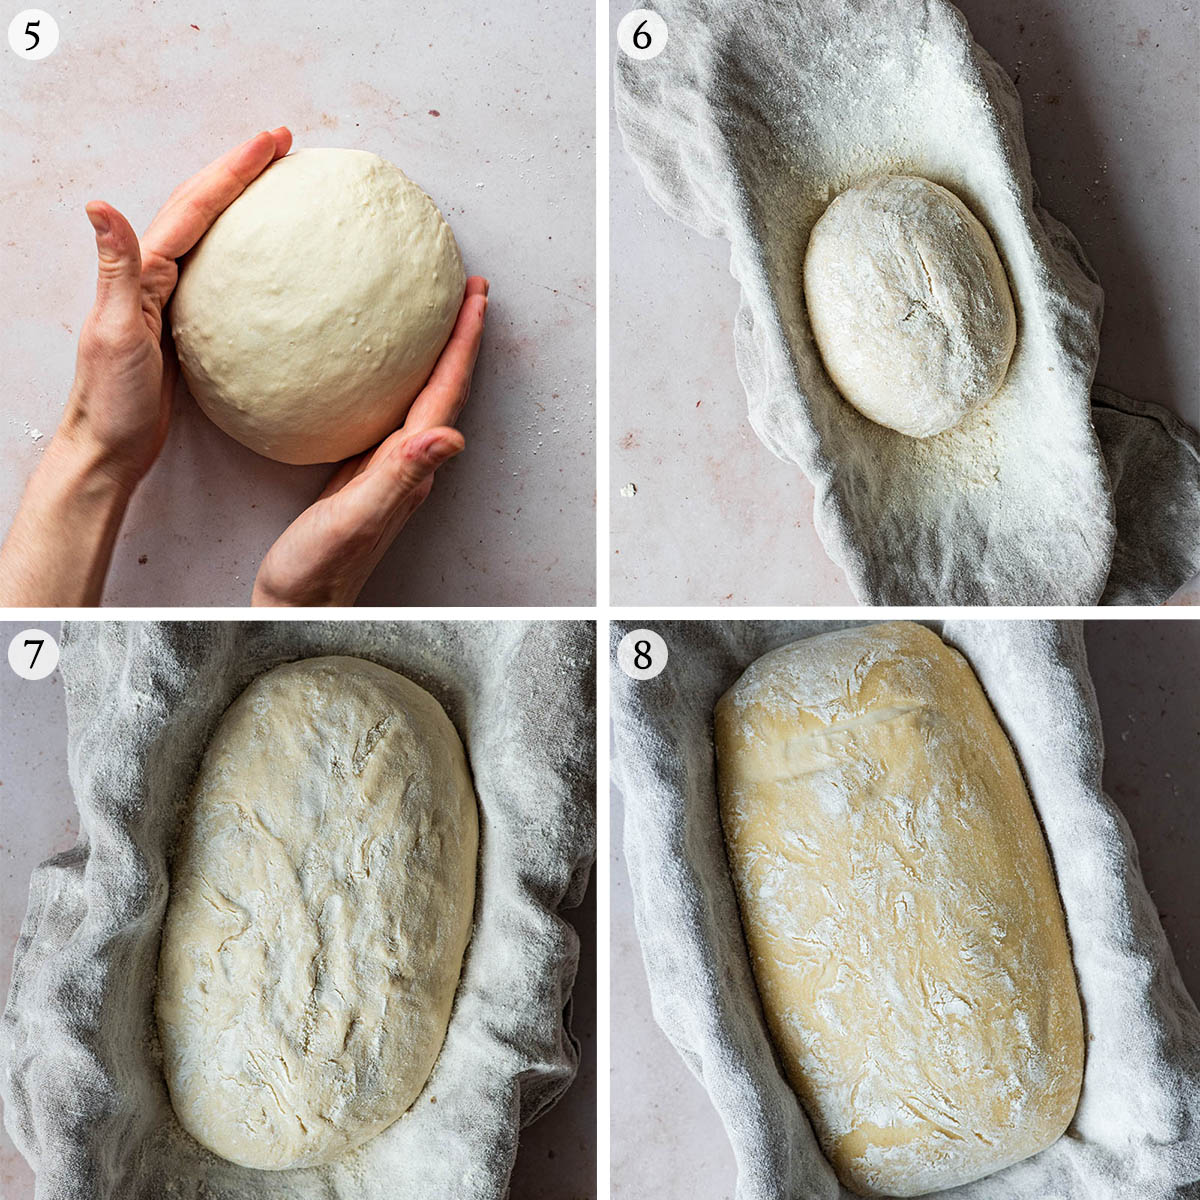
7. Rise: set aside to rise, covered, for a couple hours at room temperature.
8. Ferment: chill overnight to allow the bread to finish rising and ferment longer.
9. Score: turn the dough out onto parchment and score it. Place into the preheated pot.
10. Bake: for about 40 minutes. Cool fully before slicing.
If you can’t see the recipe video in this post, please watch it here.
Recipe Notes
If you’re unfamiliar with the terms used, please see our post on how to stretch and fold sourdough bread over at the Baked Collective.
You can use a round proving basket if preferred. I like the batard shape more for this loaf as it is fairly small and the oven spring is better in the batard form.
If your oven can’t reach the temperature required for this recipe, or you don’t have a dutch oven, you can bake the bread as a sandwich loaf. Simply shape into a log, prove in a standard loaf tin, and bake at 200°C (400°F) for 40 minutes once the refrigeration time is finished. See this honey and oat bread for a visual representation.
I did experiment with baking this from cold (not pre-heating the pot). It’s possible if you are concerned about handling the very hot dutch oven, but the end result isn’t as good.
Because this is a low hydration dough, there’s no point in shaping by rolling/pressing the dough before forming the boule. Simply turn until surface tension forms, but be careful not to break the tension.
There are no substitutions for this recipe.
Expert Tips
- Line the banneton: spelt has a tendency to stick to even the most seasoned basket. Line with a linen towel and sprinkle with flour to ensure a good release.
- Don’t over shape: this is a lower gluten bread and will tear more easily during shaping. A quick shape to make it round is enough, don’t rotate it too much.
- Room temperature first: I know it seems a bit finicky, but the short rise at room temperature is necessary for the proving to be successful. If you refrigerate immediately, the dough will be under proved. This has been extensively tested.
- Think about flour: I have only had good success for this particular bread when using a maximum of 50% whole grain flour. This can be spelt or another whole flour – in the video, I used part Graham flour (coarsely milled wheat). The first time you make this recipe, I highly recommend using all light spelt flour as it’s much easier to work with and will produce a consistently good loaf.
- Cool fully: all sourdough loaves should be fully cool before slicing to avoid gummy bread. This is especially true for those made with lower gluten flours like spelt.
More Spelt Flour Recipes
Spelt Pretzels
Spelt Sourdough Pizza Dough
Sourdough Rye and Spelt Crackers
Spelt Banana Bread
Most of the baking recipes (unless gluten-free) on OE are made with spelt flour – see a comprehensive collection here.
If you make this Sourdough Spelt Bread or any other bread recipes on Occasionally Eggs, please take a moment to rate the recipe and leave a comment below. It’s such a help to others who want to try the recipe. For more OE, follow along on Instagram, Facebook, and Pinterest, purchase the Occasionally Eggs cookbook, or subscribe for new posts via email.
Spelt Sourdough Bread
Description
Ingredients
- 300 grams (10.6 oz) water room temperature
- 100 grams (3.5 oz) active sourdough starter
- 550 grams (19.4 oz) light spelt flour also called sifted or white spelt
- 10 grams (0.35 oz) fine sea salt
Instructions
- Add the water and starter to a large mixing bowl and whisk to combine.300 grams (10.6 oz) water, 100 grams (3.5 oz) active sourdough starter
- Add the flour and salt to the bowl, and use a wooden spoon or spatula to mix until a shaggy dough forms. Finish mixing with your hands to fully incorporate the flour.550 grams (19.4 oz) light spelt flour, 10 grams (0.35 oz) fine sea salt
- Cover the bowl and set aside to rest for 30 minutes.
- Once the dough has rested, begin your stretches and folds. Do three rounds of stretches and folds over the course of an hour, once every 20 minutes.
- Form the dough into a ball or boule by placing it onto a clean surface and using your hands to rotate until surface tension forms.
- Line a proving basket with a tea towel and sprinkle with flour. Place the dough upside-down into the prepared basket.
- Cover and set aside to rise at room temperature for three hours. The dough should visibly rise during this time. If it hasn't, let it rise for longer at room temperature (see pictures 6 and 7 in the step-by-step section above).
- Place the dough into the refrigerator overnight, or for at least eight hours and up to 24 hours.
- Place a heat-safe dutch oven into the centre rack of your oven and preheat the oven to 240°C (465°F). The oven must be this hot and the dutch oven preheated for the bread to turn out properly.
- Turn the dough out onto a piece of parchment paper and score with a sharp knife.
- Carefully remove the dutch oven and place your loaf into it, using the parchment paper as handles to lift the bread.
- Bake for 20 minutes with the lid on, then remove the lid and reduce the temperature to 220°C (425°F) and bake for another 15-20 minutes, or until browned to your desired degree.
- Remove from the oven and cool in the pot for ten minutes before carefully removing the bread and cooling fully on a wire rack. It must be completely cool before slicing.
- I recommend storing it in the pot you've baked it in, or freezing individual slices and toasting to thaw.
Video
Notes
Nutrition
Nutrition is provided as a courtesy and is an estimate. If this information is important to you, please have it verified independently.

I am following a low FODMAP diet and wanted to try making a spelt sourdough. Although my starter is new, this turned out WAY better than I expected! I used 100% white spelt from a local mill in my state. I think I might try adding a little more water next time, but followed the recipe exactly. Mine was not quite as open of a crumb as pictured here, but still great. I added a little fresh rosemary and fennel seeds when combining ingredients. We will try your pizza dough next!! Thank you for developing such a robust recipe!
I usually let my sourdough proof in a bowl not the basket. First time trying with spelt though so does having it period in the basket help keep the structure better
Hi Jodi, it’s just a different method, where the bulk ferment takes place in the refrigerator after shaping the dough. I do find that spelt sourdough tends to slump more easily if proved in the bowl overnight and then shaped.
I made this using my whole meal spelt starter. The loaf turned out really well and had a lovely flavour. I’ve had issues making spelt sourdough before but this is a great recipe that I’ll be using from now on. Thank you.
I have been making traditional sourdough and use a proofer. I am transitioning to all spelt. Is there a reason for the refrigeration? I don’t understand this step.
Hi Katrinka, it’s an adaptation of Tartine’s method and a common bakery method. You can consider the refrigeration period to be the bulk ferment. It improves the structure and flavour of the loaf.
Great. Thank you!
I haven’t tried this recipe yet but I am going to. But I do have a question regarding sour dough bread. Can I substitute 1/4 white bread flour for the Spelt flour? Just curious as I have lots of white bread flour and would like to use it up. Thanks.
Hi Barbara, I haven’t tested it, but I think you’d be fine using a bit of bread flour in this recipe. You might need to reduce the total amount of flour slightly.
Hello Alexandra 🙂
I just wanted to thank you for this wonderful recipe. I’m new to sourdough baking, and because of health issues I use only spelt flour—so your website is a true treasure for me 💛
I baked my first bread using this recipe and it turned out great. I’ve just finished my second loaf, and it looks even better! I can’t wait to cut it and see the crumb 😄
I was a bit worried because I forgot to stir the starter with water first and started adding the flour right away. I stopped midway, mixed everything well, added the rest of the flour, and kneaded by hand a little longer. Fortunately, it seems everything turned out just fine!
Thank you again—I can’t wait to try more of your spelt recipes!
Have you got a recipe for the starter please and how to activate it
Hi Becky, I use the rye starter recipe linked in the recipe. Just give yourself enough time that the starter is fully active and strong enough to bake bread with before trying this recipe.
Hello Alexandra
I live in South Australia and hadn’t been able to buy Spelt bread since floods in Queensland wiped out the Spelt fields. I have just found in Adelaide Central Market organic white and wholemeal Spelt which I can buy in bulk.
I made my starter with organic wholemeal , had no problems with starter rising however it wouldn’t pass the float test further research suggest it irrelevant due to use of flour choice so will make my first loaf later this evening.
So looking forward to Spelt bread again.
Thanks for your insightful recipe.
Phil.
Hi Phil, thanks for your comment. I hadn’t heard about the spelt shortage there but happy you were able to find some flour now. Quite right, wholemeal flour starter tends not to float even when it is strong – I see this with my rye starter too. I hope you like the bread and please let me know if you have any questions.
Thank you for this recipe! I bake at least 1 loaf per week. Question, can I use millet flour instead of spelt when it’s time to bake?
Hi Nancy, I’m very glad to hear it. If you mean for handling the loaf, dusting the banneton, things like that, then I don’t see why millet flour wouldn’t work.
Thank you for this amazing recipe! It’s so easy and the bread is so delicious! I follow it exactly as written.
My dough was really sticky to work with, I used only white spelt. Is that normal? Just finished baking and looks good. I haven’t tasted it yet. But I love the clear instructions written and the summary notes above, very helpful for me as a beginner.
Hi Yosefa, sourdough in general is stickier than yeast bread, but wetting your hands before doing any stretches and folds should help. By the time you’re done with the stretches the dough should be a lot less sticky and easier to work with. I hope you liked the taste of the loaf and the more you make the better it’ll get!
This recipe is wonderful. It made the best loaf and will be my go to!
Hi. Is there any way to make this into a cinnamon raisin bread?
Thanks
Hi Monique, I haven’t tried it, but I don’t see why not. I would follow the raisin instructions on our recipe for cinnamon raisin sourdough bread (soaking the raisins and adding them before you start stretches and folds) but stick to the flour and water amount outlined here. I think it would be fine. Note that the rising time will probably be a little slower because cinnamon slows it down.
I’m so excited about this recipe as I have a friend who has requested spelt flour sourdough for dietary reasons, however two questions:
1. In your video, it seemed like you used another white flour as well, yet your recipe says 100% spelt flour. Can you explain?
2. The dough is EXTREMELY stiff. I usually use a combo of mostly bread flour and a small percentage of whole wheat, but this was another level of stiff. I knew to expect if to be stiffer, but I’m wondering if that’s normal? Or should I use more water? Last time, I added more water and it was still very dense but at least more pliable. This time, it remained hard to stretch and tire easily when doing folds. What do you recommend?
Again, I will say that I was a bir confused because in your video you seemed to use different flour in addition to the spelt so i was wondering how I’m to achieve the same results if the recipe isn’t actually for 100% spelt.
Hi Arliss, this is mentioned in the post – the video bread is made with light (sifted) spelt flour, as outlined in the recipe, and a portion of coarsely milled whole grain flour (see the expert tips section). I don’t use white or all-purpose flour in any of my recipes. It is normal for the dough to be stiff, as you can see in the video. I work exclusively with ancient grains and due to their lower gluten content, lower hydration is needed for a successful loaf in a home oven. It’s not comparable to bread flour sourdough recipes and that comparison is where you’ll start running into problems. The key for this and any of my other ancient grain sourdough recipes is to prove correctly. I get this comment with some frequency re: the video and have answered that question several times. I regret using a mix of light spelt and whole grain in the video but it really is made with spelt flour.
I absolutely love this spelt sourdough bread recipe and cannot recommend it highly enough. Have you got a rye sourdough one too?!
Hi Sarah, I’m so glad you like the bread. I have a couple of rye sourdough recipes: this spelt blend sourdough rye bread and this dark rye bread.
Do I bake the bread right after removing from the fridge or do I let it get to room temperature first?
It’s baked right from the fridge, but make sure your Dutch oven is very hot. If you want to bake with a cold Dutch oven (still preheat the oven) you should let it come back up to room temperature first.
Taste is good but my loaf came out dense and heavy. I used 100% white spelt flour as per instructions. I noted though that in the video you use two different flours? Is that the difference between the picture of bread? What flour should I use with spelt and how much?
Hi Christine, if your loaf is coming out dense, it will be due to under-proving it. In the video, as I have described in the post, I use a mix of whole grain flour and light spelt flour (no white flour). If anything, this should make the loaf more dense, but as you see in the video, it isn’t – because it has been given enough time to prove as outlined in the recipe. I am planning on making a longer real-time video soon as some readers seem to have some difficulty understanding the process needed for a lower hydration dough like this. To be clear, you should use 100% light spelt flour and be sure to prove the dough before refrigerating, until it has risen as pictured.
mixed the dough and it was incredibly dry. When I tried to stretch and fold, it was not happening. I added a bit more water and will keep trying. Not sure what I may be doing different but maybe it is the spelt flour? Any insight is appreciated. Thanks
Hi Carla, did you see the video, and how the dough is pretty dense for the first stretch? The dough will relax as you keep going – but make sure you let it rise until it’s puffy as pictured before refrigerating.
I had to add 60g basinage water. Just for other people to know. Some flours might need more water 🙂
I just made this bread and although it seems better than my other loads, it’s still too dense and really sour tasting. Can you help me determine what I’m doing wrong and how to fix it ?
Hi Fran, it sounds like the issue might lie with your starter. A newer starter will have less well-risen loaves and can impart that more sour flavour. Those problems might also be due to over-proving (if your home is warm, for example, which it may well be at this time of year). What age is your starter? Do you know how to do a finger poke test for sourdough? You might find our guide on troubleshooting sourdough to be helpful as well.
My spelt sourdough came out really nice and soft with this recipe! Thank you so much. It also fit perfectly in my Chinese ceramic pot that I use as my “Dutch oven” replacement! I used 1/2 of all the ingredients for my pot size.
Thanks for the 100% spelt flour recipe. Would it be possible to use organic sprouted spelt flour instead of the light spelt you used?
Hi Jen, it’ll be a little trickier to work with, but you can certainly get a nice loaf out of it. I make this every few days and usually use whole grains, but light spelt is easier for beginners. If you want a ‘typical’ sourdough bread, you won’t get that with 100% sprouted spelt, but if you don’t mind it being a little more dense, it’s a great option.
Came out wonderful! Thank you
I found this dough really difficult to work with. It stuck to my hands and the bowl so badly, and it was so sticky and impossible to shape before putting in the proofing basket. Not sure where I went wrong. I used white spelt flour and followed the recipe exactly.
Hi Amy, sorry to hear that. I do recommend wetting your hands before handling the dough as with any sourdough. The dough shouldn’t be very sticky if you kept the amounts as written, but it could be to do with ambient humidity in your home. As it’s a low hydration dough it should be much less sticky than standard white flour sourdough recipes but elements like humidity, how the flour was milled, starter, and so on can all play a big role in how the dough behaves.