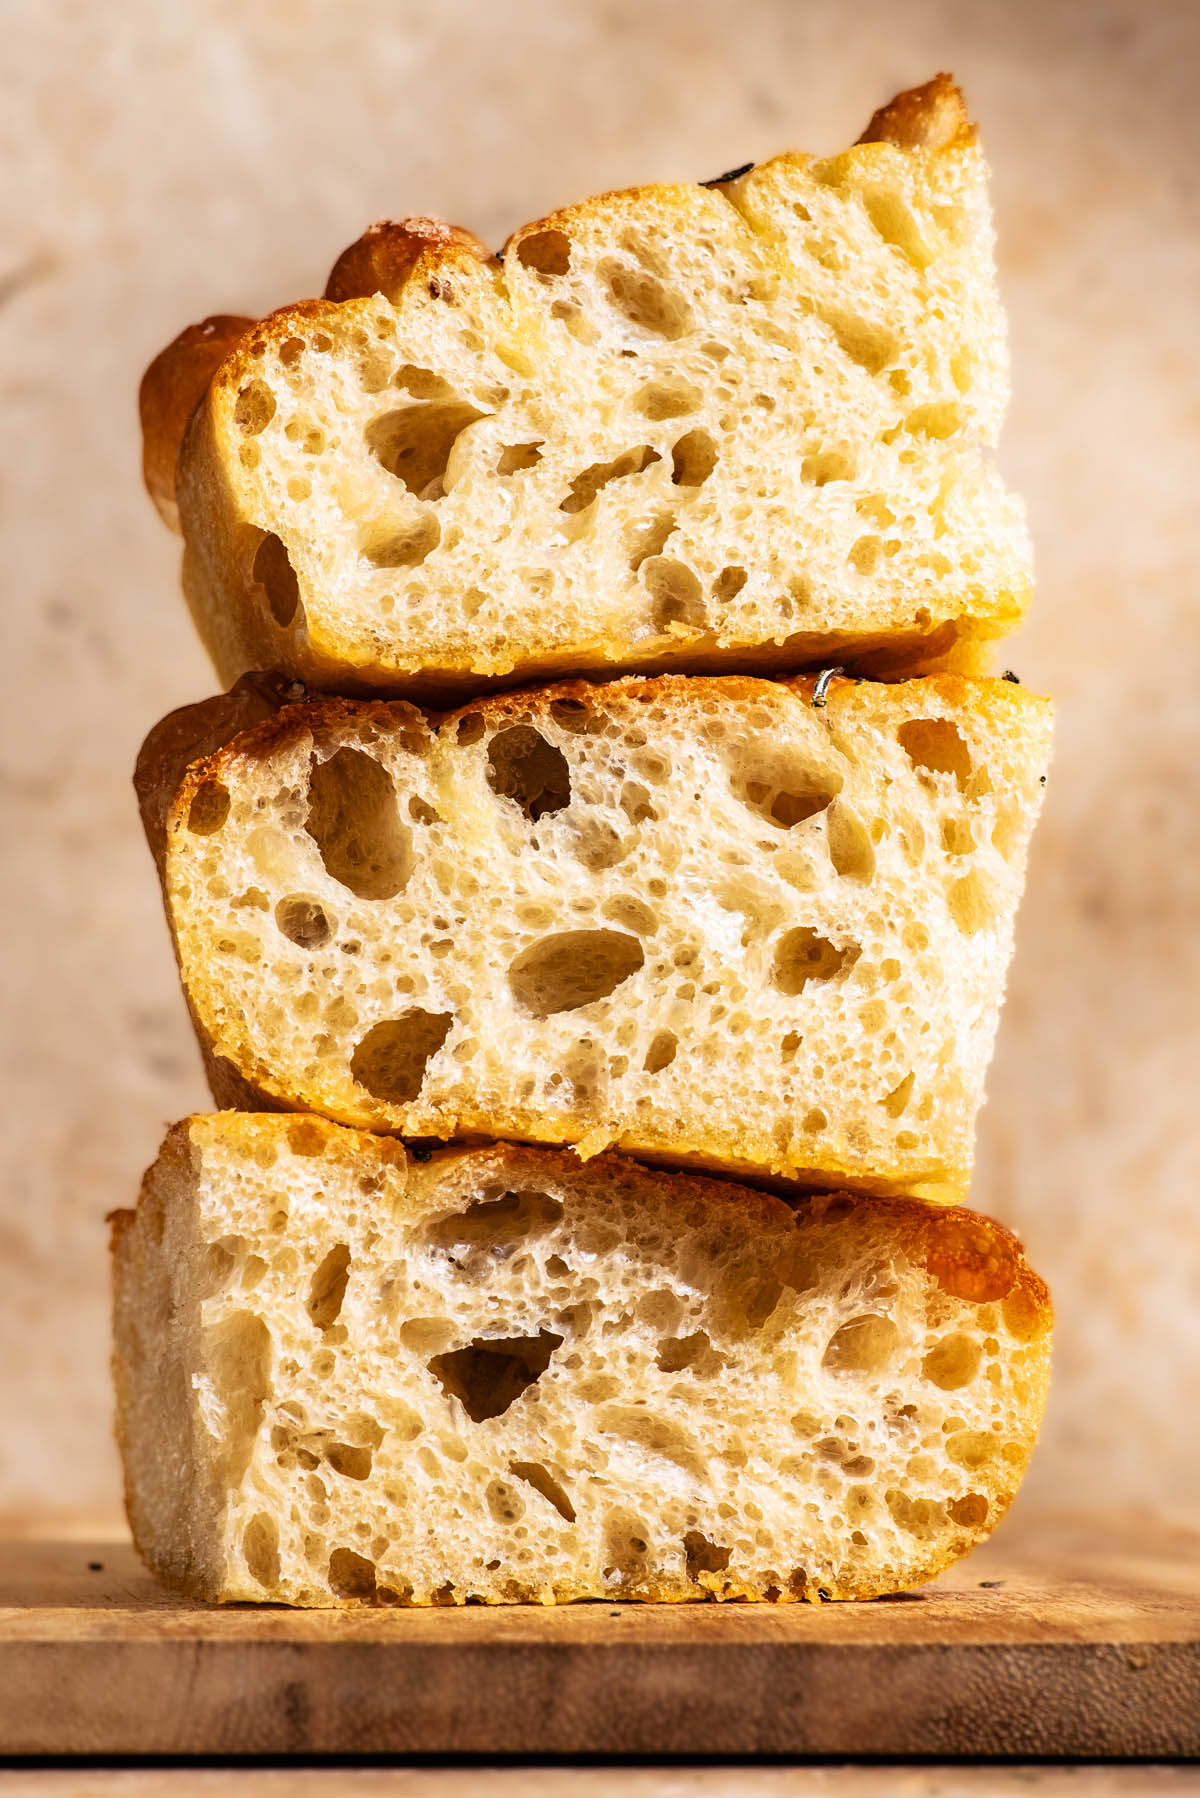
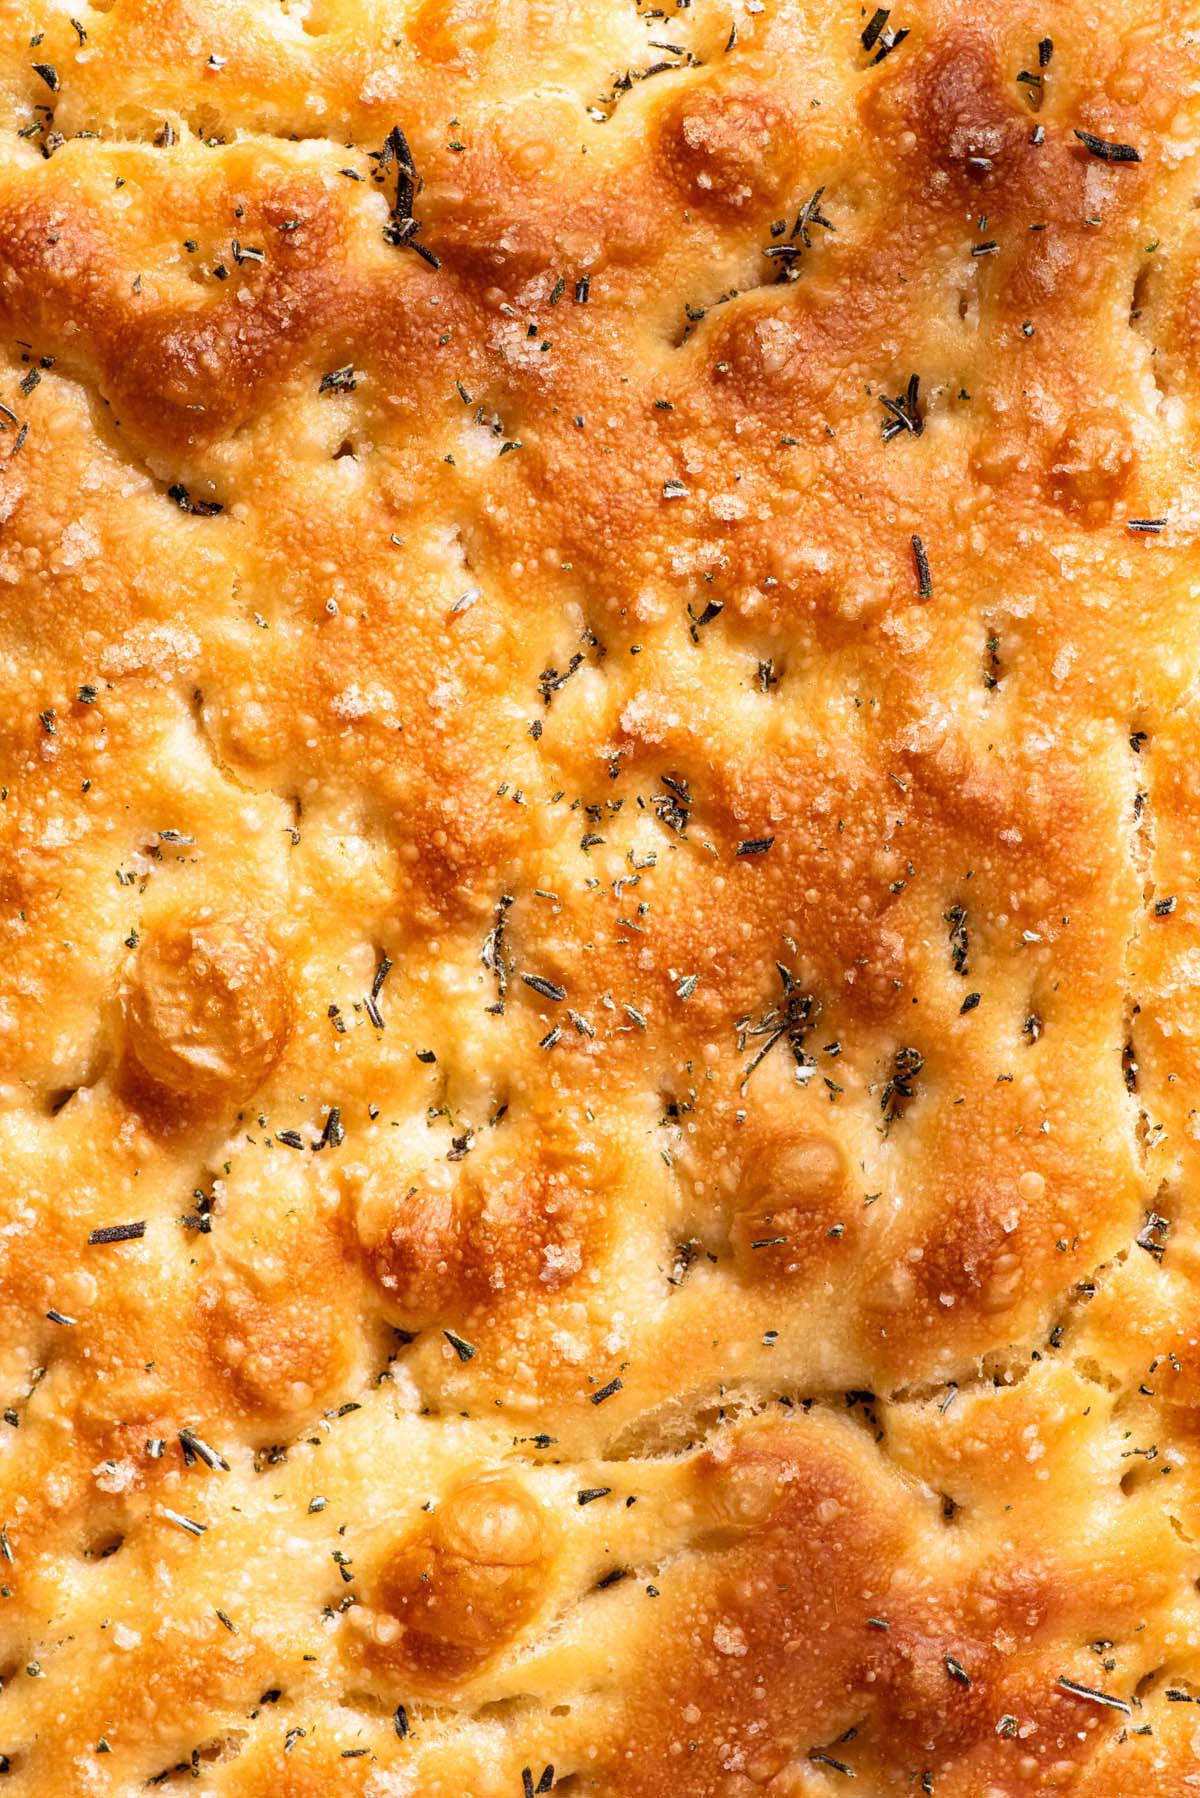
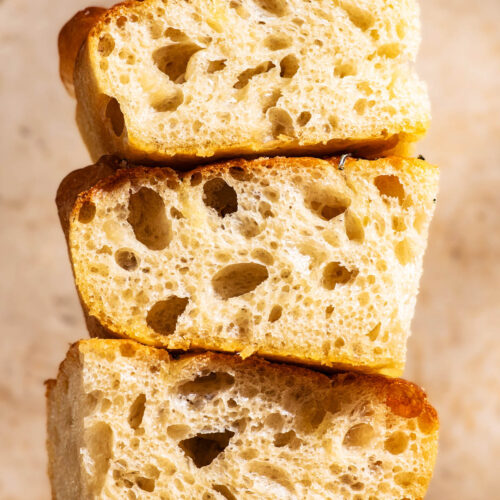
I’ve been playing around with spelt focaccia for years, both with yeast and sourdough starter, and am finally sharing the perfect version of it. This is crisp, lightly oily focaccia with a very bubbly soft interior crumb – exactly as it should be. The method is incredibly simple with one round of stretches and folds before an overnight rise in the refrigerator and one more before rising again at room temperature. No need for kneading here.
This is a 100% spelt flour recipe (I don’t use conventional wheat flour in any of my recipes) and the taste is fantastic. Pictured is with light spelt but you can use a mix of whole grains. More on this below.
Recipe Rundown: Spelt Focaccia
- Texture: a light crisp exterior that’s a bit oily, and a very soft, chewy interior.
- Flavour: olive oil, salt, and spelt. It’s nuttier than focaccia made with plain wheat flour. The flavour will vary a bit depending on the olive oil and honey used. I like very strong versions of both to add more complexity to the bread.
- Difficulty: much easier than you think. The dough does almost all the work and you don’t need to shape or knead once during the process – just a couple rounds of stretches and folds, then tipping the dough out onto the baking sheet.
Ingredients
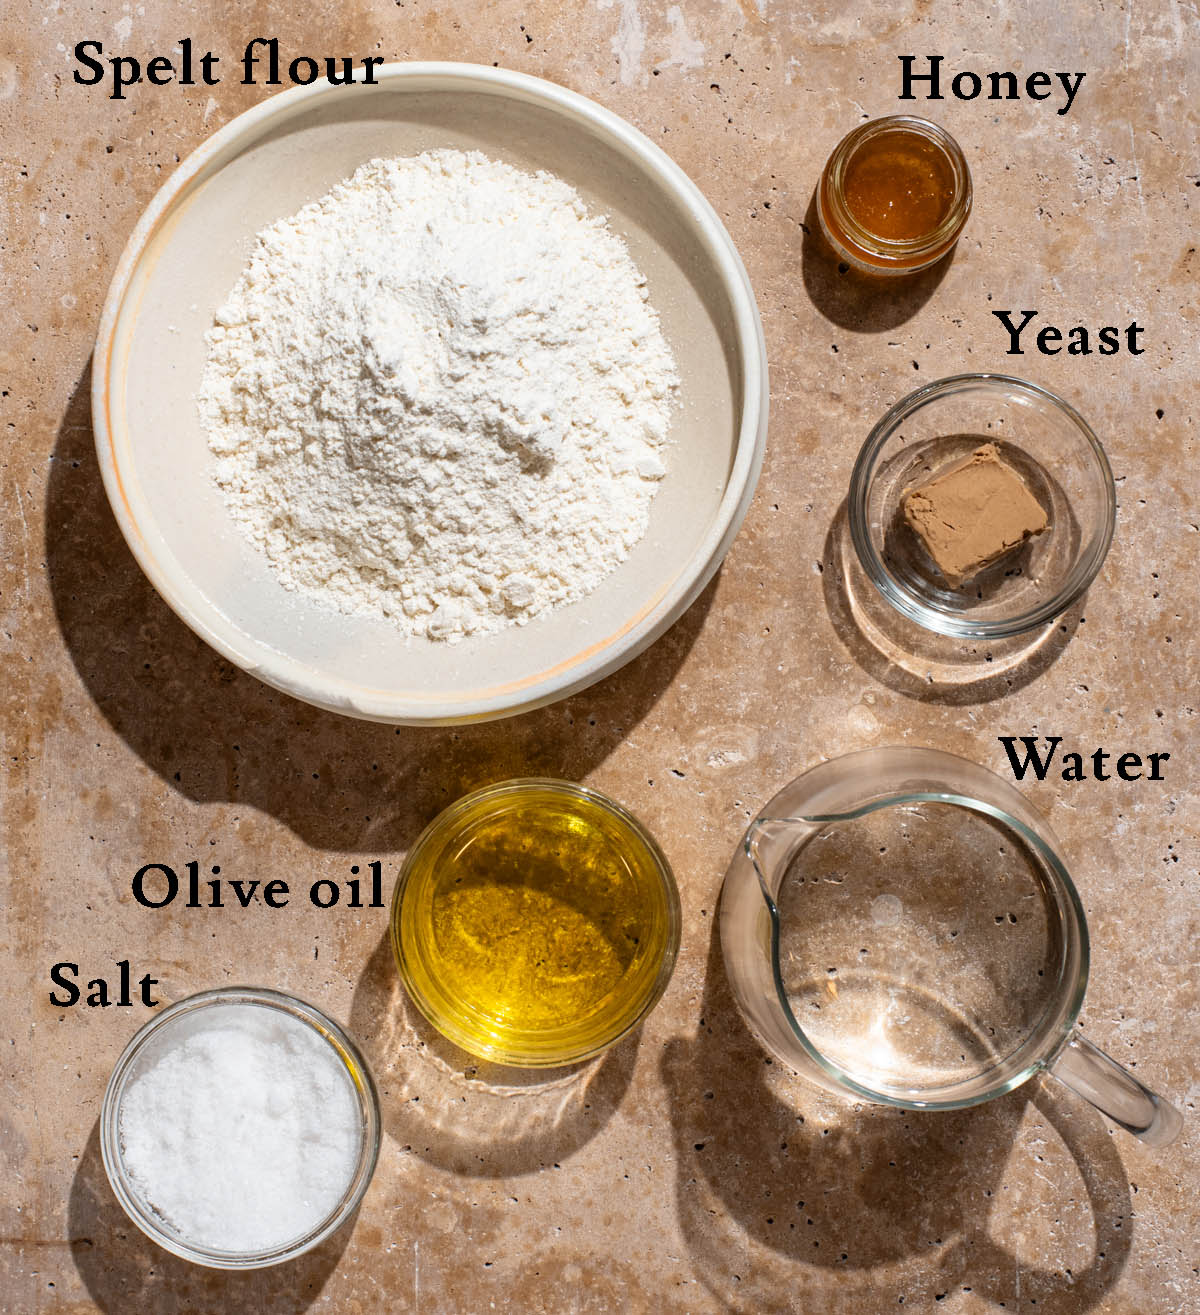
- Spelt flour: for the lightest bread, use all light or sifted spelt flour. This works well with up to 50% whole grain spelt flour but it will be a little denser and heavier.
- Olive oil: you will taste the oil so choose one you like. If you really like olive oil, go for one that’s slightly bitter and fruity – it does make a difference and the taste is excellent with a good oil.
- Honey: this matters a bit less as you’re not using much of it, but you can taste undertones of the honey if you use something with a strong flavour, like dark forest honey. Use maple syrup if needed.
- Yeast: pictured is fresh yeast but this works just as well with dried yeast. I haven’t been happy enough with sourdough versions of this recipe to share that yet.
For more 100% spelt flour flatbread recipes, try my spelt naan, easy spelt tortillas, and spelt pita bread.
Step by Step
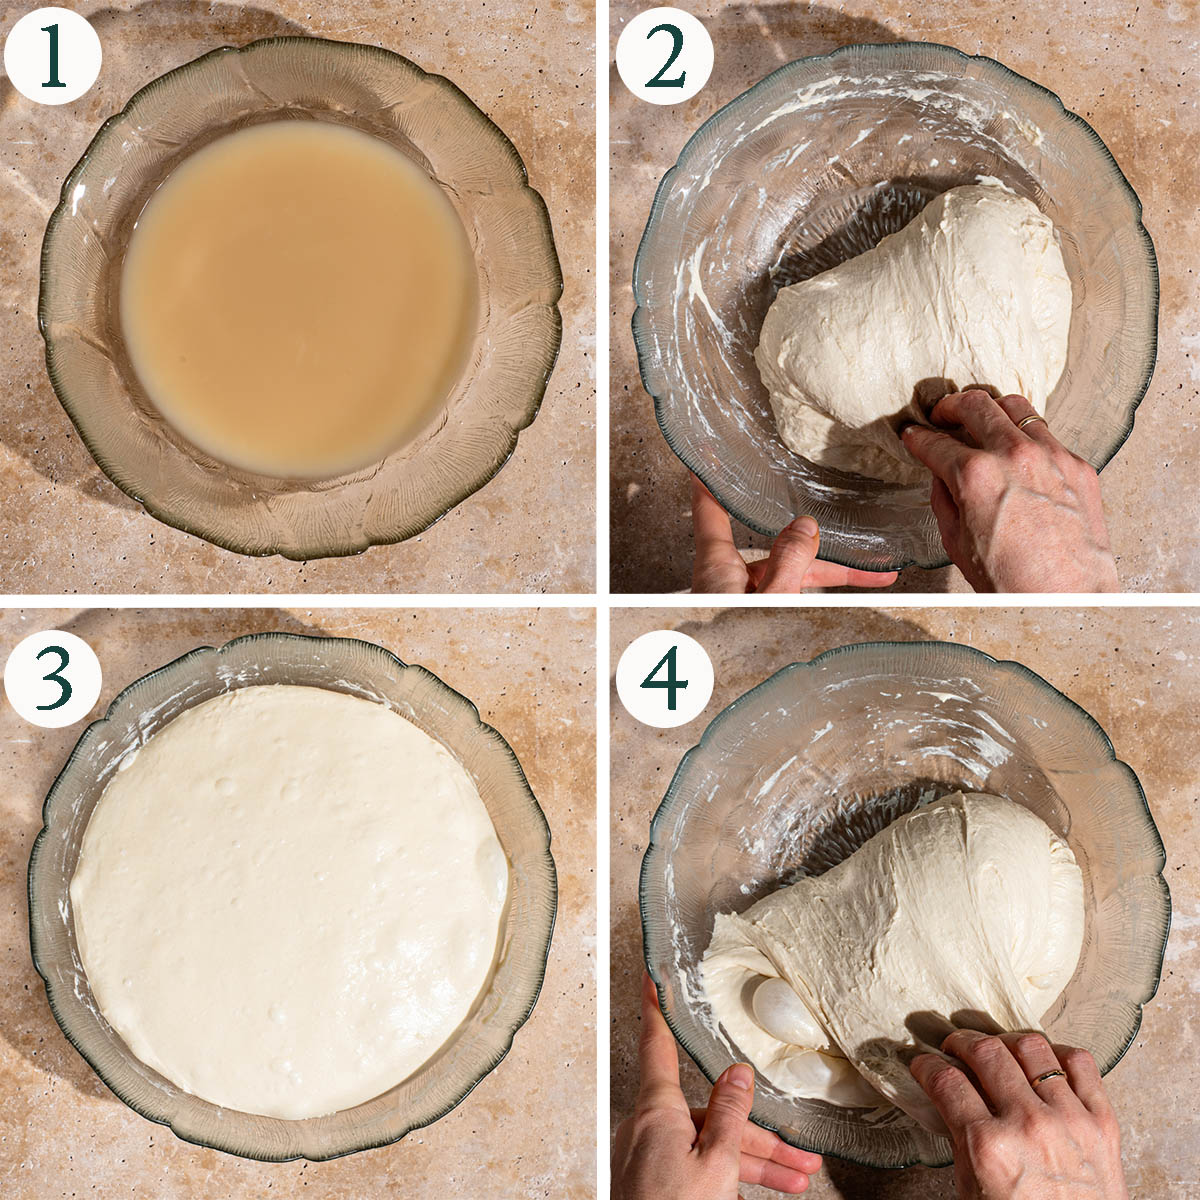
Step 1: mix the yeast and honey into the water.
Step 2: add the remaining ingredients and do one round of stretches and folds.
Step 3: refrigerate the dough overnight to double in size.
Step 4: do another round of stretches and folds.
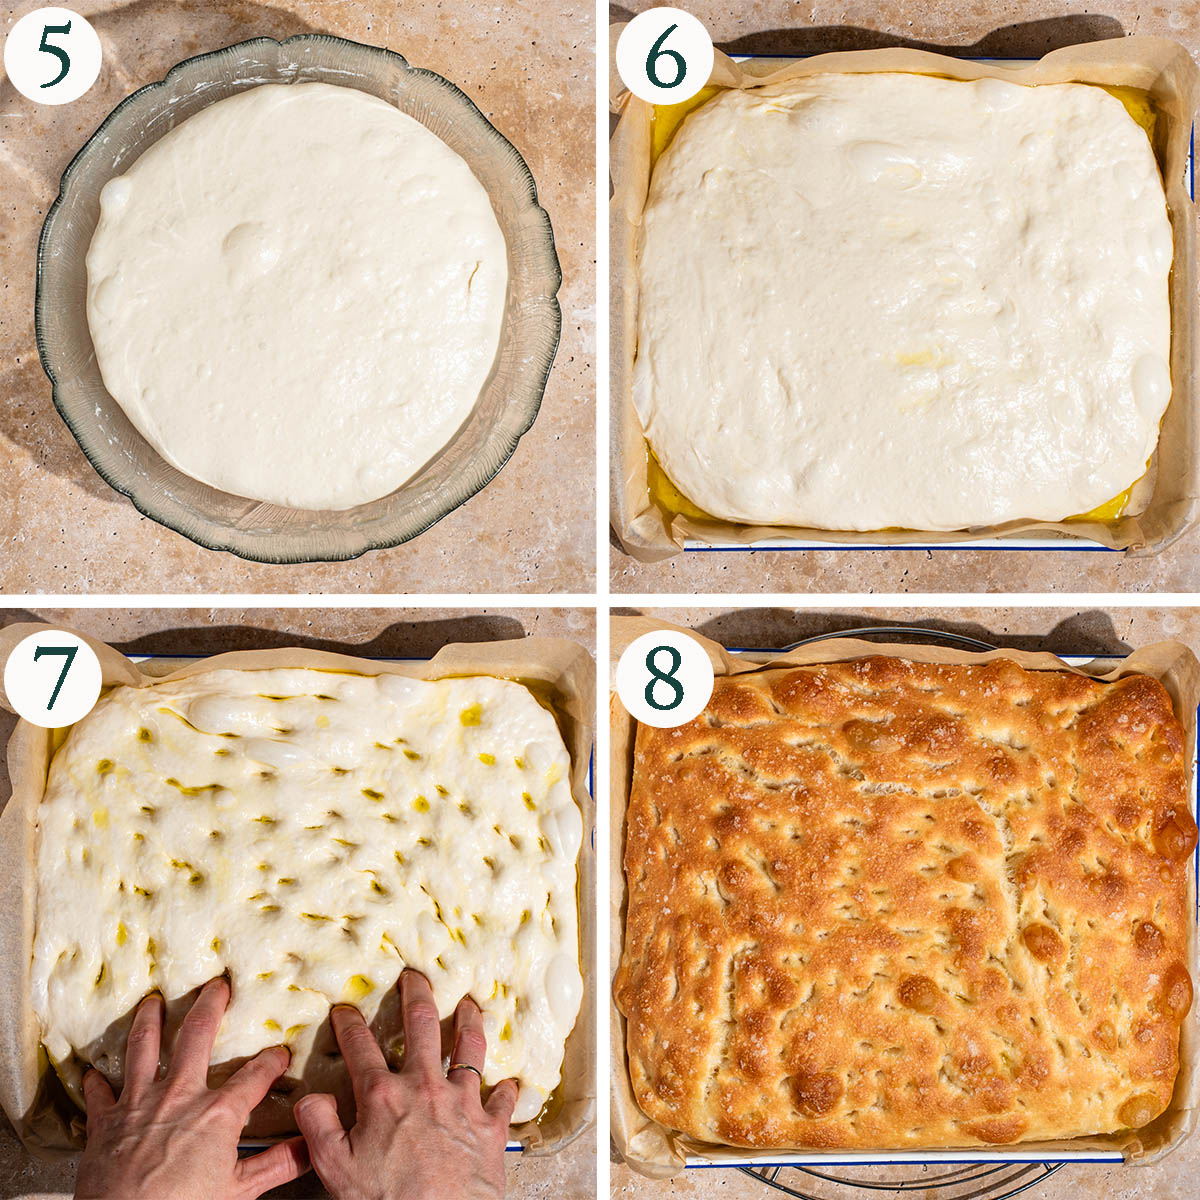
Step 5: let the dough rise again at room temperature until doubled in size.
Step 6: tip the risen dough out onto a baking sheet and gently stretch to fill.
Step 7: top with more oil and press your fingers into the dough to create the dimples.
Step 8: bake until golden brown.
Recipe Notes
For the second room temperature rise, the important thing is that the dough doubles in size. This may take more or less time than outlined in the recipe because it depends on the temperature of your home. Look for doubling and don’t worry about the clock.
The dough might rise more than expected in the overnight cold prove, and that’s fine. You’re punching it down and letting it rise again anyway. That being said, make sure the bowl is big enough to allow for it – I have had it overflow out of the bowl and that’s a bit messy.
You don’t need to line the baking sheet with parchment paper for this recipe, but I find it helps a lot with keeping the crust crisp as it’s easier to remove the bread from the sheet while it’s still very hot. Simply lift out and slide from the paper onto the wire rack.
How to Store
Storage: focaccia is best the day it’s baked, but it can be stored in a sealed container at room temperature for up to three days. The crust will soften as it’s stored. (I usually share with friends or family or dedicate myself to eating the entire loaf in one day.)
Freezing: once fully cooled, transfer the bread (whole or in pieces) to an airtight container. Freeze for up to three months. Thaw at room temperature and refresh in the oven by reheating with a spritz of water to re-crisp the crust. Be sure to freeze the same day it’s baked to ensure freshness.
Expert Tips
- Cool on a rack: if the bread cools in the baking dish, the humidity causes the crust to soften. This is the opposite of what you want with focaccia, and the best way to avoid it is to transfer the bread to a wire rack immediately after it comes out of the oven.
- Double the dough: use visual cues rather than times when working with yeast dough. The timings provided for proving are guides and will vary (mostly depending on temperature). When the dough has doubled in size, it’s ready, even if it takes longer than you think it should.
More Spelt Bread Recipes
Soft Spelt Rolls
Vegan Star Bread
Garlic Pizza Bread
Vegan Cinnamon Rolls
If you make this Spelt Focaccia recipe or any other ancient grain bread recipes on Occasionally Eggs, please take a moment to rate the recipe and leave a comment below. It’s such a help to others who want to try the recipe. For more OE, follow along on Instagram, Facebook, and Pinterest, purchase the Occasionally Eggs cookbook, or subscribe for new posts via email.
No-Knead Spelt Focaccia
Description
Ingredients
- 330 grams (1 ⅓ cups) water room temperature
- 15 grams (~2 teaspoons) honey
- 10 grams (2 ¼ teaspoons) traditional yeast or 21 grams fresh yeast)
- 40 grams (~¼ cup) olive oil
- 550 grams (~3 ⅔ cups) light spelt flour
- 12 grams (~2 teaspoons) fine sea salt
- More olive oil for the bowl and baking
Instructions
- Add the water and honey to a large mixing bowl. Whisk to dissolve the honey in the water, then sprinkle the yeast over top. Set aside for 15 minutes to bloom the yeast. If it doesn't bubble up during this time, you need new yeast.330 grams (1 ⅓ cups) water, 15 grams (~2 teaspoons) honey, 10 grams (2 ¼ teaspoons) traditional yeast
- Whisk in the oil, then add the flour and salt. Stir to form a shaggy dough, then set aside to rest for ten minutes.40 grams (~¼ cup) olive oil, 550 grams (~3 ⅔ cups) light spelt flour, 12 grams (~2 teaspoons) fine sea salt
- After the dough has rested, use wet hands to do one round of stretches and folds. Cover the bowl tightly (I use a plate and damp tea towel) and place in the refrigerator to rise overnight, or for at least eight hours and up to 24 hours.
- The next day, take the dough out of the refrigerator. Wet your hands again and do another round of stretches and folds (this will deflate the dough). Add a tablespoon of olive oil to the bowl and roll the dough around to coat in oil – this is important.More olive oil for the bowl and baking
- Let the dough rise again at room temperature until doubled in size. This usually takes between two and four hours.
- Once the dough has risen, line a small baking sheet or 23×33 cm* (9×13 in.) pan with high sides with parchment paper. Pour one tablespoon of olive oil into the pan and spread with a pastry brush to coat the paper. It will pool in places, that's normal.More olive oil for the bowl and baking
- Gently tip the risen dough out onto the prepared baking sheet. Do not deflate the dough. Set aside while you preheat the oven to 200°C (400°F).
- Once the oven is hot, lightly oil your hands and use your fingertips to poke holes all over the top of the dough to create deep dimples. Drizzle another tablespoon of olive oil over the dough and top with sea salt and any other toppings you'd like (see notes).More olive oil for the bowl and baking
- Bake for about 25 minutes, or until golden brown. The bread will rise significantly in the oven.
- Remove the focaccia from the oven and immediately lift it, using the parchment paper, to transfer to a wire rack. Slide the bread off the paper so that it can cool on the rack to prevent softening of the crust. Serve warm or cool fully before slicing.
Notes
Nutrition
Nutrition is provided as a courtesy and is an estimate. If this information is important to you, please have it verified independently.

Hi! A couple of things . . I assume the pan dimensions are 9 in x 13 in, did you already catch that the conversions are wrong. 🙂
Also, I baked this with sourdough starter instead of the yeast and it turned out great! Thanks for a wonderful recipe. It was hard to find a 100% spelt flour recipe that doesn’t include bread flour, so THANK YOU. Here are the modifications I used to include sourdough starter.
– 100 grams active sourdough starter
– Decreased water to 280 grams
– Decreased flour to 500 grams
Hi Kelly-Anne, thanks for pointing out the dimension conversion error, that’s been fixed now. Glad to hear the recipe worked so well with you using a starter!
Really pleased with the outcome, followed the recipe to the letter and had a beautiful dough and successful bread.
In hindsight I could have risen it longer but it was lunch time and it looked good enough. Next time I will put dried rosemary in the dough also. This recipe is a keeper, thank you!
If I am using active dry yeast, how should I modify the process?
What brand of spelt flour are you using? Is there a brand selling sifted spelt flour? Or by sifting, you meant sifting it by oneself?
Thank you for clarifying.
Hi Yujung, no need to modify if using dry yeast, follow the recipe as written. I use different brands of spelt flour depending on where I am – sometimes directly from mills and sometimes from the grocery store. I buy sifted or light spelt flour. It might be called white spelt depending on where you are.