
Homemade Garlic Knots

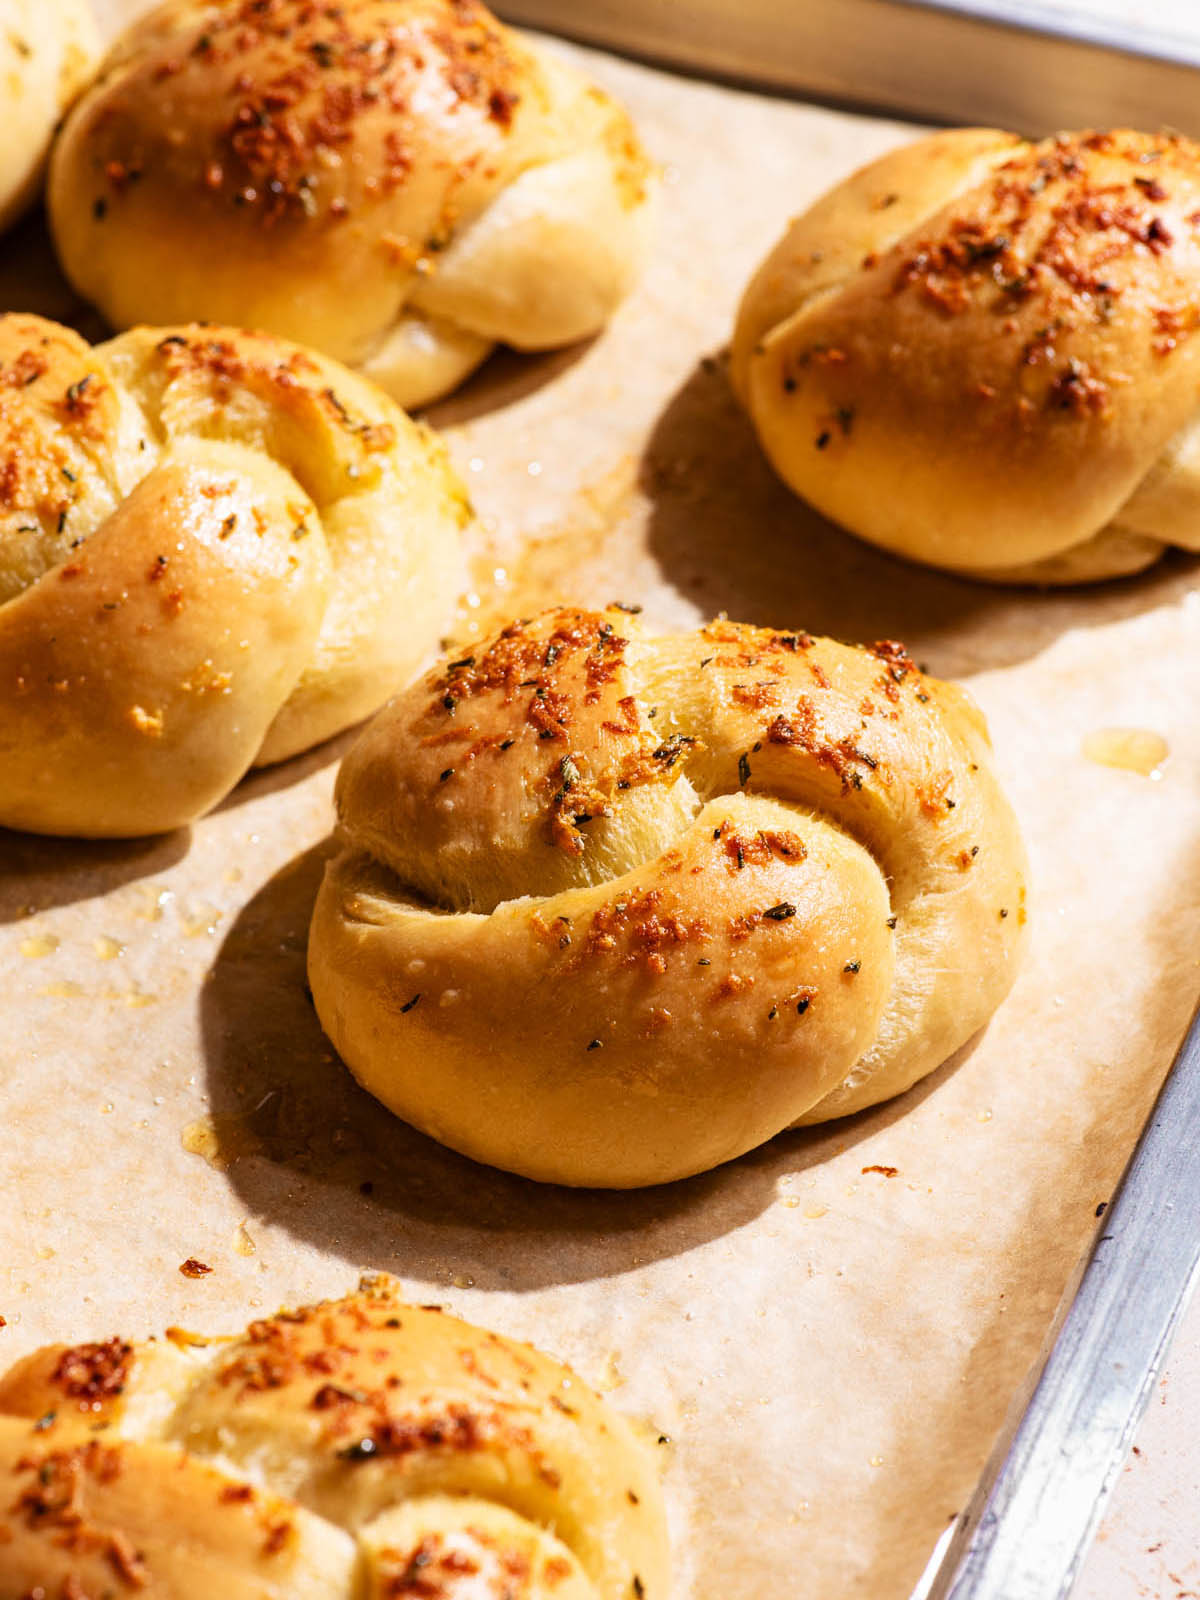
No store-bought pizza dough here! These garlic knots are made with a dough from scratch, to get the best flavour right from the bottom up. Most of the garlic flavour comes from a minced garlic, olive oil, and herb mixture that’s brushed onto the knots right before baking. While garlic can be added to the dough, it can cause uneven rise.
If you’ve never had garlic knots, the texture is a lot like dinner rolls – very soft – but the dough is rolled out and knotted. They’re very garlicky and great with soups, hearty dinners, and chili. You can also serve with spicy marinara and have bread for dinner (I’ve done it, and it’s fantastic).
Don’t worry if you’re not a bread expert. This type of dough is very forgiving and easy to work with. The trick is to make sure it’s well kneaded and risen, and I’ve included tips for both so you know when the dough is ready. The knotting part is easy and they don’t need to be perfect.

I don’t use affiliate links. Any links you see here are to other recipes or related information, not paid links.
Ingredients You’ll Need and Why
These are basic bread ingredients for a slightly enriched dough. Because the dough is made with milk, honey, and oil, it’s soft and easy to shape without being sticky. These are my notes from recipe testing. You can find the full recipe card below with complete measurements and instructions.
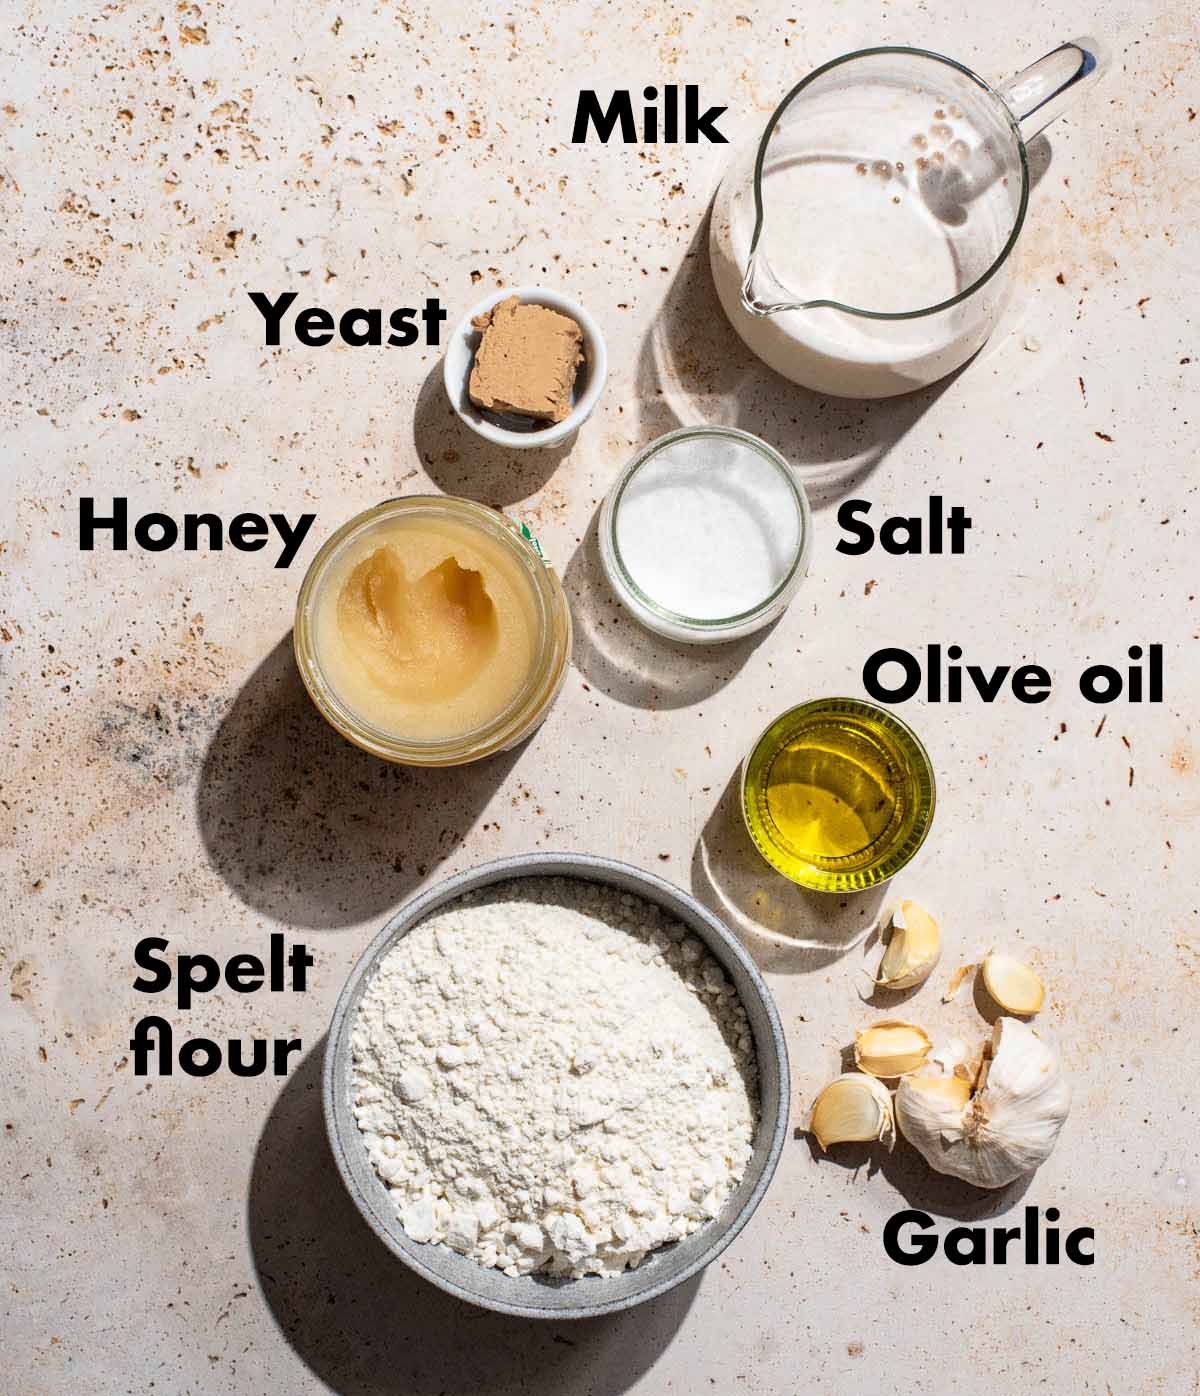
- Flour: I always use light (sifted) spelt flour for this recipe and that’s what’s called for in the recipe card, but you can use all-purpose flour with a slight provision. Knead the dough for almost double the amount of time, about ten minutes, if using plain white flour. Whole grain flour can be used but note that it is more likely to cause tearing in the buns.
- Garlic: any variety. You can also try using roasted garlic in the dough for a milder, sweeter taste.
- Milk: any unsweetened non-dairy or dairy milk will be fine. I recommend soya milk, which has a higher protein content and makes a stronger dough.
- Olive oil: this is added to the dough and brushed on with the garlic before baking. Another oil can be substituted but I don’t recommend butter or coconut oil, both of which will make the knots denser once cooled.
- Yeast: fresh or dry yeast, it doesn’t matter, and both are outlined in the recipe card. I prefer the taste of fresh yeast and it’s cheaper where I live. If using instant yeast, it can be added with the dry ingredients and note that the rising time might be slightly shorter.
- Honey: a small amount of honey is added to the dough to make it softer and more flavourful. If you want a fully vegan bun, use maple syrup instead.
- Salt: added salt is important for gluten development in bread baking, and reducing or altering the amounts can lead to uneven or slow rise. I never recommend adjusting the amount. Fine sea salt is best for even incorporation into the dough.
- Herbs: you can add some dried herbs to the garlic and oil mixture if you’d like, but it’s optional. The buns can also be sprinkled with fresh herbs when they come out of the oven.
How to Make Garlic Knots
It’s a lot of pictures, but it’s not a complicated recipe. I wanted to include more step-by-step images here so that you could see exactly what the process looks like, from the dough before and after kneading, after rising, how to shape, and how the knots should look once shaped and risen.
But remember that even if the shaping isn’t perfect the first time you make garlic knots, they’ll still taste great!
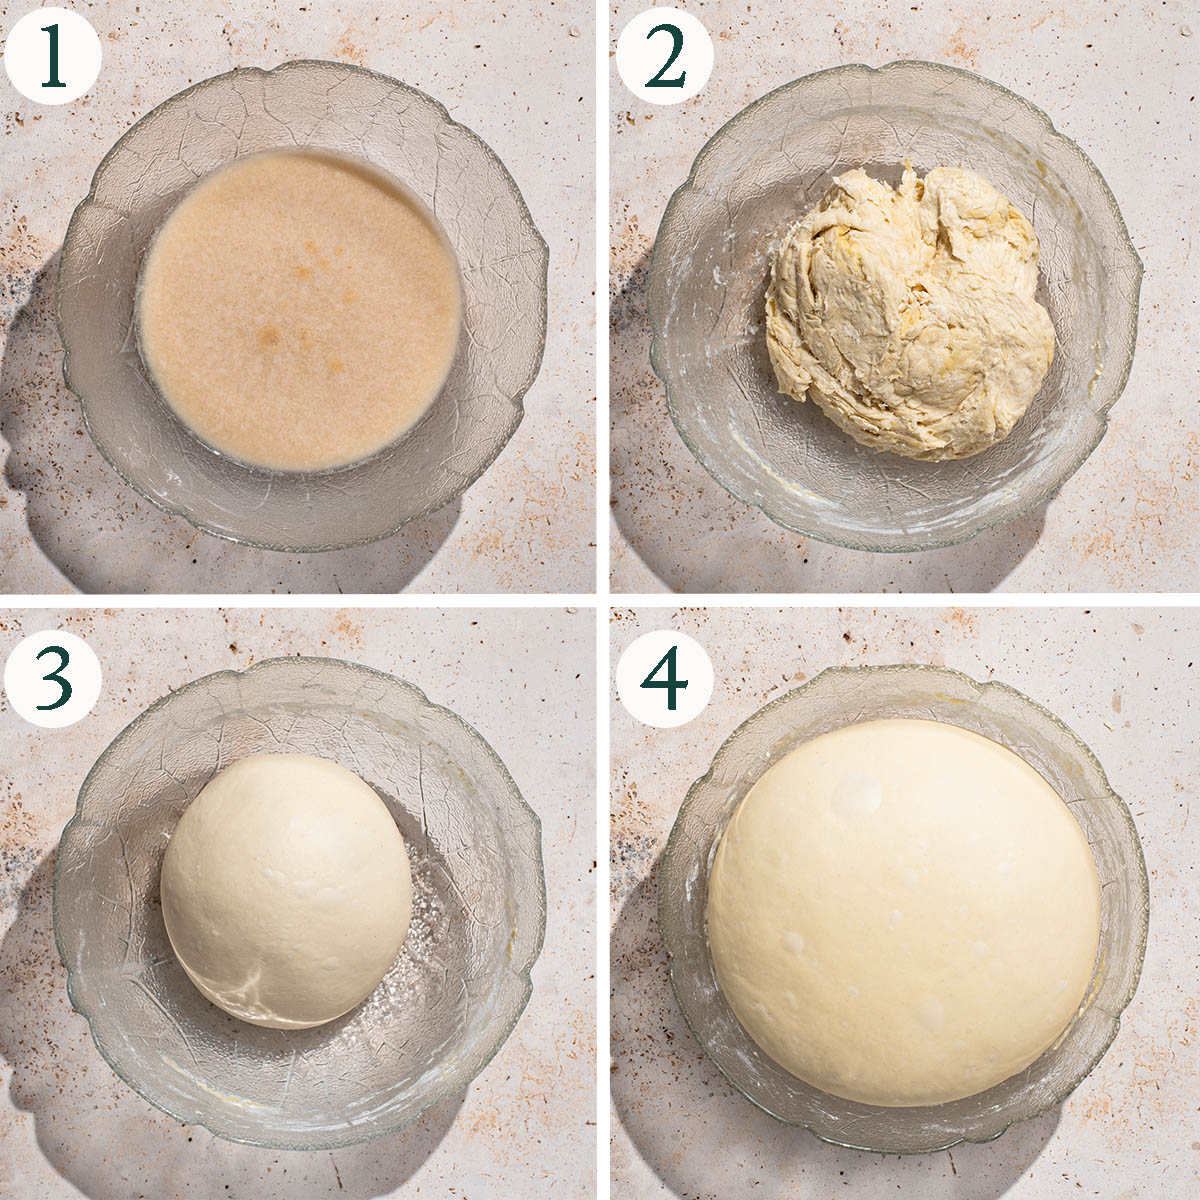
Step 1: heat the milk until just warm to the touch, then pour into a large mixing bowl. Add the honey and yeast. Let the yeast bloom, resting until it bubbles. While this isn’t technically necessary for modern yeast (for it to function) it’s still a good idea so that you know your yeast is still active.
Step 2: whisk in the olive oil, then add the flour and salt. Stir to form a rough, shaggy dough. Like most spelt flour recipes, this is a slightly lower hydration dough, but it will feel soft – just less sticky.
Step 3: knead until very soft and smooth. That will be several minutes by hand – don’t add more flour! – or about four minutes with an electric mixer. If using all-purpose white flour, double the kneading time.
Step 4: let the dough rise in a warm, draft-free place until doubled in size. Since this is an enriched dough, it might take a little longer than you expect, usually around an hour and a half. Keep it tightly covered, and place into an enclosed space like your oven or microwave if your home has very low humidity.
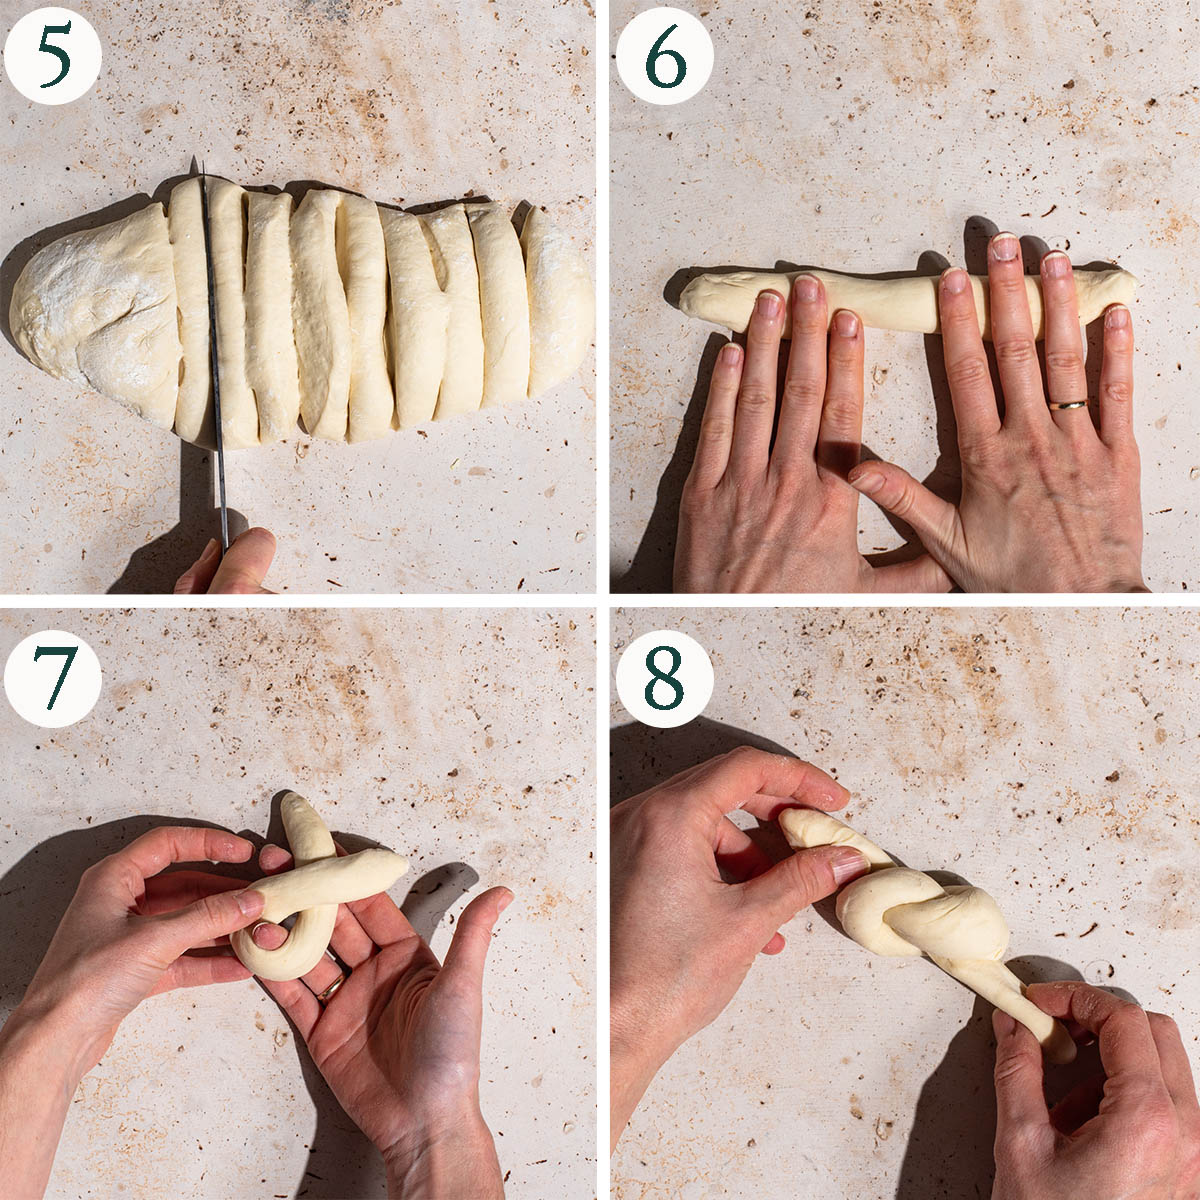
Step 5: deflate the dough and turn it out onto a work surface. It shouldn’t be sticky at all, but a light dusting of flour can be used. Divide into 12 pieces.
Step 6: roll the pieces of dough into ropes, each 20cm long. The dough will want to spring back. Roll it out partway, then set aside, continue with the other pieces, and come back around to the first one once it’s had some time to relax.
Step 7: tie the ropes into knots, just as you would tie string into a knot. Fold one end over the other, leaving a loop in the middle.
Step 8: put one end through the loop and gently pull to form the knot. Tuck the ends under the knot and you’ve got the shape of a garlic knot!
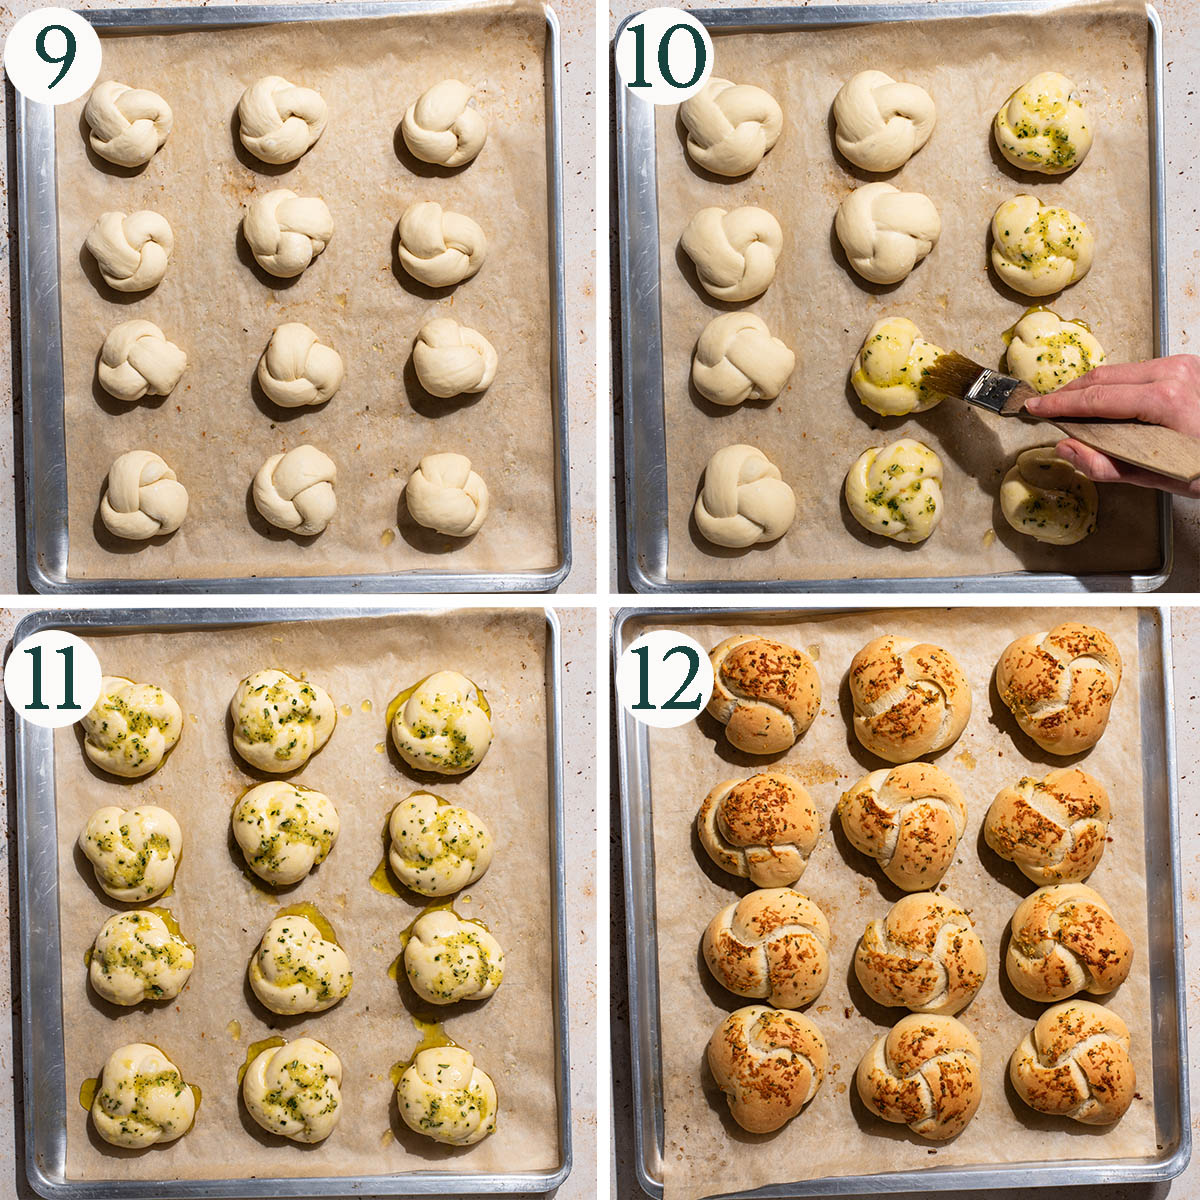
Step 9: place the knots onto a lined baking sheet, leaving at least 6cm space between each. I recommend lining because the olive oil topping can be hard to clean off unlined baking sheets. Grease the baking sheet in a pinch.
Step 10: set aside to rise, covered, for about 45 minutes or until almost doubled in size. Again, set in an enclosed space if your home has low humidity, to prevent the dough from drying out. A dry crust on the outside of dough prevents it from rising effectively.
Step 11: brush the tops with the garlic, oil, and optional herbs, making sure each bun gets plenty of garlic. Most of the garlic will move into the folds of the knots.
Step 12: bake for about 20 minutes, or until golden. If the garlic is browning too much, loosely cover the top with foil. This should only happen if your oven is running too hot from the upper heating element or if the buns have been placed too high up in the oven.
Expert Tips for the Best Buns
- Rise in a warm, not hot place: too hot of a spot, like on a radiator, causes the dough to rise too quickly and will reduce rise once baked. It can also kill the yeast if it gets too hot.
- Bake on the middle rack: to prevent the topping burning, be sure to bake the knots on the middle rack of your oven and not too close to the top. Loosely cover with foil if you notice too much browning.
- Don’t add too much garlic: the dough has optional garlic added, but that is a bit risky, as garlic can impact rise. Add at your own risk. The topping makes the buns garlicky enough in my opinion.
- Try a hand mixer for kneading: the spiral attachments are for kneading dough, and work well for soft dough like this.


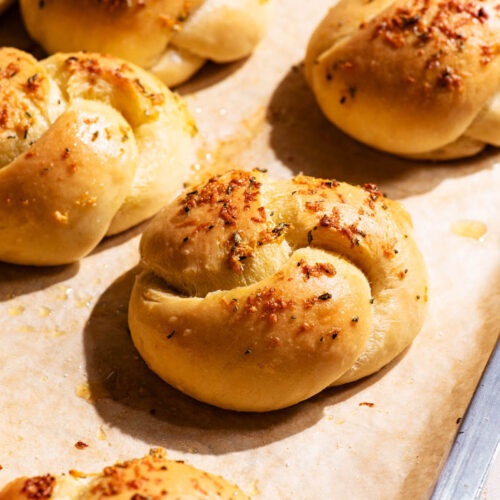
Garlic Knots (with Homemade Dough)
Description
Ingredients
- 250 ml (1 cup) non-dairy milk or dairy milk
- 1 teaspoon honey or maple syrup
- 2 ¼ teaspoons active dry yeast or ½ cube fresh yeast
- 3 tablespoons olive oil
- 400 grams (2 ⅔ cups) light spelt flour or all-purpose flour
- 1 ½ teaspoons fine sea salt
Garlic Topping
- 4 tablespoons olive oil
- 3 cloves garlic finely minced
- 1 teaspoon rosemary minced, or oregano, or Herbes de Provence
- Sea salt
Instructions
- Prove the yeast: heat the milk until just warm, about skin temperature (around 35°C or 95°F). Add to a large mixing bowl and whisk in the honey, then sprinkle the yeast over top.250 ml (1 cup) non-dairy milk, 1 teaspoon honey , 2 ¼ teaspoons active dry yeast
- Set aside for ten minutes to allow the yeast to bloom. If using instant yeast, you can skip this step and add the yeast with the dry ingredients.*
- Make the dough: whisk in the olive oil. Add the flour and salt, and stir to combine into a rough, shaggy dough.3 tablespoons olive oil, 400 grams (2 ⅔ cups) light spelt flour, 1 ½ teaspoons fine sea salt
- Knead the dough until it forms a soft, smooth ball. This will take about five minutes with a handheld electric mixer with the dough attachments, or around eight minutes by hand. Spelt flour dough will not pass a windowpane test but it should be smooth and fairly elastic when ready. The dough will slowly spring back when poked with a fingertip. Don't add more flour when kneading. If using all-purpose flour, knead for double the time and do a windowpane test.
- First rise: place the dough back into the mixing bowl and cover well. Set aside to rise until doubled in size, 60 to 90 minutes in a warm, draft-free place. I recommend an enclosed space like an oven or microwave if your home is very dry. Once proved, the dough should very slowly spring back to fill the indent when gently pressed with a fingertip.
- Line a large baking sheet with parchment paper and set aside.
- Shape the knots: Once the dough has risen, gently punch it down to deflate. Dust a work surface with flour and turn the dough out onto it. Divide into 12 approximately equal pieces.
- Roll the pieces of dough into 20cm (8-in.) ropes. The dough will want to spring back and will be tricky to roll to the full length. Roll the dough partway, then set aside and do the same with the next piece before coming back to the first piece and rolling it to the full length. This allows the gluten to rest, making it easier to roll.
- Tie the ropes into knots, just as you would tie string into a knot. Fold one end over the other, leaving a loop in the middle. Put one end through the loop and gently pull to form the knot. Tuck the ends under the knot, pressing to make sure the ends are secure.
- Place each knot onto the prepared baking sheet, leaving at least 6cm (2-in.) between each.
- Second rise: cover the shaped knots with a damp tea towel and set in a warm, draft-free enclosed space like your (cool) oven with the light on to rise again until almost doubled in size, 30 to 45 minutes.
- Once the buns are almost done rising, preheat the oven to 190°C (375°F).
- Make the topping: whisk the olive oil, garlic, and optional herbs in a mixing bowl. The garlic will sink to the bottom, that's normal.4 tablespoons olive oil, 3 cloves garlic, 1 teaspoon rosemary
- Brush the tops of the risen buns with the garlic mixture, making sure each knot is topped with approximately the same amount of garlic. Optionally sprinkle with salt.Sea salt
- Bake the knots: bake for 18 to 20 minutes, until golden. Cover the knots loosely with foil during baking if you notice the garlic browning too much. Serve warm.
Notes
Nutrition
Nutrition is provided as a courtesy and is an estimate. If this information is important to you, please have it verified independently.
Broccoli Cauliflower Soup (No Cheese)
Baked Pumpkin Falafel
Gluten-Free Apple Crisp
Honey Spelt Muffins
About Alexandra Daum
Alexandra Daum is a professional recipe developer, food photographer, and cookbook author. She started sharing carefully tested vegetarian recipes in 2014 and has since published hundreds of recipes with seasonal ingredients and whole grains as the focus. Her work has been featured on CTV, in House & Home and Chatelaine, on popular websites like Buzzfeed and Best Health, and in countless other publications.