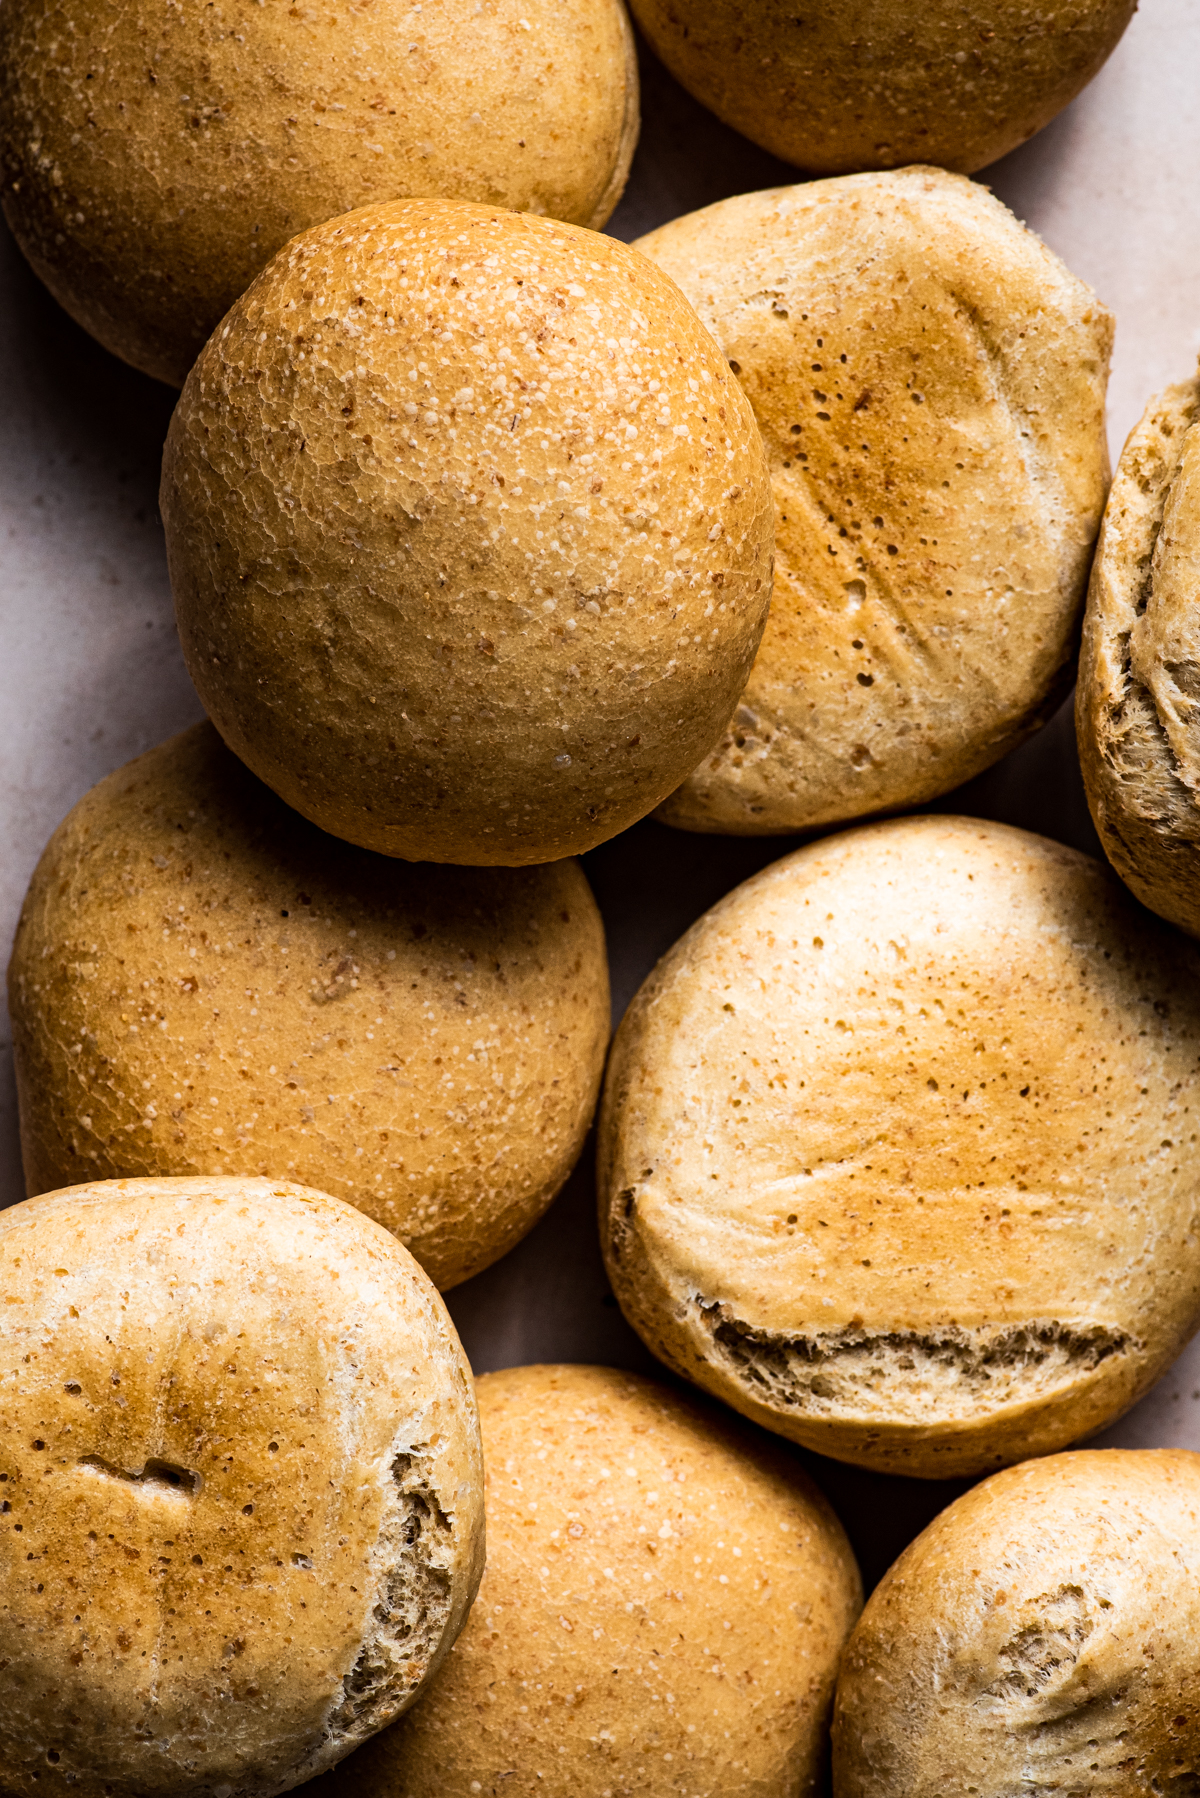
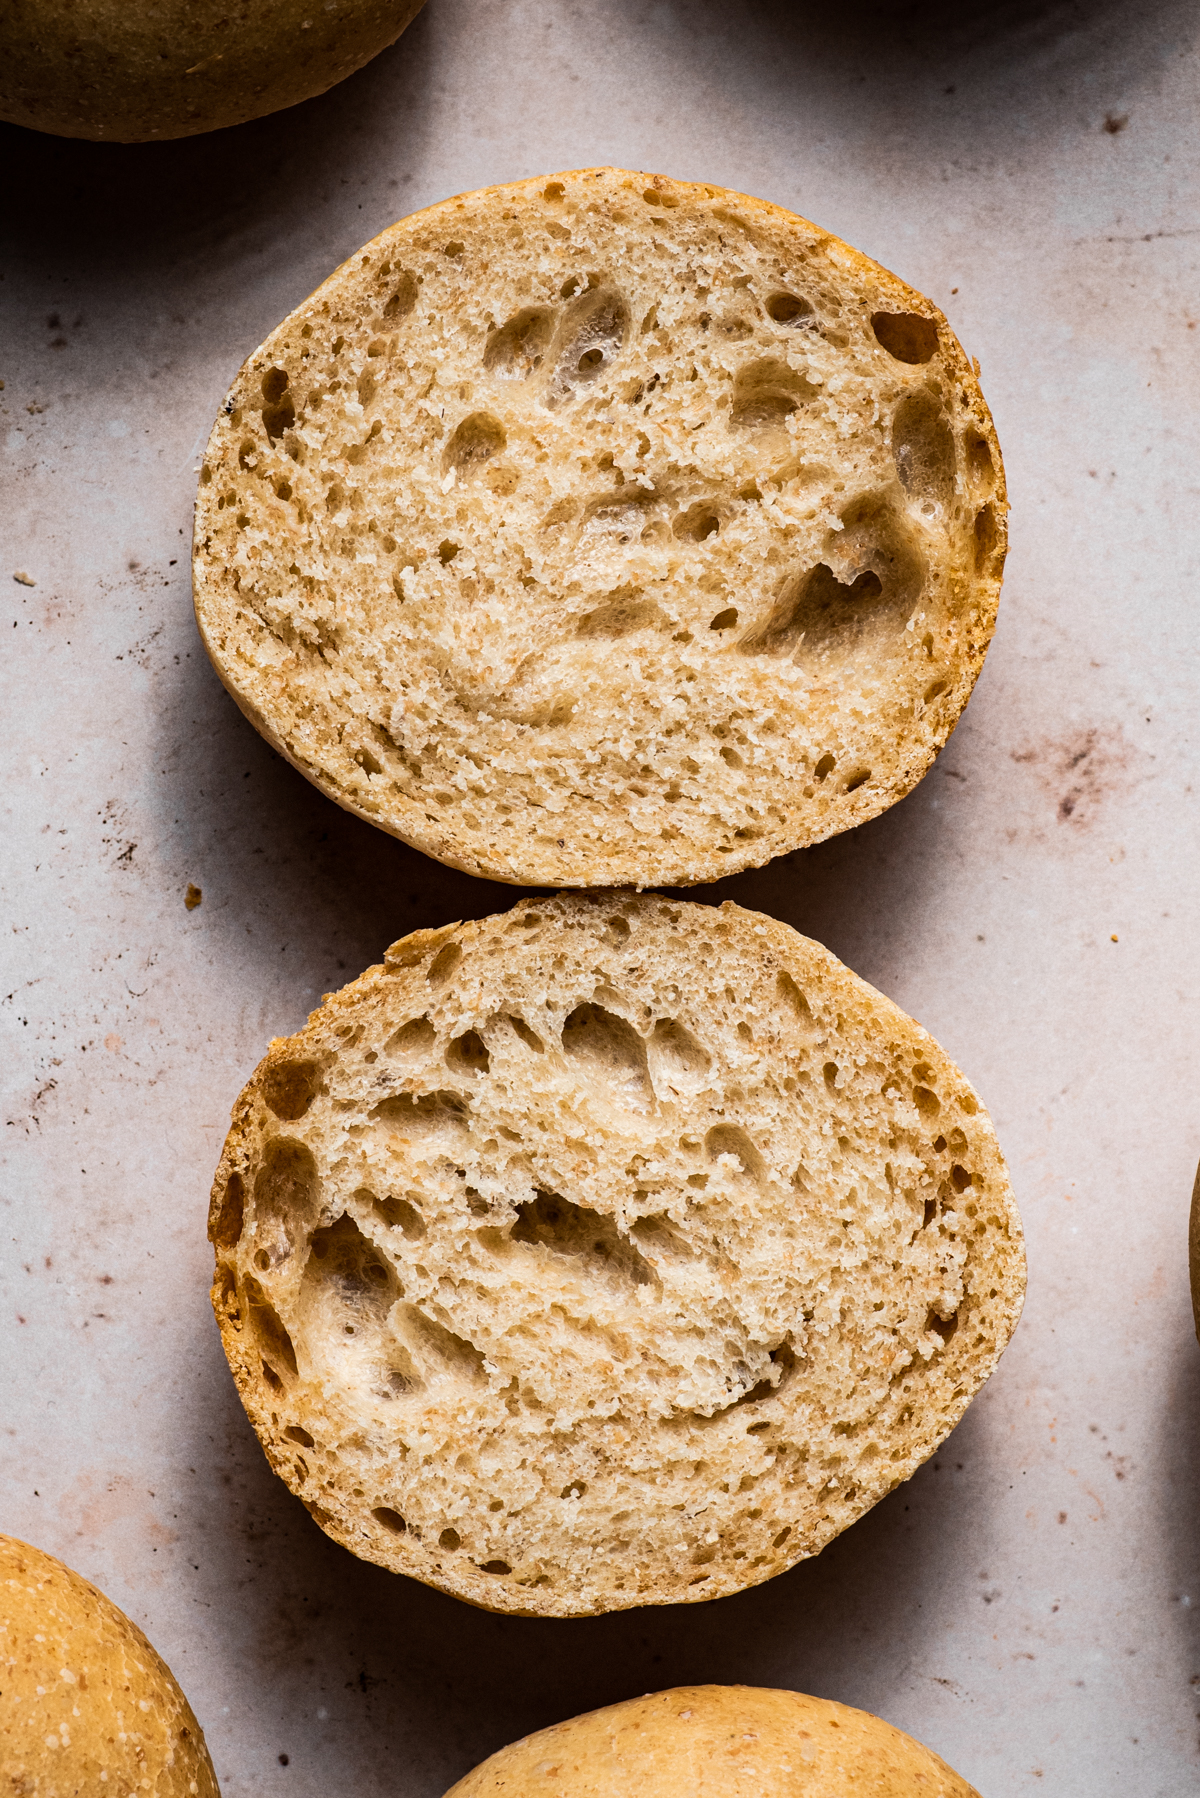
Spelt buns are light, with a thin crisp crust, just right for a sandwich or to serve with soup. This is a much easier and less time intensive version of classic German breakfast buns, which need a long fermentation and use sourdough starter (typically mixed with yeast).
This type of spelt flour bun is very common in German bakeries but now that I’ve moved to Sweden, there’s much less bun variety available. I started making these when I still lived in Canada, where it’s almost impossible to get this type of bread, and they were a lifesaver. Spelt seems to be really growing in popularity in North America now, though, and it’s become easier to find the flour, at least. So you can make these at home!
Like all spelt bread recipes, these need a shorter kneading time and rise beautifully, so it’s a good option if you’re not that confident with bread making or a bun beginner. If you’re still unsure, try these no-knead buns instead.
This is a higher hydration recipe, making the dough a little different than some other bun recipes. If you’re familiar with making sourdough boules, it’s a bit more like that. This high hydration is how you get that crisp crust and light interior texture.
Why You Should Try This Recipe
Spelt flour is more flavourful than white flour and although it won’t achieve quite the same rise or fluffy texture, these taste so much better than plain buns. Make them if you’re a fan of bread that’s good on its own without any additions.
- It uses whole grain flour: the recipe can be made with all light spelt, but does benefit from adding whole grain. This boosts the flavour and fibre content – win win.
- You don’t need a stand mixer: I don’t have one, and spelt bread is generally best kneaded by hand in any case to avoid overdoing it.
- Minimal ingredients: with just a handful of basic ingredients, you don’t need to worry about finding anything uncommon (assuming you can get spelt flour easily).
Ingredients
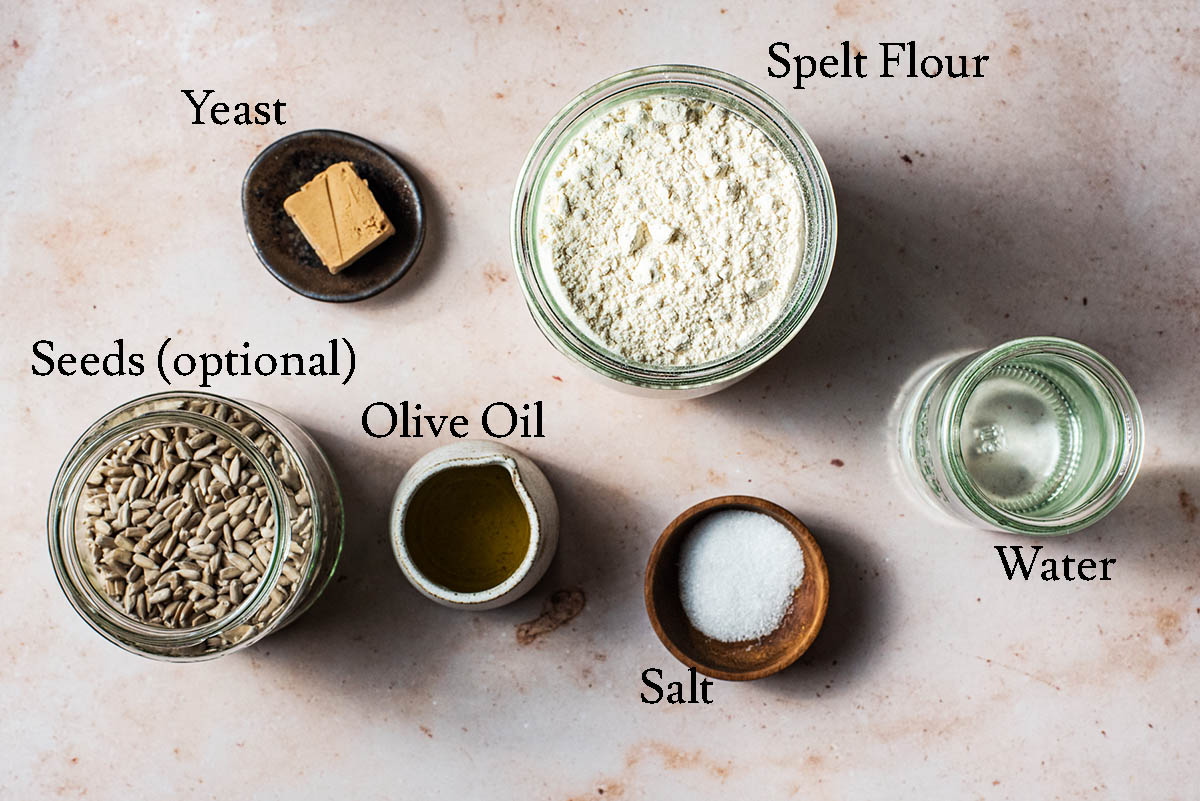
Ingredient Notes and Substitutions
- Spelt flour: this is a spelt specific recipe so I won’t offer any alternatives. Note that you can use a mix of light and whole grain, though, and even make 100% whole grain if preferred.
- Seeds: if using seeds, use any mix of sunflower, pumpkin, and sesame seeds. I don’t recommend flax or chia for this recipe.
- Yeast: options are provided for both fresh and dry yeast. This recipe is developed with a step to activate the yeast, so you can use any type of dry yeast. Instant yeast may result in slightly faster rising times so be careful not to over prove.
Step by Step
1. Mix: whisk together the water and oil, then add the yeast. Add the flour and salt and mix into a shaggy dough.
2. Knead: use your hands or a standing mixer to knead, then place the dough into a bowl and use wet hands to tuck it into a round ball (see video).
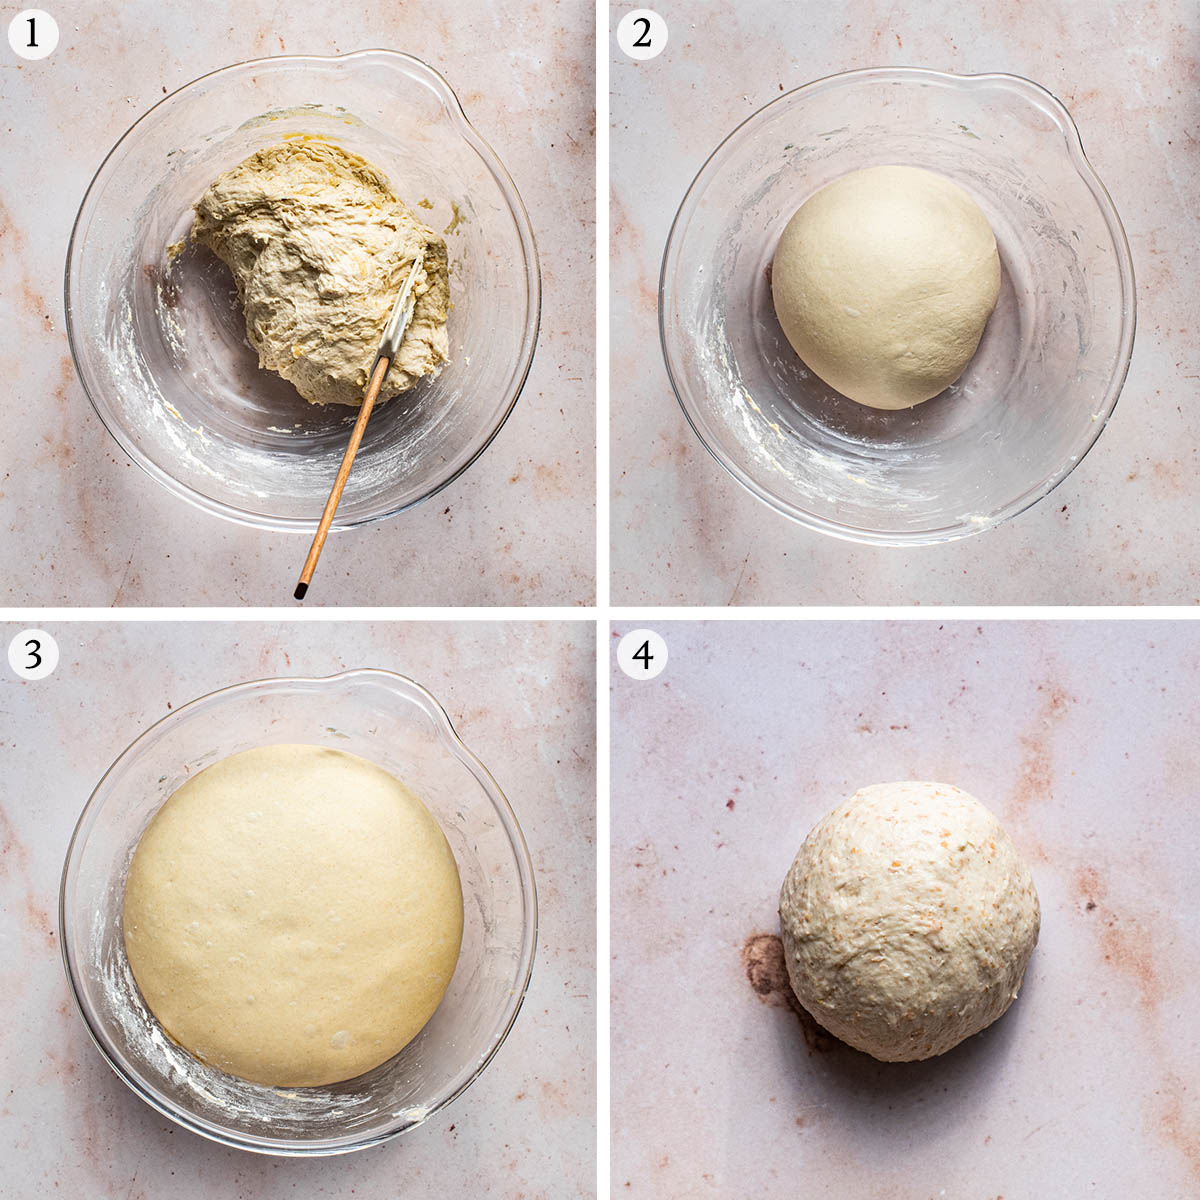
3. Rise: set aside to rise until doubled in size, about an hour.
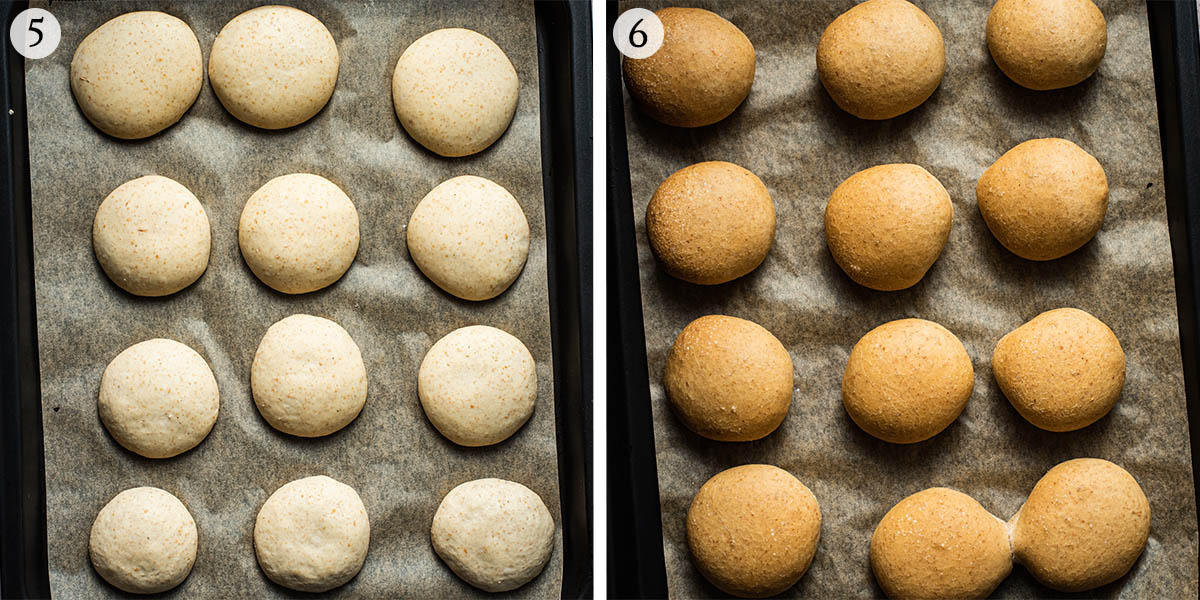
4. Shape: divide the dough into 12 equal pieces, then shape into balls.
5. Rise again: place the buns onto a lined baking sheet and rise again until puffy, about half a hour.
6. Bake: until golden brown, about 20 minutes.
Recipe Notes
The seed coating isn’t necessary, but it’s delicious. You can coat with seeds or leave them off – the buns are good either way. For this particular recipe I do prefer them without the seeds as they’re more of a breakfast bun, but it’s up to you.
The base recipe here is vegan/egg-free, but the buns are brushed with egg if coating with seeds. It’s what makes the seeds stick. You can use water or even a bit of non-dairy milk but the result will be slightly different (more soft than crisp).
Cool fully to prevent the bun interior from rolling or pilling when slicing. If you don’t mind this, then certainly serve warm, as they do taste best fresh.
For kneading, the method here is slightly different as it’s a higher hydration dough. Think more of a stretching and slapping movement rather than a rolled kneading motion. Once the dough stretches a lot without tearing, it’s ready to prove – it won’t be soft and smooth when kneading. If using a stand mixer just let it go for about 5 minutes and it’ll be ready.
I did try scoring these but found that the combination of a wet dough and regular oven (not a steam oven) meant that the scoring only worked perfectly about 50% of the time. You can do oval buns with a centre score if you’d like that traditional shape.
How to Store
Storage: keep cooled buns in a sealed container at room temperature for a couple of days. This is yeast-based rather than sourdough and the buns will go stale fairly quickly, but can be toasted to wake them back up a bit.
Freezing: place the buns in an airtight container and freeze for up to six months. Thaw at room temperature and serve as usual. They will dry out slightly in the freezer.
Expert Tips
- Don’t over knead: spelt flour has a lower gluten content and doesn’t take well to over-mixing. Knead until stretchy, but not as long as you would for white or bread flour.
- Check your yeast: if you’re uncertain of the age of your yeast, test a little bit in some warm water first. It should foam up after a few minutes.
- Refrigerate yeast: fresh or dry, all yeast should be refrigerated for the longest shelf life. Don’t keep it in the cupboard and certainly not over the stove.
- Add spice: if you want to add Brotgewürz, go for it, but I’m not really a fan in this recipe – these are light, crisp buns, not dark bread.
- Use damp hands: I keep a spray bottle on hand and spritz my hands before handling each piece of dough to form the buns. The dough is sticky and you’ll need to wet your hands lightly each time, and this is an easy way to do it.
More Spelt Bread Recipes
Honey Oat Bread
Spelt Pretzels
Swedish Cardamom Buns
Spelt Naan
If you make these Spelt Flour Buns or any other ancient grain bread recipes on Occasionally Eggs, please take a moment to rate the recipe and leave a comment below. It’s such a help to others who want to try the recipe. For more OE, follow along on Instagram, Facebook, and Pinterest, purchase the Occasionally Eggs cookbook, or subscribe for new posts via email.

Spelt Flour Buns
Description
Ingredients
- 300 ml (1 ¼ cups) water
- 4 tablespoons olive oil
- 2 ¼ teaspoons instant or quick yeast or 1/2 cube fresh yeast
- 500 grams (3 ⅓ cups) spelt flour*
- 1 teaspoons sea salt
Seed Coating (Optional)
- 1 egg lightly beaten
- Raw seeds sunflower, pumpkin, etc.
Instructions
- Add the water and olive oil to a large mixing bowl and whisk to combine. Add the yeast and stir to dissolve. If using dry yeast, set aside for 15 minutes in order to allow the yeast to bloom.300 ml (1 ¼ cups) water, 2 1/4 teaspoons instant or quick yeast, 4 tablespoons olive oil
- Add the flour and salt, then stir to mix into a shaggy dough. It will be soft.500 grams (3 ⅓ cups) spelt flour*, 1 teaspoons sea salt
- Turn the dough out onto a lightly floured surface. Knead, using a dough scraper as needed, until a soft, stretchy dough forms. It will be sticky. You should knead for 5-6 minutes by hand, or less time if using a stand mixer.
- Transfer the dough back into the mixing bowl. Dampen your hands and use a scooping and rotating movement with your hand to form the dough into a smooth ball (see video).
- Cover the dough with a damp tea towel and set aside to rise until doubled in size, about an hour or an hour and a half, depending on the room temperature.
- Gently punch the dough down to deflate. Form 12 equal buns, pinching the pieces of dough to form balls and then rotating on a clean work surface to create some surface tension. Each bun should be about 72 grams in weight if you want to have exactly equal sizes.
- Place the buns onto a lined baking sheet and cover again. Set aside to rise until puffy but not doubled in size, about half an hour. Preheat the oven to 200°C (400°F) while the buns are rising.
- Score the tops of the buns if desired and bake for about 20 minutes, or until very golden and the outside feels hard to the touch. Cool on a wire rack before slicing.
Seed Coating
- For the optional seed coating, place seeds into a shallow dish. Brush the buns with the egg wash after shaping (don't let them rise first), then dip in the seeds. Place the coated buns back onto the lined baking sheet, then rise and bake as usual.1 egg, Raw seeds
Video
Notes
Nutrition
Nutrition is provided as a courtesy and is an estimate. If this information is important to you, please have it verified independently.


These buns are o amazing and tasty! Doesn’t take long to make. I made the recipe as is.
I made these tonight and we just had them with chickpea salad. Mmm delicious!
I ran out of spelt flour at 3cups and I used 1/3 cup of teff. I found them to be a little flat almost like cookies. They still cut in half fine and would still be suitable as a bun. Any suggestion to help them rise better or take more of that classical round shape when baked?
Hi Jessica, barring other potential problems like old yeast, too hot of liquid, under-proving, and so on, I think the issue here is probably having added teff. It’s gluten-free (spelt isn’t) and would make for heavier, flat buns. I would make sure to use all spelt in future or sub another flour that contains gluten like standard wheat or another ancient grain like einkorn instead.
What adjustments are needed to the recipe if the oil is omitted?
Hi there, I haven’t tested this recipe without oil. You’d have to add more liquid to make up for it but note that the buns will not turn out as pictured if you leave out any ingredient.
If I wanted to add honey to this recipe, when would I add it?
Hi there, you can add it to the water and whisk it in before adding the yeast. I wouldn’t add more than a tablespoon or so without otherwise adjusting the recipe.
These are delicious spelt rolls, so tasty and lovely toasted the next day. I love all of Alexandra’s wholesome recipes!
Honestly awesome! I’ve made them with light spelt flour and whole spelt and both were great but the light definitely was more hamburger-bun-like. Love that they don’t require any sugar. Definitely the “fluffiest” spelt bread I’ve ever managed!
These are five star Michelin restaurant quality! Haven’t had anything like since being in Germany. Thank you so much for the recipe
Thank you! I haven’t had a lot of luck with making spelt bread in past but these were delicious!
These are fantastic! Great texture and taste. Perfect size for sliders. Have you made larger rolls, 6 instead of 12? If so, result? Thanks!
Hi Laura, yes, you can make six larger buns, but I’ve never timed it. Check for colour and tap the base and you should be fine 🙂
These are better than any store, or bakery roll I have ever made or eaten. Thank you thank you! We’ve been able to enjoy healthier grains and are so grateful.
These buns are SO good, and very professional! I added one teaspoon of sugar into the recipe too.
I wonder, could you use sourdough starter for these instead of dried yeast? And would it work to substitute other flour which doesn’t contain ‘processed/modern’ wheat, such as brown rice, or buckwheat?
Hi Chloe, I’m so pleased to hear that you like the buns. You could use starter (I would do 50g active starter) but note that the dough would be a bit more difficult to work with. You could also try making my spelt sourdough bread into buns. This recipe has not been tested with any flour other than spelt, but I am quite sure that it wouldn’t work with a 1:1 substitution of a gluten-free flour like brown rice or buckwheat. I would recommend seeking out a GF specific recipe for that.
I love these rolls. I covered them with seeds and sauted onions to make a nice onion roll. Good as hamburger buns or just with a bit of cheese. Thanks for this lovely recipe.
How many buns will this divide into? Or how much should each approximately weigh?
As it says in the recipe, it makes 12 buns 72 gms. each. When I first divided the dough I though they would be too small but once they rose it seemed just right.
Hello ! I’d like to cook this recipe as a loaf instead of buns. What cooking time would you recommend ? Thank you
I’ve never tried this, but I’d say 50-55 minutes at the same temperature. It should sound hollow when tapped and be golden in colour. Hope that helps!